Learn the method for making the most delicious Neapolitan pizza using all-purpose flour. After attending culinary school in Italy, I can share all my knowledge about making this dough to provide you with the best recipe for all-purpose flour pizza crust.

Want To Save This Article?
Enter your email below and we'll send it straight to your inbox. Plus, you'll receive new weekly recipe inspiration.
When I was in culinary school in Italy, we were always making different doughs for bread, desserts, and my favorite: pizza. Nearly every Friday night, we would have a pizza party, and while I loved eating the pizza, I also loved preparing the dough.
I got a ton of practice making pizza Napoletana, which has a thick and airy dough. This style of pizza originates from the city of Naples in the region of Campania and we made a huge amount of this dough before every pizza party.
I know that it can be hard to find different types of flour and the price of that flour is usually not budget-friendly. With this in mind, I was determined to find a way to make delicious Neapolitan pizza crust using all-purpose flour. After plenty of trial and error, I finally created the most amazing pizza crust recipe using easily accessible four.
If you love this all-purpose flour Napoletana pizza dough recipe, check out my authentic Italian Neapolitan pizza dough too.
Jump to:
What You'll Learn In This Recipe
- The key techniques for perfect Neapolitan pizza crust.
- Helpful tips and tricks for stretching your pizza into a perfect circle.
- Cooking instructions for a home oven and a pizza oven.
Want to make the best Italian pizza? Grab a list of 85+ Italian pizza topping ideas.
Ingredients You Need
Neapolitan pizza is amazing because of how simple it is to make. While authentic pizza Napoletana has very specific regulations, I’ve simplified the process to make it easy for the average home chef.
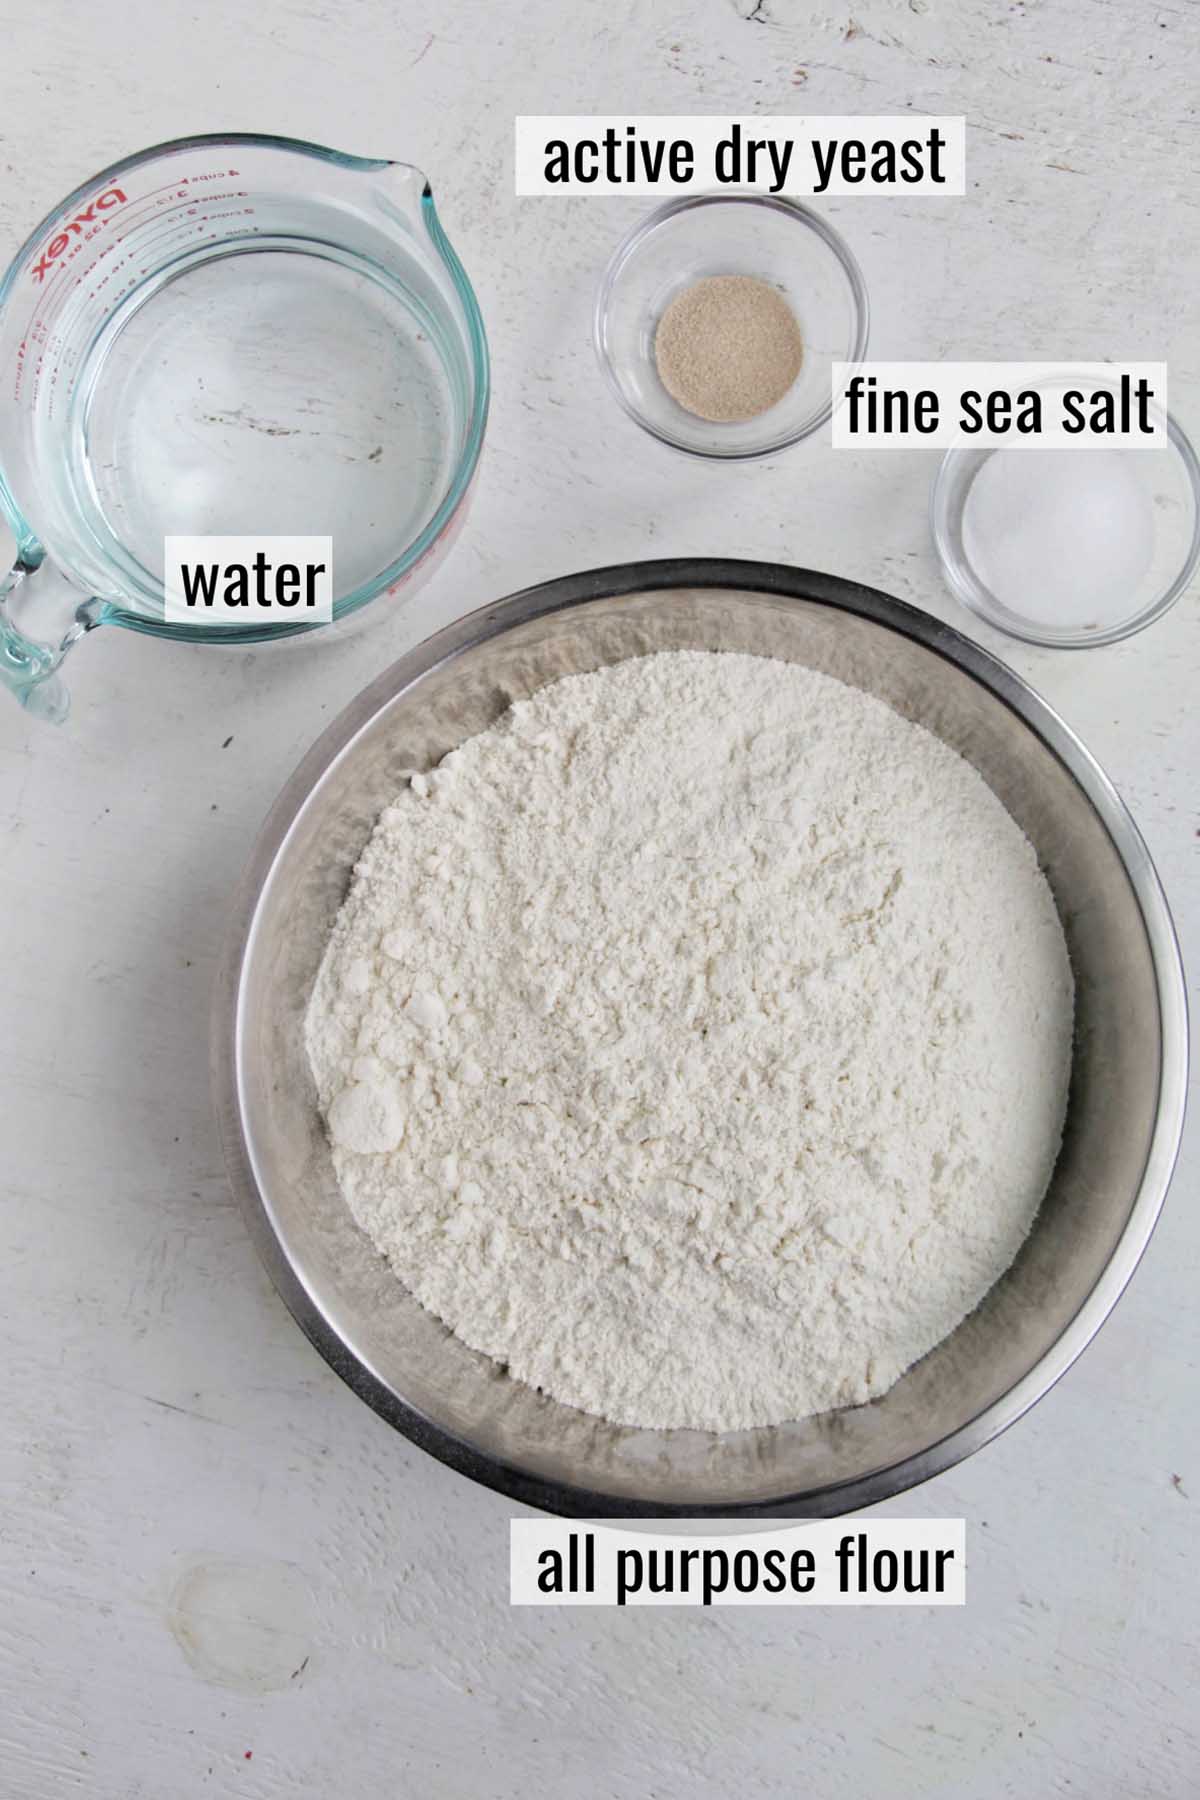
All-purpose flour: Traditionally, Neapolitan pizza dough uses flour with a higher protein content to give the dough a chewy texture. Don’t worry, using all-purpose flour will not damage the quality of your pizza, it will just have a little less bite to it. Be sure to accurately measure your flour to ensure perfect pizza dough.
Active dry yeast: Yeast is an essential ingredient for creating the airy and light texture that makes Neapolitan pizza iconic.
Do not use instant yeast for this pizza dough. The key to quality pizza dough is slow fermentation (rest) in a cold environment. Because of this, you need to use either active dry yeast or fresh yeast (1 gram of dry = 3 grams of fresh).
Water: For flour to form gluten, water has to be added. You don’t need any specific kind of filtered water for this recipe, tap water will work just fine.
Fine sea salt: Salt provides some flavor to the dough as well as helps the dough hold its shape. I prefer to use fine sea salt (not coarse kosher salt) because it distributes better throughout the dough.
How To Make This Recipe
Follow the dough-making process carefully to ensure you're enjoying delicious, flavorful, and perfectly textured pizza made with all-purpose flour.
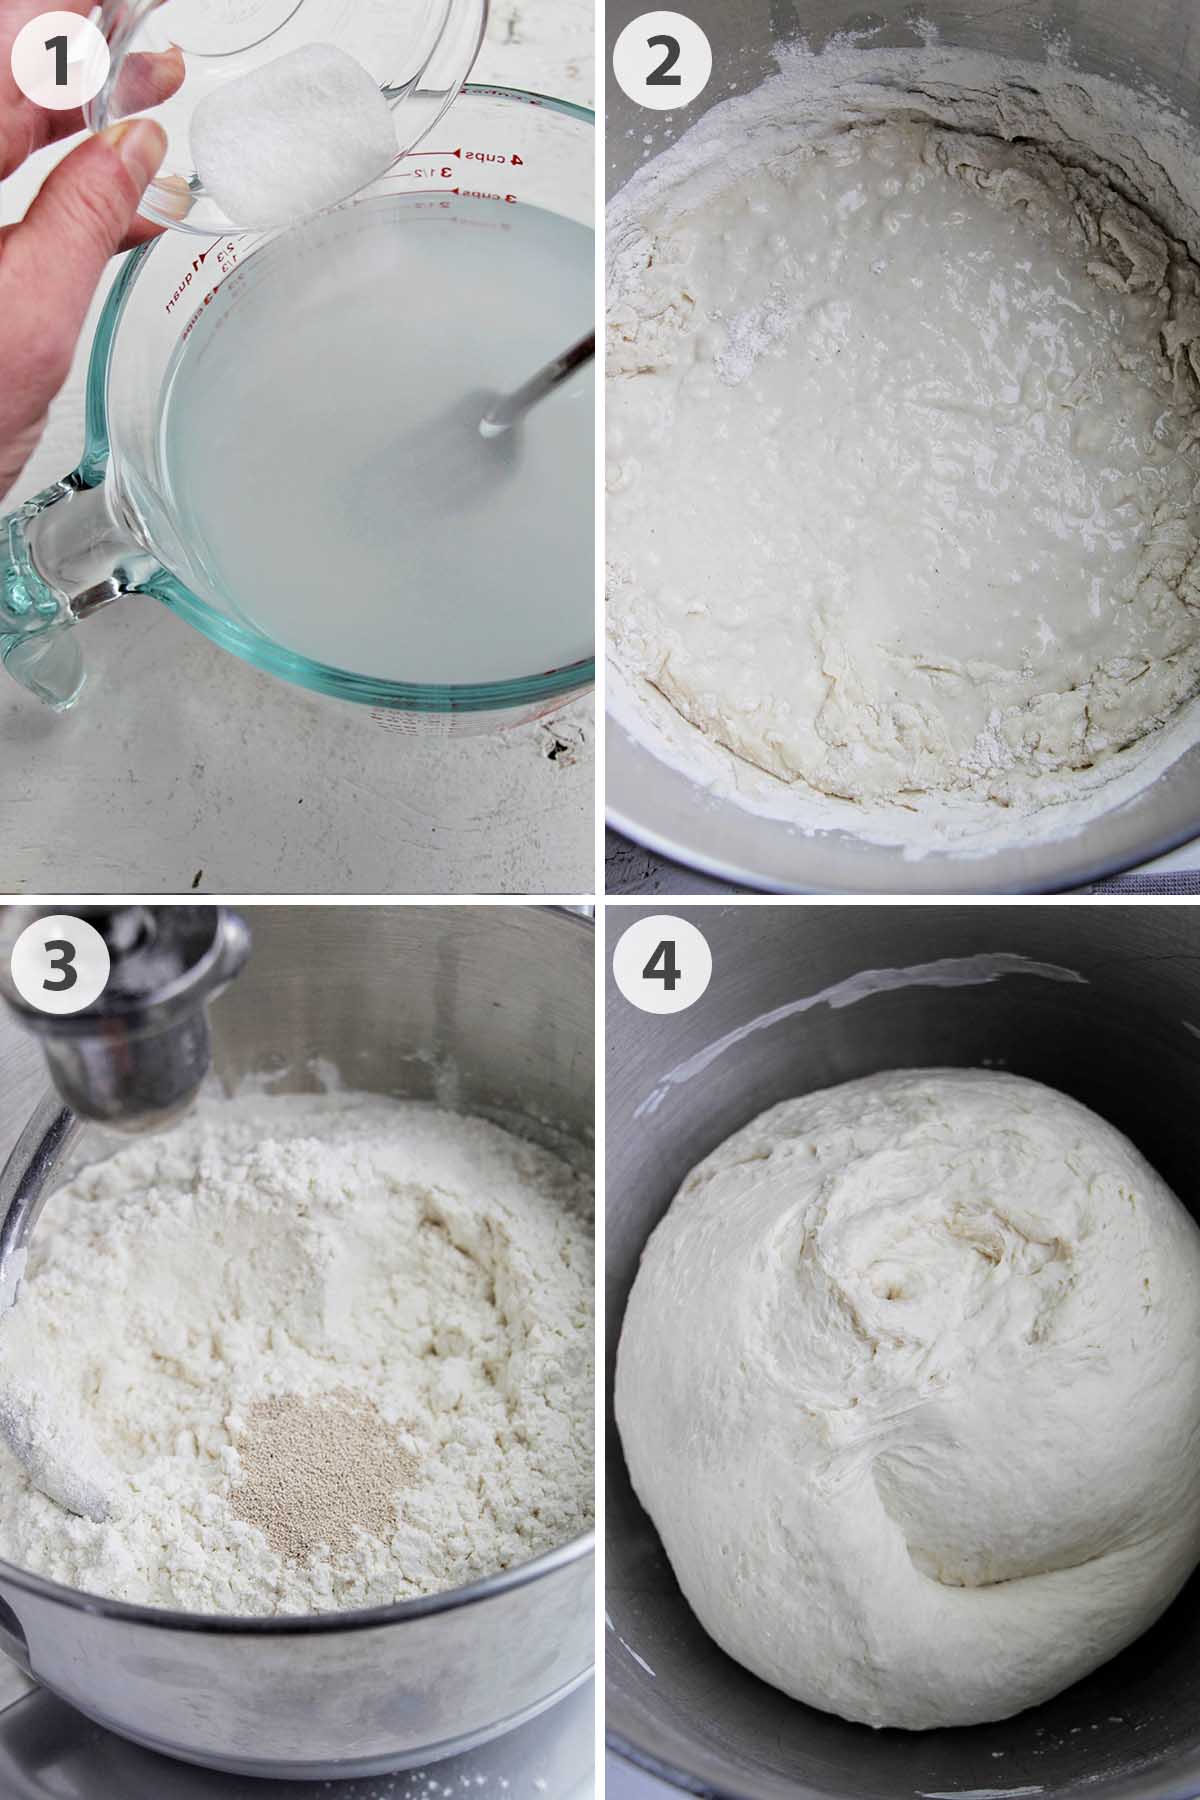
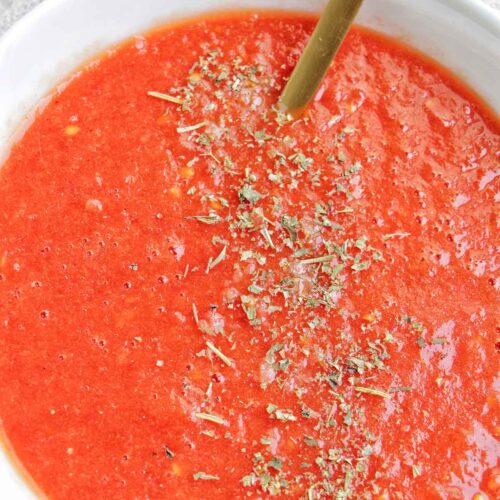
1. Begin by combining the salt and water in a bowl. Whisk them together.
2. Make sure your stand mixer is fitted with a dough hook attachment. Add the water and salt mixture and half of the flour. Turn your mixer onto a medium speed, and let this combine until a loose dough forms.
If you don’t have a stand mixer, check out the recipe card below for hand-kneading instructions.
3. With a loose dough formed, add the remaining flour and the yeast. Continue to mix on medium speed for 7 minutes.
4. Your final dough should look like this. It is essential to allow the dough to mix for the full 7 minutes to ensure the proper amount of gluten forms. This is what gives the dough the ideal texture and flavor.
5. The best way to check if the dough is fully formed and kneaded is by performing the windowpane test. For this test, you are going to want to pinch off a little piece of the dough and stretch it out. As the dough stretches, it should stay together until it’s thin enough to see light through it. If the dough breaks right away, continue kneading. When the dough doesn’t tear, you’re ready to move on to the next step.
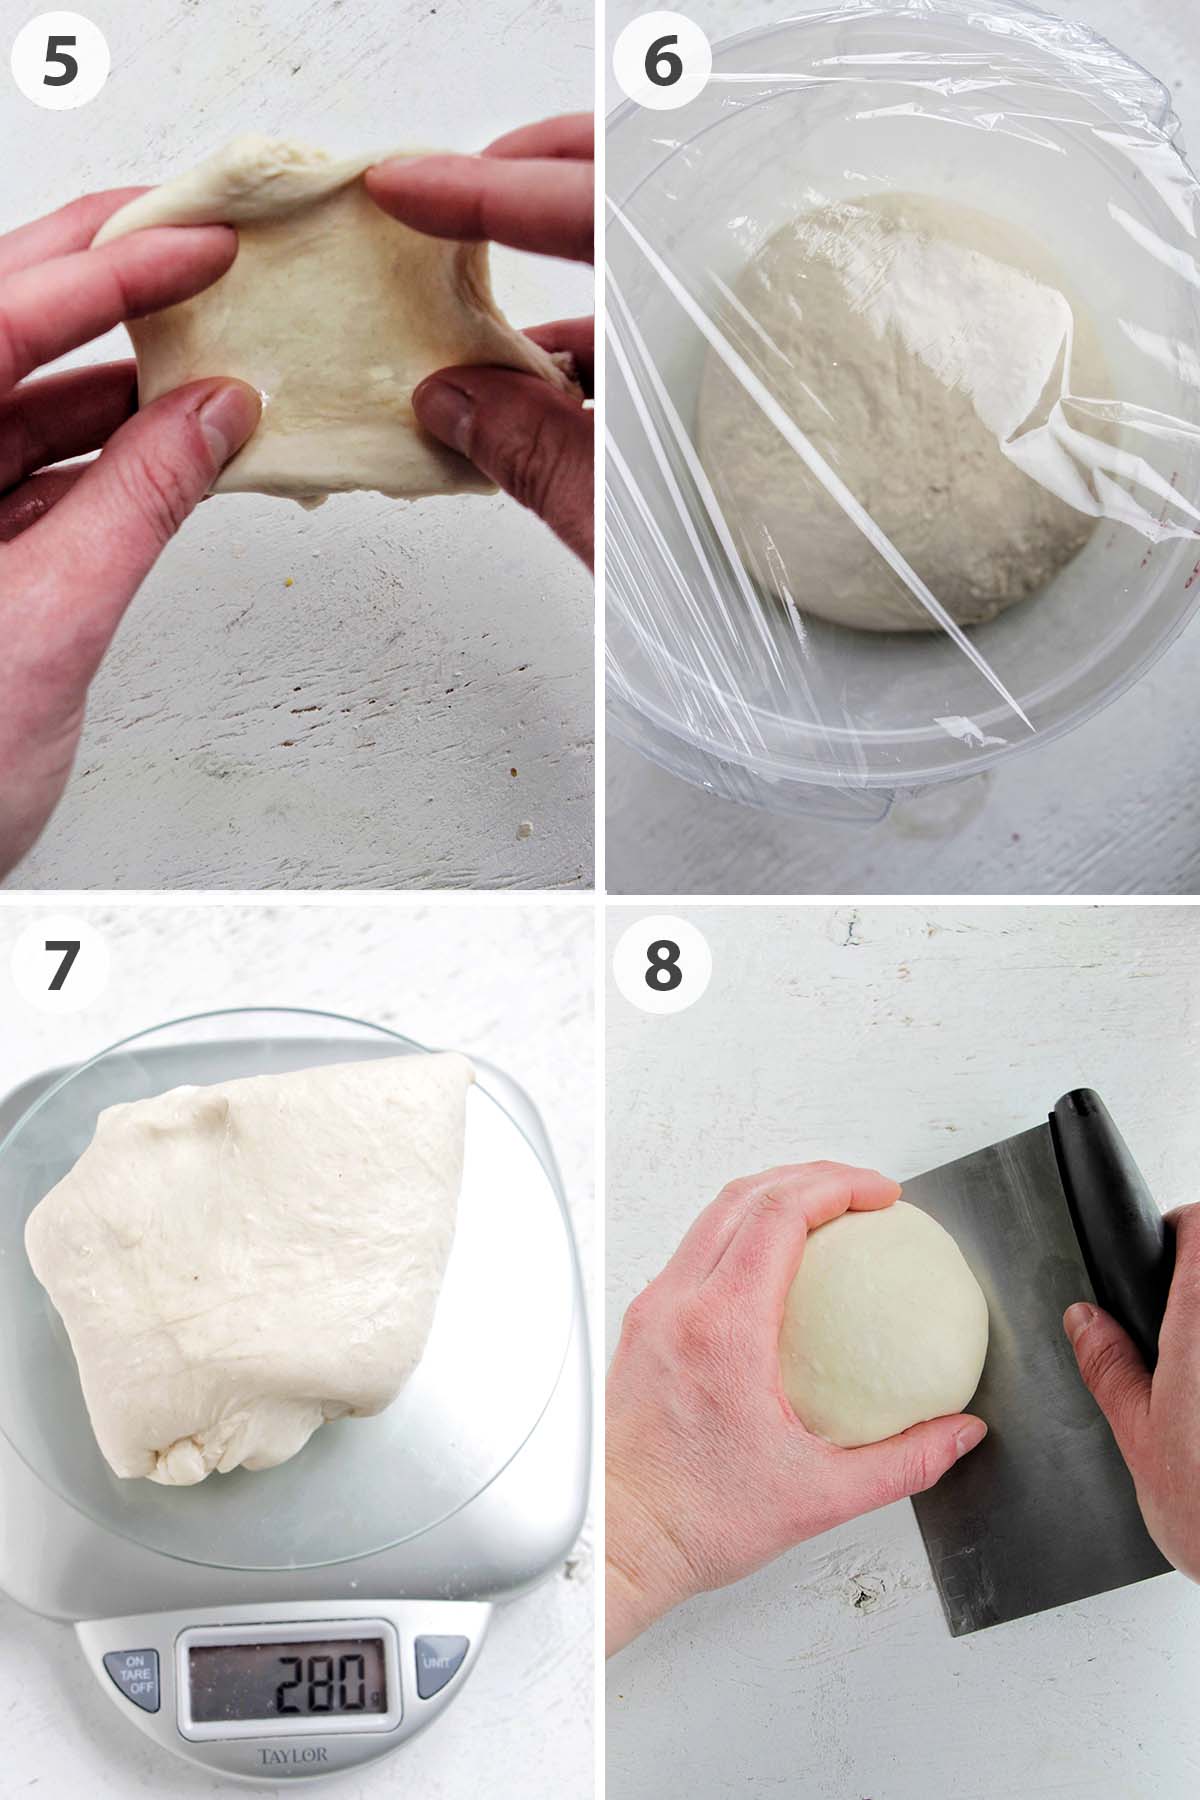
6. Remove the dough from the mixing bowl, and roll the dough into a tight ball. Place the dough ball in a lightly oiled mixing bowl. Cover the bowl with plastic wrap, and leave it out to rest for 1 hour.
7. After patiently waiting the full hour, it’s time to measure out the individual dough balls. Using a digital kitchen scale, weigh five 9.9 ounce (280 gram) portions. Use a bench scraper to help you handle and portion the dough.
8. With 5 equal pieces of dough, it’s time to roll the dough balls. Begin by rolling the dough into a rough ball.
Then, cup your hand and push the dough against the counter as you slide the dough ball towards yourself. Repeat this cupping movement a few times, slightly rotating the dough ball as you go. You can use a bench scraper for this part.
It is super important to make sure your individual dough balls are as round and tightly rolled as possible. The rounder the dough ball, the easier it is to have a perfectly circular pizza.
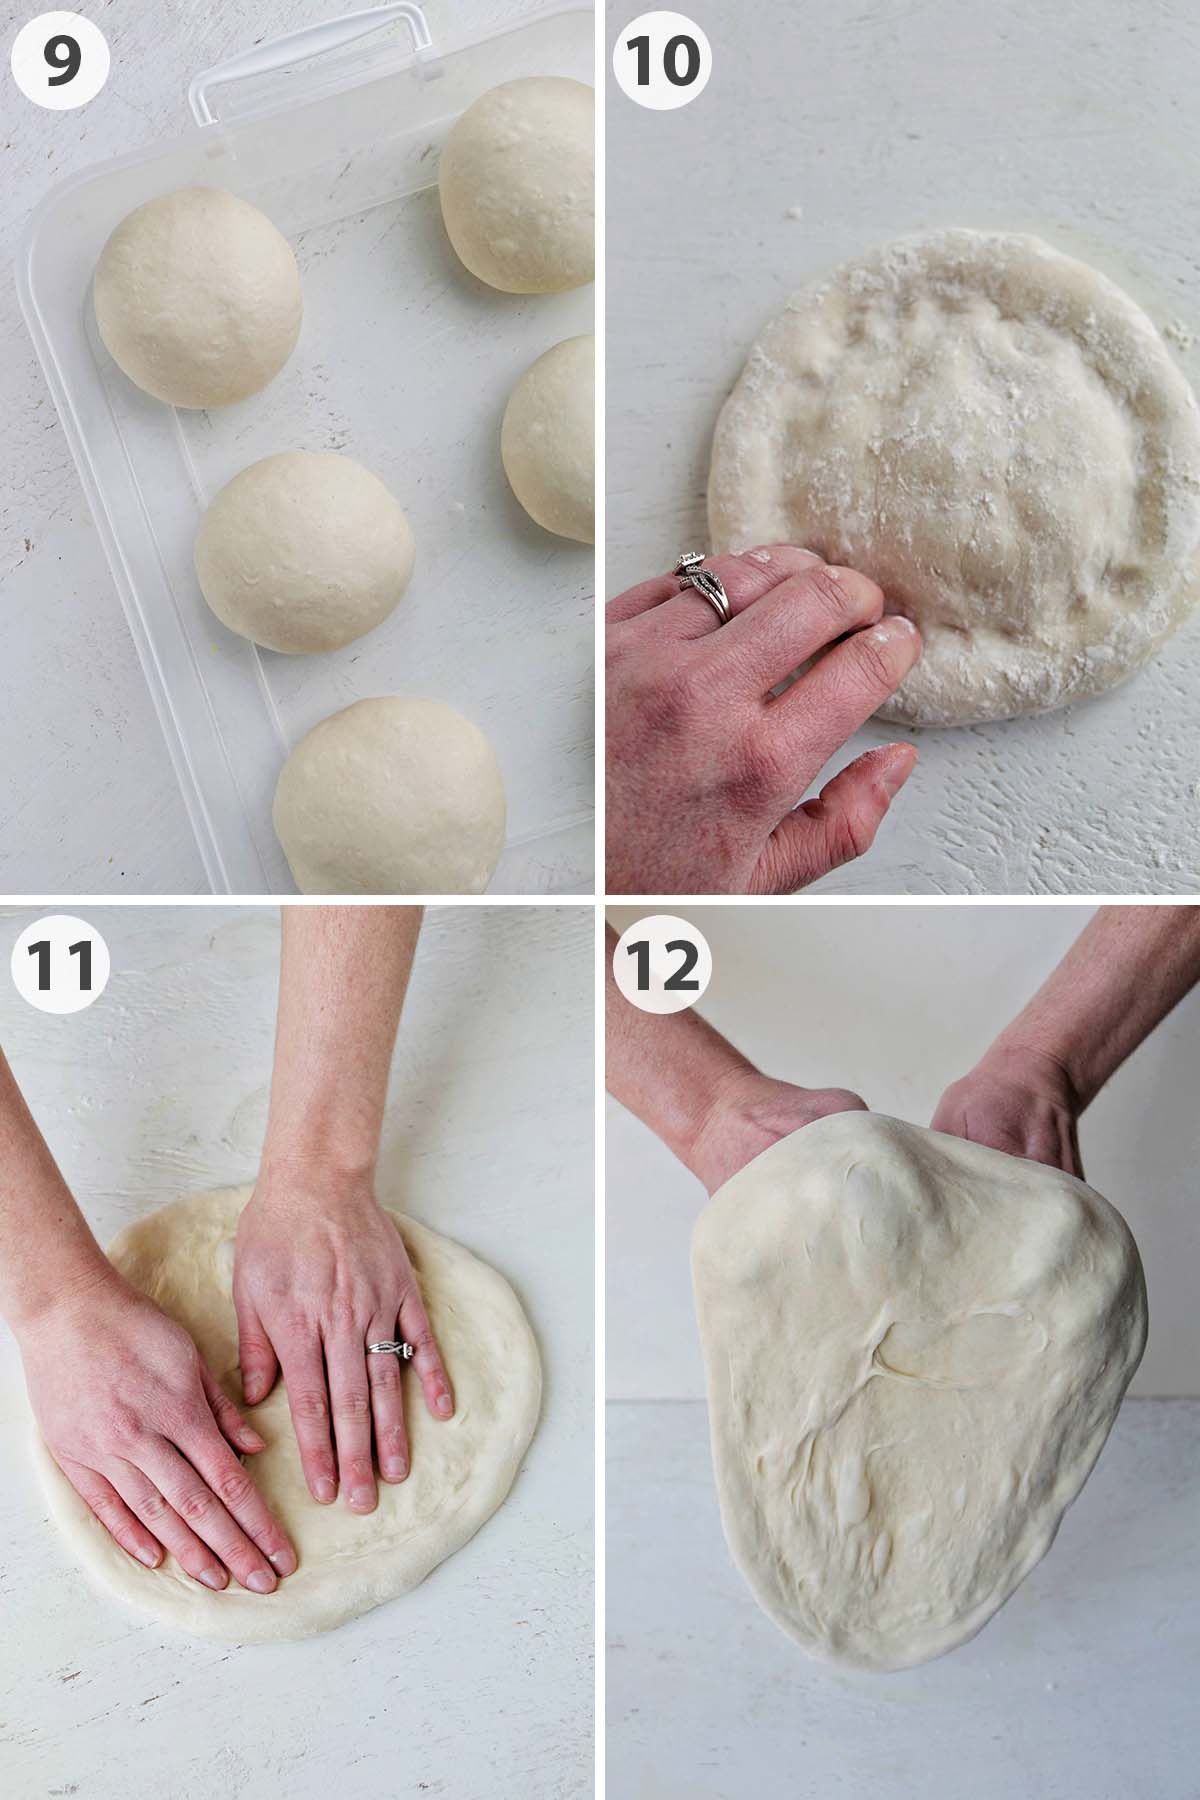
9. With all 5 of the dough balls formed, use a lightly greased storage container to place these roughly 3 inches (7 cm) apart from each other. Cover the container with plastic wrap. I love to use this dough-proofing box to store my pizza dough since it holds 6 balls perfectly.
Place the dough in the fridge to store for 48 hours to develop flavor. I know this sounds like a long time to wait, but if you cut corners here, your pizza dough will not turn out the way you want it. This 48-hour waiting period is what gives Italian Neapolitan pizza dough its unique texture and flavor.
10. When you are ready to cook, allow the dough to come to room temperature. This will allow you to work with the dough without it fighting against you. You can also preheat your oven to 450ºF (230ºC) or your pizza oven to 810ºF (432ºC) at this time.
On a clean and floured work surface, flatten one dough ball slightly with your hands. Then, use your fingers to gently indent where the crust is going to be.
11. Once you’ve formed a circular ring, use the outer palm of your hand to stretch the dough until it is 13 inches (33 cm) in diameter with an even thickness all around.
12. To help form the dough, hang it on your knuckles, and allow gravity to pull it downwards. As each part of the dough stretches, rotate to ensure an even roundness. Do not use your fingers for the dough shaping or they may rip a hole in the dough.
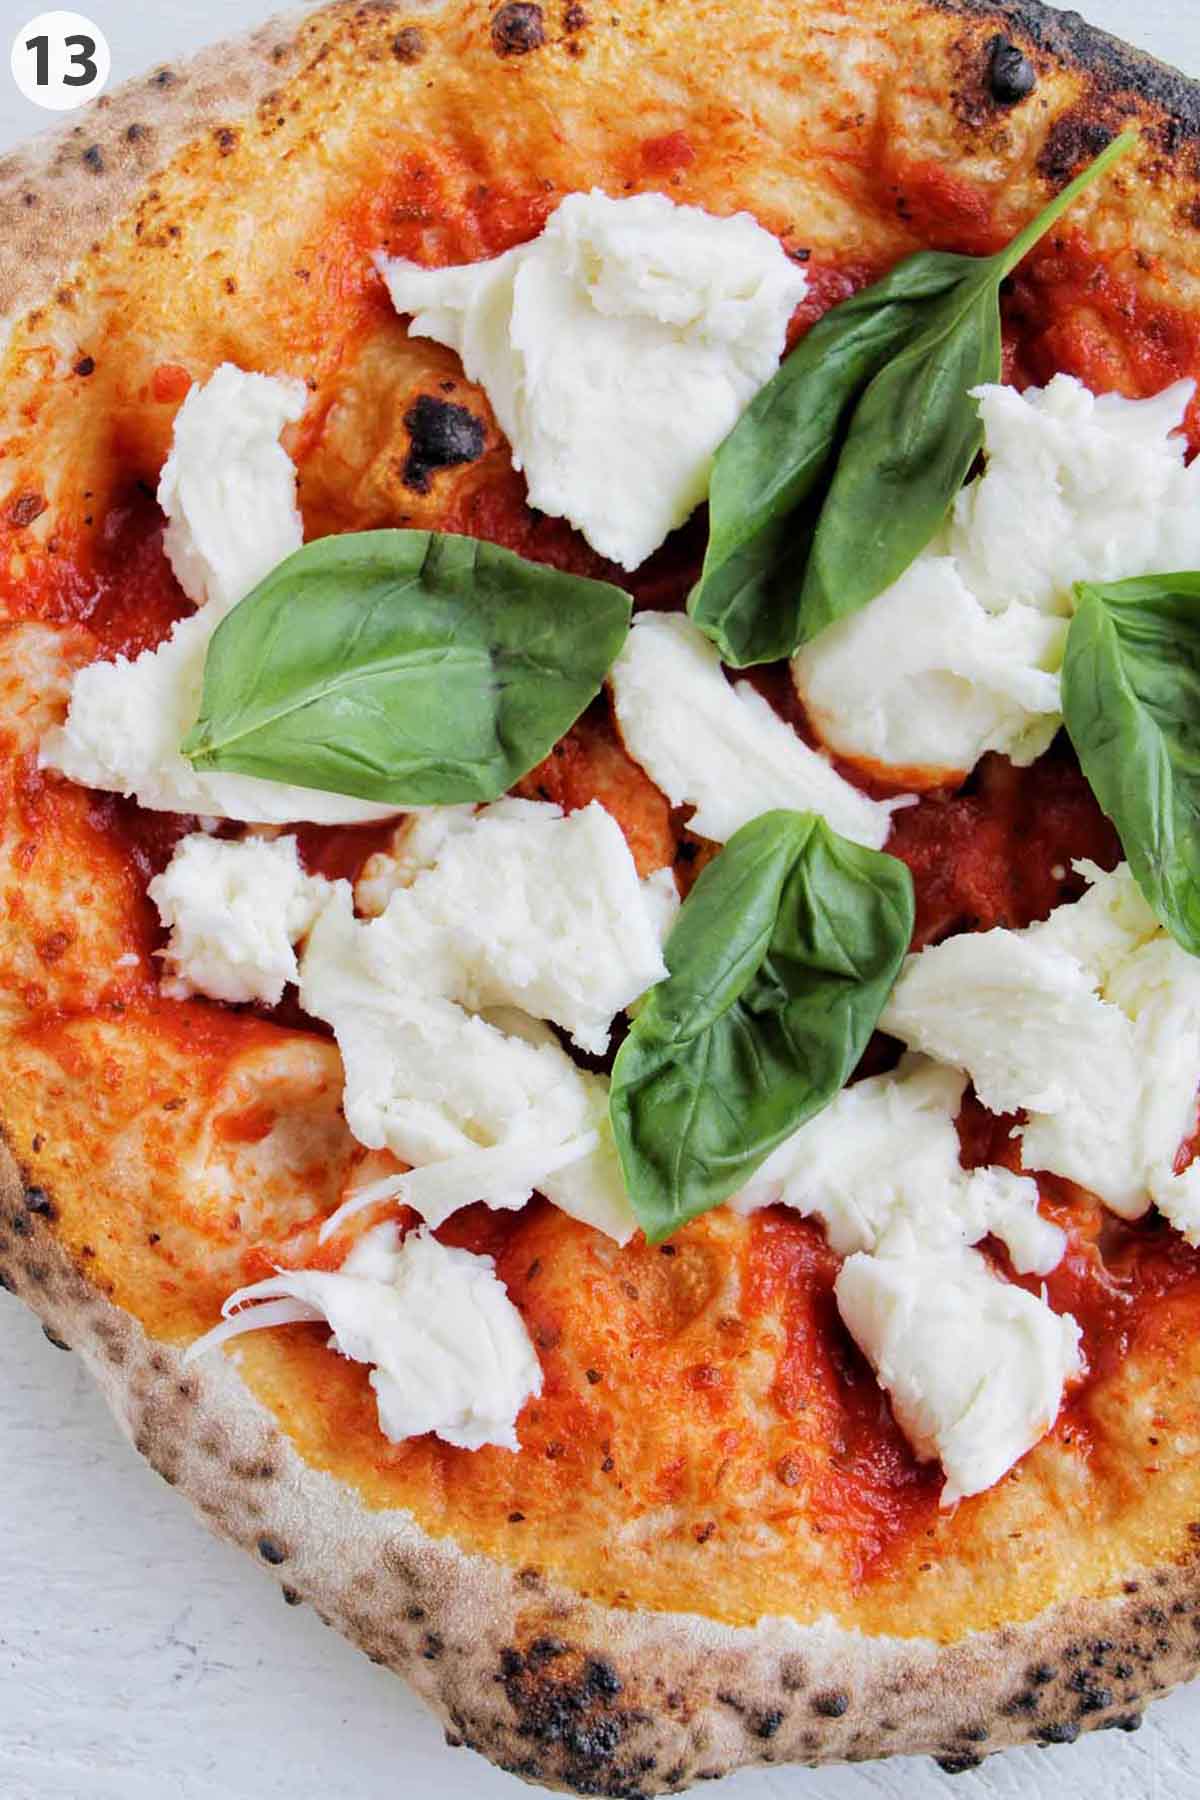
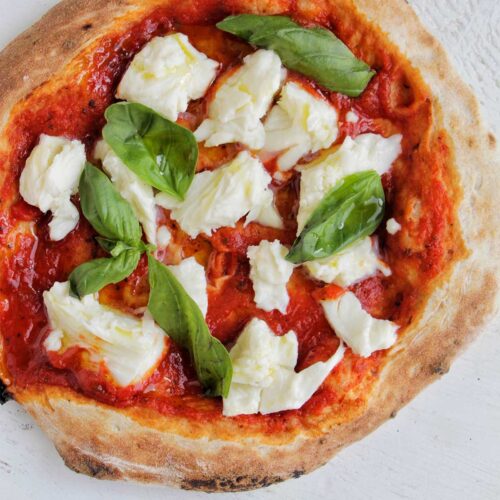
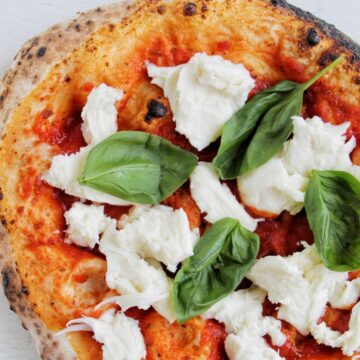
13. Before placing the dough back down on the work surface. Be sure there is a layer of flour to avoid any sticking. Now you can top your pizza with whatever toppings your heart desires.
Depending on if you’re using a regular oven or a pizza oven, the cooking time will differ. Either way, you want to bake until your crust is golden brown and the dough is fully cooked on the bottom.
If you're looking for an affordable, at-home pizza oven, I love my Ooni Koda oven.
Expert Tips
- Making pizza dough requires very few steps, but these steps are all very important for achieving the desired pizza. Be sure to follow each step carefully, and avoid cutting corners to guarantee a quality end product.
- Just like everything in life, practice makes perfect. Don’t beat yourself up if you have an oval-shaped pizza, or accidentally rip a hole in your dough. The more delicious homemade pizzas you make, the better you’ll get.
- Neapolitan pizza is traditionally topped with simple tomato sauce, fresh basil, and fresh mozzarella (buffalo mozzarella) or fior di latte. Wait until after the pizza is cooked to add the cheese and the basil.
Recipe FAQs
If you want flavorful and perfectly textured pizza dough, then yes. The cold fermentation in the refrigerator allows the flavors to develop the longer it rests. If you don’t have time to wait the full 48 hours, I strongly recommend at least letting the dough rest overnight (12 hours).
If you notice the dough is very tough, here are some things to check:
1. Did you fully knead the dough and perform the windowpane test? To test that the dough is ready, pinch off a little piece and stretch it out. The dough should stretch thin enough that you can see light through the dough without any tearing. If the dough breaks right away, continue kneading.
2. Check that your yeast is alive. You can add the yeast, along with a pinch of sugar to water heated to 100°F (38°C). If the yeast does not become foamy after 5 minutes, it's likely dead. You should replace the yeast and make the dough again.
3. Be sure not to overcook the dough in the oven or pizza oven.
Round pizzas come with practice. If you notice your pizza isn't perfectly circular, don't worry, it will still taste delicious. Keep working on your technique for stretching pizza. You have to allow gravity to help you stretch the dough.
If the hole is small enough, you can gently pinch the dough back together. If you rip a big hole, you may need to start over!
More Pizza Recipes


Love this recipe? Please leave a 5-star ⭐⭐⭐⭐⭐ rating in the recipe card below. Have questions as you're cooking? Leave a comment below, and I'll help!
All Purpose Flour Pizza Dough
Equipment
- bench scraper
- kitchen scale
- pizza stone or pizza oven
Ingredients
- 2 ¼ cups water (70°F or 21°C)
- 4 teaspoons fine sea salt
- 7 ¼ cups, plus more for stretching the dough all purpose flour
- ½ teaspoon active dry yeast
Instructions
- Whisk together water and salt until combined.
- To a stand mixer fitted with a dough hook add the water mixture along with half of the flour. Mix on medium speed until a loose dough forms. Add the remaining flour and yeast, then continue mixing on medium speed for 7 minutes. To test that the dough is ready, pinch off a little piece and stretch it out. The dough should stretch thin enough that you can see light through the dough without any tearing. If the dough breaks right away, continue kneading. If at any time your mixer becomes too hot, take a break, or begin hand kneading (see notes below).
- Roll the dough into a tight ball, then place it in a lightly oiled mixing bowl. Cover with plastic wrap, and allow to rest for 1 hour.
- Divide dough into five 9.9 ounces (280 grams) portions using a bench scraper. Roll each piece of dough into a tight ball. Place rolled dough balls into a lightly greased storage container roughly 3 inches (7 cm) apart from each other, and tightly secure with plastic wrap.
- Store the dough in the refrigerator for 48 hours to develop flavor.
- When you're ready to cook the pizza, remove the dough from the refrigerator, and allow it to come to room temperature. Arrange the oven rack to the center of the oven. Place a pizza stone on the rack, then heat oven to 450°F (230°C). Allow the oven and pizza stone to preheat for at least 30 minutes. Alternatively, heat pizza oven to 810°F (432°C).
- Lightly, flour a clean work surface. Pour some additional flour into a mixing bowl. Grab a dough ball with a bench scraper, place in the mixing bowl, and cover both sides in flour. Flatten one dough ball slightly with your hands, then use your fingers to make an indent for the crust. Once the dough is circular, use the outer palm of your hand to continue stretching the dough until it reaches a 13 inch (33 cm) circle with even thickness. To help stretch the dough, hang it on your knuckles, and allow gravity to pull it downwards.
- Top the dough with your desired sauce, toppings, and cheese, then bake on a pizza stone dusted with cornmeal for 10–14 minutes until the crust is golden brown. If you are using a pizza oven, bake for 60–90 seconds, rotating as needed, until the crust is golden brown and the bottom of the dough is fully cooked. Repeat with remaining dough balls.


Am
I’ll update my comment and review after I make the pizza! This dough was extremely hard to kneed. My kitchen aid completely gave up… not sure what went wrong here.
Jessica Mode
Hi Am! What model of mixer do you have? Some KitchenAid models don't do as well with bread/dough. I have the KitchenAid Professional HD and haven't had much issue with this. Hand kneading is always an option if you're able. I hope it turns out well 🙂
Tanveer
my kitchen aid almost broke. the pizza turned out okay but still 00 better. I have a kitchen aid professional.
Jessica Mode
Hi Tanveer! Oh no, I'm sorry to hear that! It usually works well with my KitchenAid Pro. You're always welcome to hand knead, if needed. What speed setting did you use to knead the dough?