Learn how to start a food or baking blog with this step-by-step guide. I'll walk you through food blog name ideas to your first 5,000 pageviews.
Want To Save This Article?
Enter your email below and we'll send it straight to your inbox. Plus, you'll receive new weekly recipe inspiration.
So, you're looking to start a food or baking blog? You've come to the right place! This is the perfect guide for you if you're looking for:
- The EXACT steps you need to take to get your food or dessert blog set up and running.
- A guide that is easy to understand (not full of technical jargon)
- How to gain your first 5,000 pageviews (and beyond) to grow your website audience and make money.
To make things easier, here is a table of contents to navigate to each section:
Jump to:
- Step One: Find a Niche
- Step Two: Name Your Food/Baking Blog
- Step Three: Set up Your Blogging Platform
- Step Four: Design Your Food or Baking Blog
- Step Five: Add Important Plug-Ins
- Step Six: Add Google Analytics
- Step Seven: Create Your First Blog Pages
- Step Eight: Publish Your First Blog Post
- Step Nine: Gain Traffic (First 5,000 Pageviews)
- Step Ten: What's Next?
- What Questions Do You Have?

Step One: Find a Niche
If you've done any sort of research on blogging, you have probably heard a million times to find a niche. Niching down will help you build an audience more quickly.
As you continue to work on your blog and grow your audience, your niche will likely change and evolve. That's okay, it happens to everyone! At this stage, have a loose niche idea around the type of content you're more interested in creating.
Your niche will also help you with step two, naming your blog. Here are just a few niches within the food blogging world that you could choose:
- Recipes for specific dietary preferences: Vegan, gluten-free, vegetarian, Whole30
- Recipes for a certain type of baking/dessert: Macarons, ice cream, bread baking
- Recipes for a specific way food is made: Air fryer, Crockpot, Instant Pot
- Recipes for certain health and wellness perspectives: Intuitive eating, paleo, keto
- Recipes for a specific population: Family meal plans, recipes for one, kid-friendly recipes
- Recipes that focus on a specific type of food: Healthy dinners, cocktails, entertaining food, desserts
- Other miscellaneous categories: Entertaining party menus, cooking basics, best kitchen tools/appliances
While your ultimate goal is to narrow down your niche, don't feel so pressured to choose one specific niche if you're not certain you're going to love that niche and want to stick with it forever.
Ultimately, it's important to narrow down your niche so Google and other search engines recognize you are an authority on the subject (you'll have time to do that as you continue to blog). But for now, if you need to stay general, go ahead and do so.
Step Two: Name Your Food/Baking Blog
One reason you first need to brainstorm your niche is to help you narrow down a name for your blog website.
Keep in mind, as you go through this step, that a website name is going to be harder to change down the line. Usually, your name is in your domain name, social handles, etc. and it will be a headache to change if you decide you no longer like it in a week.
So, if you are starting off with a very narrow niche (i.e. vegan desserts), be sure that if you include 'vegan desserts' in your blog name, that's the niche you're going to stick with!
It's time to brainstorm food or baking blog names. Here are some blog name ideas (and examples) to get you started:
- Incorporate your name like What's Gaby Cooking
- Use a food you love or that you'll feature often on your blog like Love and Lemons
- Incorporate your niche like Apartment Bartender
- Include cooking/food-related words (flavors, baked, apron, dining, yum) like Pinch of Yum
- Keep it simple - just use your first and last name like Rick Martinez
Before you solidify your name, be sure to do a quick Google search to see if anyone else is using that name. Also, check social handles to see if your preferred name is available.
Step Three: Set up Your Blogging Platform
If you're creating a blog with the hopes of making money one day, the only platform you should consider is WordPress. Why? WordPress gives you:
1. The freedom to design and adapt your blog as it grows
2. Makes search engine optimization (SEO) a priority. This will be crucial for growing your blog.
3. And, 99.9% of the blogs you already read are using WordPress, which means it's an industry standard.
To start setting up WordPress, you first need to select a host. A host is the company who will store all of the back-end data for your website. I prefer BlueHost for all beginner bloggers. My main reason for selecting Bluehost is that it's SUPER affordable (under $5.00/month).
That being said, if you are serious about making money with your blog, I would suggest starting out with a faster, more reliable host like BigScoots.
BigScoots has some features that you will not see from the Bluehost Basic plan including daily site backups (so you don't lose any blog posts or photos if something goes wrong), lightning-fast customer service (they usually respond in under 10 minutes), and a support team to answer any and all questions you're confused about.
I would also encourage you to start your hosting platform with BigScoots if you can afford it and are wanting to quickly earn money with your blog. BigScoots will handle setting up everything, so I don't even need to walk you through the steps. Don't worry, you can always switch to BigScoots down the line.
If you'd prefer to start slow, I'll show you how to set up a Bluehost account :
Set up a BlueHost Account
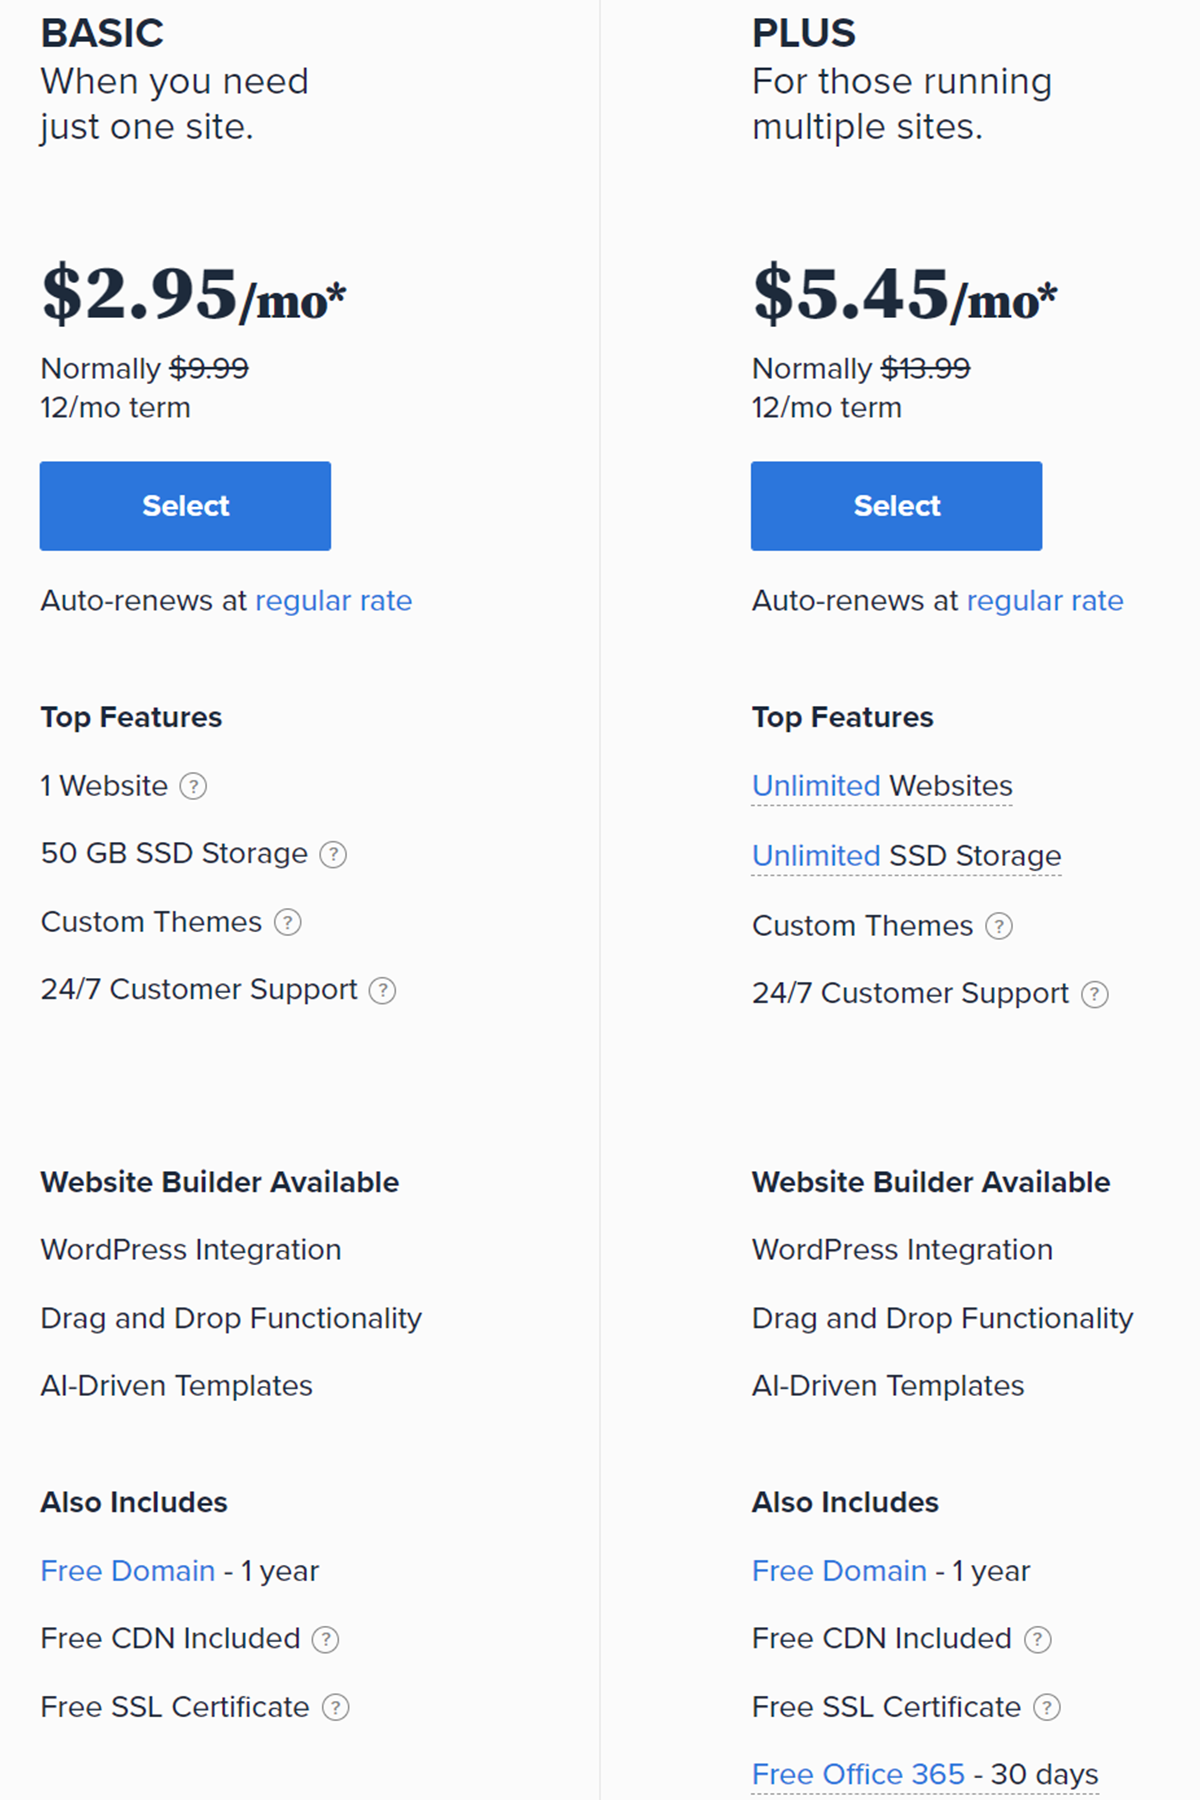
The first thing you need to do is select what plan is best for your site. If you're just starting out, the 'basic' package will work just fine.
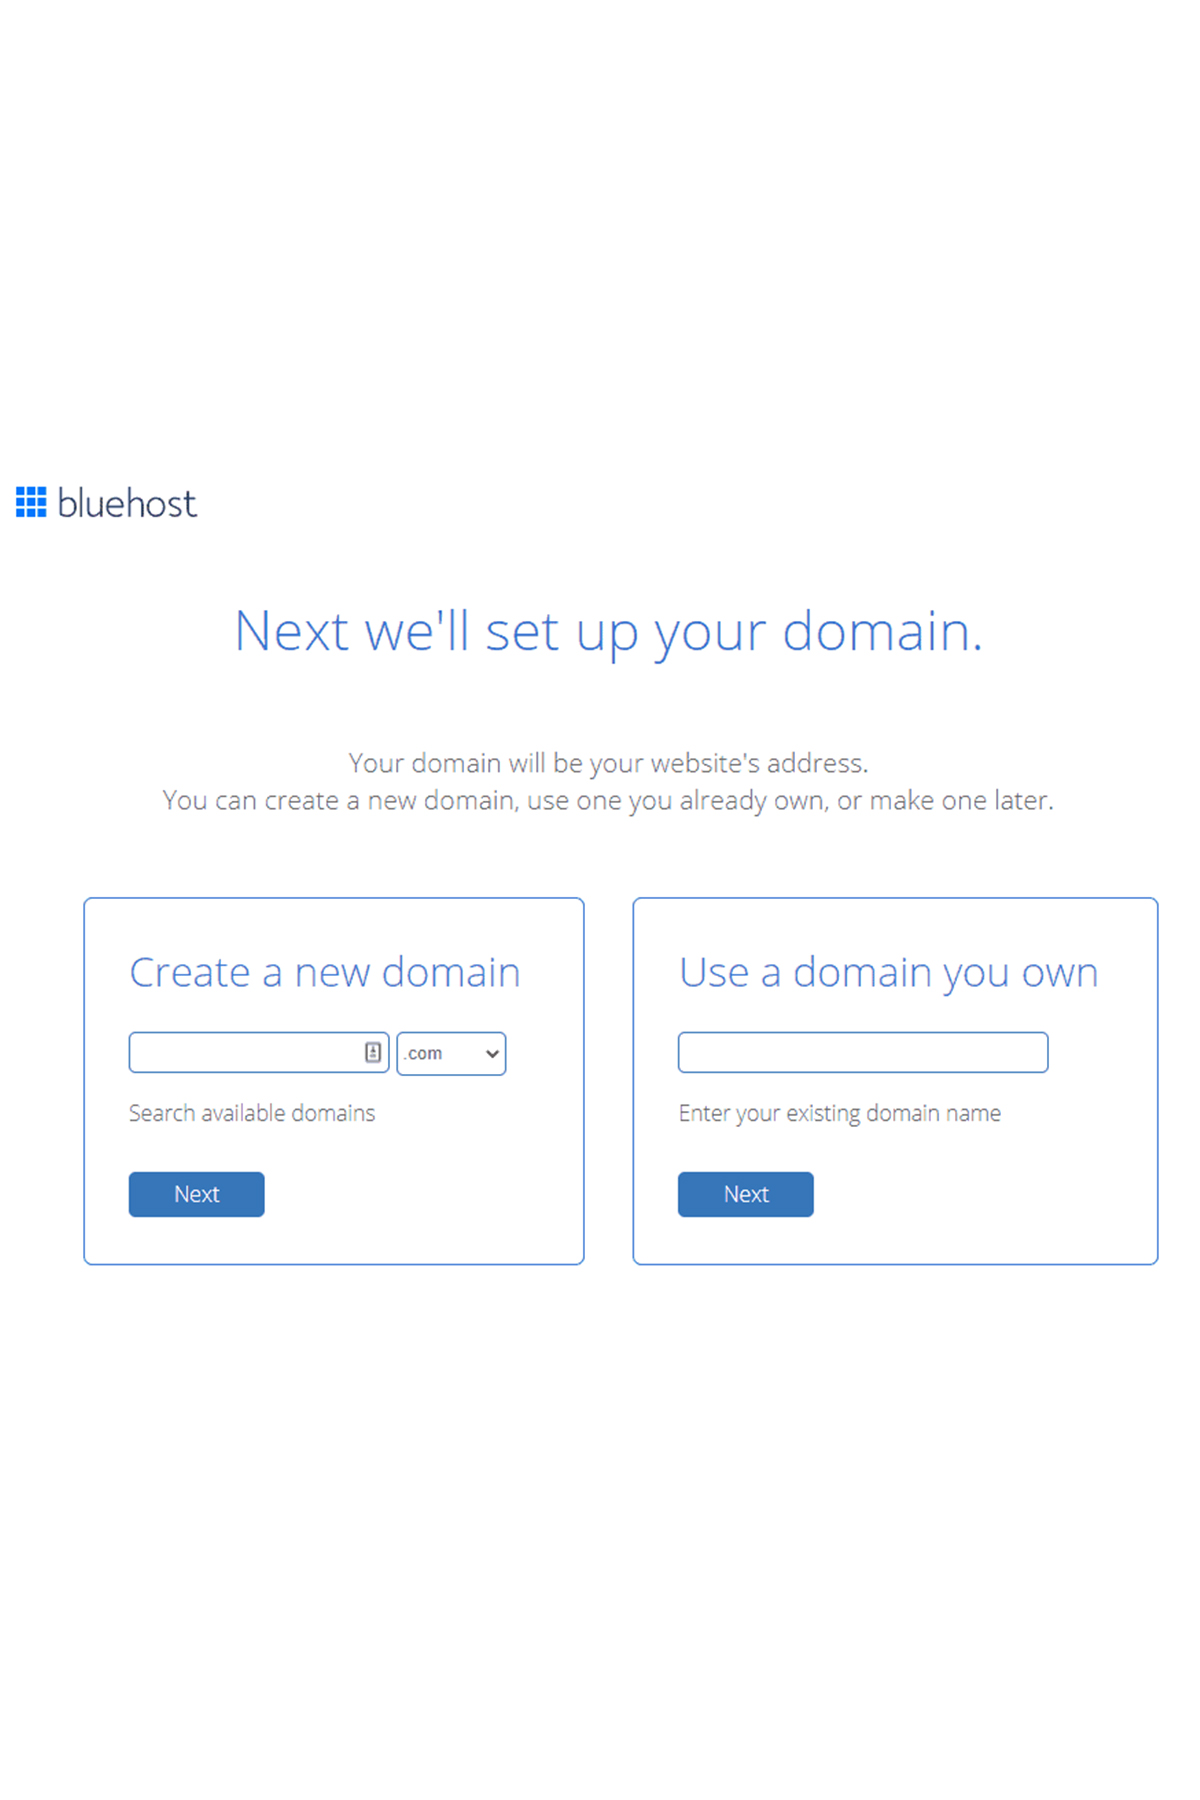
Set up Your Domain
Next, you'll need to choose your domain (the website URL people will search to navigate to your site). Be sure to keep your domain simple and not too long. You should incorporate the name of your blog into your domain.
Most websites end in .com, so be sure your domain is available with a .com.
Add Account Information
Now it's time to create your account information, finalize your BlueHost package, and pay for everything! If you don't want to create an account for 36 months, you can reduce it to a 24 or 12 month plan. The prices will increase slightly, but it's still super cheap!

As for the 'package extras' section, I recommend you select the 'domain privacy + protection' to help give an extra sense of security for your personal information.
Then, add in your payment information.

Create Your Password & Login
Next, you'll be prompted to create your password. Create your password, and then you can log in for the first time!
At this time, you'll also want to verify your email to fully activate your domain.
Step Four: Design Your Food or Baking Blog
Now it's time to design the website and make it look pretty! You have a couple of options when you choose your theme:
- Select a FREE theme: This is a great option for anyone who is looking to save money. The 'kale' theme is free and is a favorite among food bloggers. Here's a great tutorial on how to install the kale theme.
- Purchase a one-time fee theme: There are lots of options out there for this! Etsy is a great place to start. Be sure you purchase a theme that is compatible with food blogs and the recipe card plug-ins that you'll be using (like this Pinch of Salt theme). The benefit of purchasing a theme is that it will have a more upscale and personalized look to it.
- Purchase a constantly updated theme: What I mean by this is a theme that is actively managed and consistently updated. A popular example of this for food blogs is Feast Design Co. Their themes are constantly updated to ensure fast page speeds, support with search engine optimization (SEO), and stay up to date with the trends. While you will have to pay for your theme on a yearly basis, this is a great option for someone who always wants to stay up to date with the latest and greatest.
If you're serious about making money, definitely use Feast Design Co theme.

Step Five: Add Important Plug-Ins
Plug-ins help add additional features to your website. You can think of them as mini packages that add a specific important function to your blog. To instill a plug-in, navigate to your WordPress dashboard, click on 'plug-ins', then 'add new'. From there, you can search for the plug-in you're looking for.
Here are some popular plug-ins that you'll want to download and configure:
- Yoast: Yoast is going to help with search engine optimization (SEO), one of the main things you'll need to focus on for organic traffic. The free Yoast plug-in will do everything you need to start out, so no need to upgrade to premium right now. Here's a beginner's guide to Yoast SEO so you can learn how to use it.
- WP Recipe Maker: You'll need a recipe card plug-in so your recipes are nicely formatted and set up for SEO. This one is free and provides all the basics you'll need to get started!
- Akismet Anti-Spam: This helps protect your site from publishing malicious or spam content. It also automatically blocks all comments that look like spam.
- Broken Link Checker: Websites are penalized by Google when they have broken lines (links that don't go anywhere or go to a broken page). This plug-in helps detect when links are bad so you can check them and remove as necessary.
- Hubbub Lite: A great plug-in to encourage your audience to share your content. It gives people easy access to share to Pinterest, social sites, and email.
- Visual Link Preview: You know when you copy & paste a link and a little preview pops up (usually with a cover photo and title of the article)? If your theme doesn't automatically do this, you can install this plug-in.
- Subscribe to Comments Reloaded: WordPress doesn't automatically notify people who leave a comment on your blog once you've responded to them. This plug-in allows commenters to recieve emails when replies occur.
- WP 2FA - Two-factor authentication for WordPress: Keep your site secure by requiring two-factor authentication for any admins on the backend.
Step Six: Add Google Analytics
In order to start monetizing your blog through ads or from sponsored posts, companies will want to know how much traffic you're getting to your blog. The way you can track this data is through Google Analytics. Rather than me walking you through it step by step, here's an in-depth article with three different options to get Google Analytics installed on your blog.
Step Seven: Create Your First Blog Pages
In order to get your blog up and running, there are a few key items you should have.
First, create a short 'About Me' page. This is helpful so returning readers can get to know a little bit more about you. You can include your name, some personal photos, a short story/bio, and maybe even your mission.
However, there are still many people who blog anonymously, so if you'd prefer to start out anonymous, just skip this 'about page' step!
It's super important that you have some sort of contact information on your site. You can accomplish this in a few ways:
- Make sure your email is accessible to readers so they can email you with questions.
- Link your social media channels. People can follow and then DM you with questions.
- Create an email opt-in freebie with your favorite email provider so readers can get on your email list for updates.
Also, don't forget to add a privacy policy. This is something every dessert or food blog needs for legal reasons! I'm not a lawyer, so I'd recommend talking to someone who is a lawyer and can guide you in the right direction.
Step Eight: Publish Your First Blog Post
You're FINALLY ready to start publishing some content! This is the part you've been waiting for! So, what makes up a blog post? There are some key parts you'll want to include in each post:
- A title that's optimized for SEO (more on this later)
- Content to go along with your recipe to make up the bulk of the blog post (this is part of what helps people find your post by optimizing for SEO)
- Photos of the completed dish and possibly some process shots while making the recipe. Make sure they are optimized once you import them into WordPress.
- Your recipe (obviously!)
Food Blog Post Ideas
First things first, you have to brainstorm what you want to write about. There are literally millions of ideas out there! But make sure to write about something that goes along with your niche. Here are a few food blog post ideas to get your creative juices flowing:
- Recreate a family-favorite recipe with your own spin
- Play around with your favorite ingredient and transform it into a delicious recipe
- Shake up a new and inventive cocktail with your favorite liquor
- Make some fun party or finger food recipes
- Put a spin on a meal you ate (and loved) at a local restaurant
- Create a menu or meal planner recipe guide
- Recreate a childhood favorite dessert
- Teach people a new skill in the kitchen
If you're trying to make money with your blog, don't just aimlessly choose a topic to write about. Rather, select keywords that will bring traffic to your blog.
How to Write a Recipe
After you've come up with a recipe you want to create, it's time for the recipe testing stage. Here's the simplified version of recipe testing:
- Research other recipes to get a feel for the proportions, cooking methods, and ingredients others are using. This will also help you determine what angle you want to take your recipe so you can make it stand out from the others.
Be sure NOT to copy other's recipes. People spend hours creating original recipes, and they are not yours to plagiarize. Inspiration is different from copying. Remember that! - Write down the first draft of your recipe and get to testing. You will inevitably need to tweak, re-write the recipe, and re-test until you've created a recipe that you know works and will be successful for others! This is a long process, so don't give up. Have fun with it and accept your mistakes (we all make them)!
- Once you have your final recipe, you need to write it out in an easy to understand way so you can publish it on your blog. It takes time to get good at recipe writing (I'm working on this skill every day).
You can learn how to write a recipe, but ultimately it takes time and practice to hone your skills. Be sure to check out this resource from the Virginia Cooperative Extension and from the Kitchn if you want some help!
For people who are serious about learning how to write a recipe, I'd recommend purchasing The Recipe Writer's Handbook. I use it every time I sit down to write a recipe.
How to Take Food Photos
Once you have your finalized recipe, it's time to style your food and take some photos. This is another skill that takes time to learn and master! In order to get started taking photos, you'll need a few supplies:
- A camera: Your phone camera works great! Down the line, you can invest in a DSLR camera, but it's not necessary right away.
- A photo backdrop: Replica Surfaces are a popular choice for photo backdrops. However, if you want to start out with a cheap option, you can purchase some foam core and marble contact paper. With some DIY skills, you'll have yourself a backdrop for around $30.
You can also go to a local hardware store and pick up some ½" plywood and some paint samples. There are lots of DIYs out there for painting your own backdrops. - Styling Props: These can be props from around your kitchen! You'll need some fun plates, bowls, linens, or utensils to add some depth and interest to your photos.
- An editing app: If you're starting out on your phone, Snapseed or Lightroom for mobile are great options!
As for learning how to take great photos (and edit them), that takes time and practice! I love learning more by watching videos from The Bite Shot, from Replica Surfaces, or people you follow on social media. Also, don't forget about online classes or one on one coaching that's available!
Write Your Content
Writing your content is an important piece to people finding your blog, reading your posts, and you earning money for all your hard work. Search engine optimization is an important skill you'll need to learn about alongside practicing your content writing skills.
To get you started, here are key items to plan for and add in to every piece of content you write:
- Keywords & Complementary Terms: Every post you write (and every recipe you create) needs to have a keyword you are trying to rank for in Google. I like to keep track of my Google and Pinterest keywords in a simple Google sheets document.
If you're new to the idea of keywords, take a look at this resource.
If you're familiar with keywords but are looking to dig a little deeper into the concept to drive your traffic, I love this free Pinterest & Google SEO training from Adventures in Blogging. This course is easy to understand and really helped me understand an invaluable concept that has helped with my growth - not all keywords are created equal. This course is free, so it's worth checking out! - Click-worthy title: Titles are what make people click on your content! So, it's important to create a title that people can't help but click on. Remember, you ALWAYS need to include your main keyword in the title.
Here are some of my favorite clickable words to include in a title:
- Best + keyword
- Simple/Easy + keyword
- Healthy + keyword
- Number of Ingredients (usually if it's 5 or under) + keyword
- How to + keyword
- Dietary Need (i.e. gluten free) + keyword
- Time of Cooking (usually 30 minutes or under) + keyword
- Holiday/Season + keyword - Summary: This is your promise to the reader about what you're going to talk about in your blog post. I usually list this at the very top of my post and include my keyword/complimentary terms as I'm describing what the post is about.
- Main Content/Key Points: This is the meat of your blog post. To make things simple, I like to choose 2-4 key points to discuss throughout the post. Each key point then becomes a header that you can write your main content under.
Remember to sprinkle your keywords/complimentary terms throughout the content. - Recipe: Use the WP Recipe Maker plug-in to insert your complete recipe ingredients and instructions into your blog post.
- Call to Action: Throughout your post, be sure to have important calls to action linked. This could be a related blog posts, an affiliate link to a product, or a free email opt-in that goes along with the post.
Step Nine: Gain Traffic (First 5,000 Pageviews)
So now what? You have your website all set up, you’ve written a few blog posts, and now you’re finally ready to get eyes on your blog. Because let’s face it, you want more than just your mom and best friend reading your blog.
Most importantly...if you want to make money on your blog (from ad revenue, sponsored posts, affiliate links, etc) you HAVE TO attract an audience. This is the most frustrating part of blogging and one of the hardest things to keep working at.
Here are some easy ways to gain traffic on your blog. With the help of these, you should easily get to your first 5,000 page views in a month. Then, as you continue to build on these strategies, they will add up over time and continue to bring you traffic.
Map your XML Sitemap
You need to make sure your website can be found by search engines (that's how you'll rank on Google). Once you have content up and ready for readers, you want to be sure the search engines can find it!
Go to your WordPress dashboard to the settings tab. Once you're in the settings tab, click reading. From there, uncheck the search engine visibility box.
Next, go to Yoast general settings. Click on the features tab. Make sure that 'XML sitemaps' are switched to 'on'.
Finally, follow this video short tutorial to finish things up.
Food Sharing Websites
Food sharing websites are a great way to get your recipes out into the world. These websites help recipe content creators drive traffic to their food blogs. Each site is a little different as far as requirements and what information they want you to submit. You can read up on their individual submission guidelines. Here are the sites I think are worth submitting to:
- Food Gawker: This site gets me a few hundred website clicks a month, and is super easy to submit (takes less than 3 minutes). However, they are picky about accepting clear photos with good lighting and good angles, so keep that in mind as you're submitting your recipes.
- Fave Healthy Recipes: This site gets me around 50 - 100 website clicks per month. As you start to gain more and more traffic from Google/Pinterest, this probably isn't worth submitting to. However, when you're first starting out, all traffic wins are helpful!
I should mention I don't include my full recipe ingredients or instructions in the submission process so it encourages people to click over to my site.
Build Backlinks
This one sounds kind of scary if you're new to blogging. But don't worry, it's easier than you may think.
First off, you should start to learn the importance of backlinks. More or less, backlinks are important for SEO because they validate that your content is good, and something other people should read. They will be useful when we talk about building your Google organic traffic.
Backlinks can also help new readers find your site, thus leading to new pageviews.
The easiest way I've found to start building backlinks is by joining Facebook groups for bloggers requesting round-up links. Basically, these groups have bloggers who are looking to create round-up posts (i.e. 15 Valentine's Day Desserts You'll Love). You can then submit your blog post in the comments, with the hopes that they'll feature you on their round-up.
Here are my favorite Facebook groups for food bloggers:
Organic Traffic with Pinterest & Google
Okay, now on to the stuff that really matters and is going to help you WIN BIG in terms of pageviews - Pinterest and Google! If you want to learn how to start a successful food blog, you have to understand this!
It took me entirely too long to realize that if I wanted to qualify for MediaVine ads on my website, I HAD TO use the power of Pinterest or Google to get me there. After literally hundreds of hours researching how to grow my traffic, this is the only surefire way I could find to grow an audience and my pageviews.
Let me show you why Pinterest and Google are so important. Anytime we look up ANYTHING on the internet, we use keywords - like 'best holiday desserts' or 'healthy kid friendly dinners'. Meaning, how people find you on Pinterest or Google is all determined by ranking with keywords.
What does this mean for you? Plain and simple - if you want to grow, you have to learn how to rank on Pinterest and Google.
I took two classes that have helped me grow in record time with ranking on both of these platforms. Let me show you. These were my stats before the classes. I could not figure out how to get above that 3,000 pageview mark.

Within just two months of completing both courses (in December 2020), I was able to grow to over 20,000 monthly pageviews. And as of January 2022, I have over 140,000 monthly pageviews. I promise it gets better!
Let me break down why each of this course is worth investing in:
Adventures in SEO (Adventures in Blogging): This course goes very in-depth on how to find the best keywords to optimize your content for Google AND Pinterest. What I love about the Adventures in SEO course is that it's taught by a blogger whose whole philosophy is to work smarter, not harder.
She has a genius concept that I didn't even realize mattered until I took the course: how to know if you can rank for the keyword you want. Lucky for you, she has a free course you can take to find out this secret.
After you take this free course, I'd definitely consider enrolling for the full course. It's a bit pricey but well worth it when you receive your first check from MediaVine ads (my first payment was over $1,700). She teaches some life-changing concepts including how to find the end of Pinterest (where people are almost forced to click on your content), learning to find hidden niches on Google that will result in big traffic wins, and how to get people to actually click on your content once they find it on Pinterest or Google.
I can guarantee you that my 20,000 pageviews would not have been possible without this course. I'm happy to answer any questions you have about it. Just leave me a comment on this post.
Another popular course among food bloggers is Cooking With Keywords. I recently finished this course (in January 2022), and it has many valuable lessons on keyword research including ways to build traffic on low volume keywords, how to perform keyword research from start to finish, and a secret way to find really valuable keywords that don't have much competition.
The Cooking With Keywords course is more affordable than Adventures in SEO. However, the instructor uses a lot of paid tools to teach you keyword research, as opposed to the free keyword research tools given in Adventures in SEO.
Either way, both of these classes can be valuable in different ways. Do you own research to see which is best for you!
Step Ten: What's Next?
What's next? Well, that's sort of a loaded question. What I've learned from starting a food blog is - there's always more to learn!
Rather than getting overwhelmed, here is a simple step you can take to move forward with your blogging journey on your path to making money.
Become a member of Food Blogger Pro! This is the cheapest and easiest way I found to get the burning questions I had answered. Sure you can join food blogger Facebook groups, or listen to podcasts. But, these free sites aren't guaranteed to have the answers you need or have your questions answered by people who are reputable and have been successful.
Food Blogger Pro was created by the founder of Pinch of Yum, a food site that gets millions of monthly pageviews (yeah, they're legit). Here's what is offered on Food Blogger Pro to help you grow:
- Free video tutorials on over 350 topics. These videos go through everything you need to know step by step.
- Get your questions answered from other bloggers in the community.
- Free live events over specific trending topics in the food blogging community.
- Exclusive discounts to useful tools and services that can help your food blog grow.
This was seriously a game-changer for me in my first year of blogging! Best of all, you can cancel at any time, or once you feel you've outgrown the content they offer.
What Questions Do You Have?
I hope this guide taught you how to start a food blog! If you have additional questions, I'll do my best to help. Just throw any questions you have in the comments!
Love this guide? Please leave a comment below. Don't forget to follow along on Instagram, Facebook, YouTube, and Pinterest for more recipes.
Leave a Reply