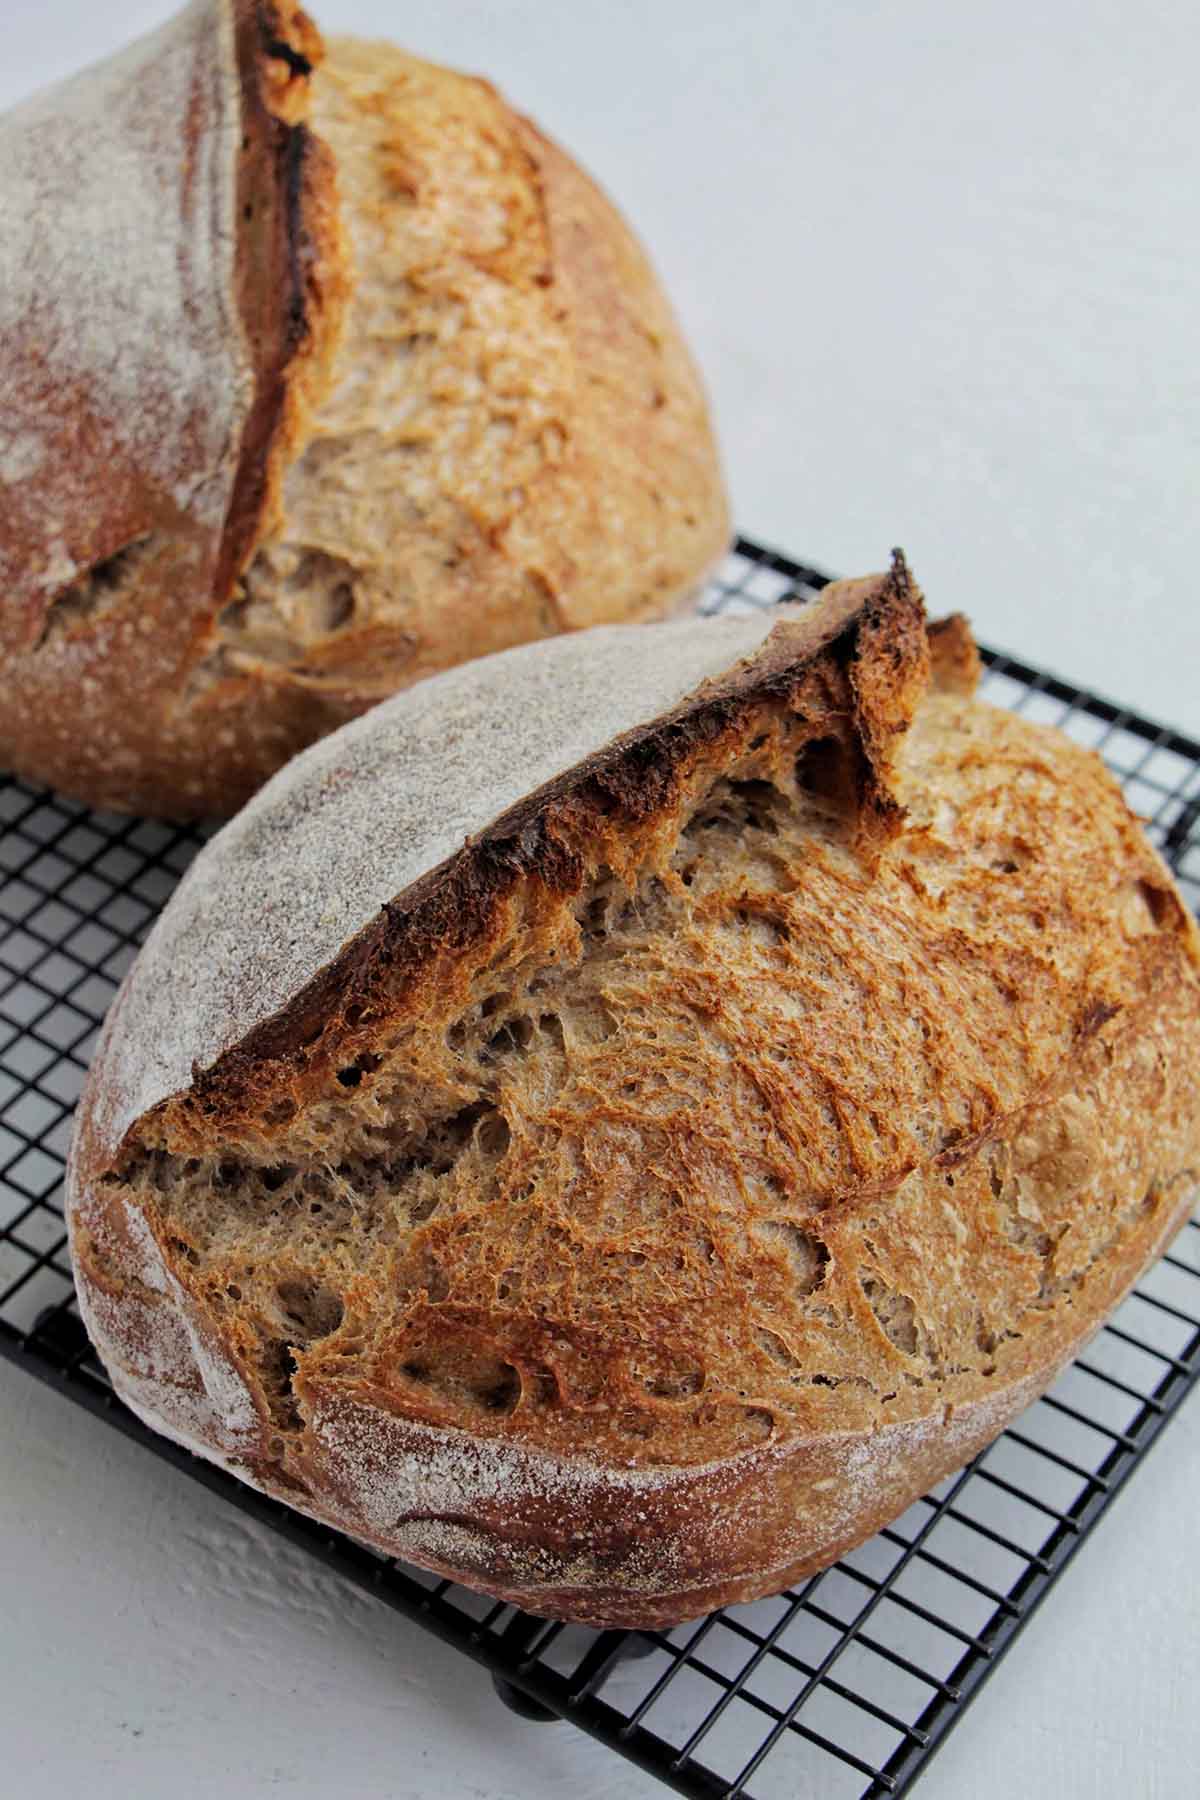
Learn how to make two batard shaped sourdough loaves using whole wheat flour. This is the perfect everyday loaf of sourdough bread great for breakfast, sandwiches, or paired with a meal.
Want To Save This Article?
Enter your email below and we'll send it straight to your inbox. Plus, you'll receive new weekly recipe inspiration.
I love baking sourdough bread at home! There's something about fresh, homemade bread that just hits the spot.
This recipe is unique because it's meant to be an "everyday" sourdough loaf that's simple to make and can be made in bulk so you have sourdough bread that's prepped and ready to eat when life gets busy.
I've designed this recipe to make 2 loaves (don't worry, sourdough freezes and reheats beautifully), so your hard work will last a while. I also use part whole wheat flour to give the sourdough a great taste and an extra kick of fiber.
Even if you're new to sourdough bread baking, this recipe is easy to follow. I'll walk you through all of the steps with helpful tips along the way to ensure your sourdough loaves turn out just right!
What You'll Learn In This Recipe
- How to know your sourdough starter is active and ready for baking.
- What stretch and folds are, and why they are necessary when baking sourdough.
- A helpful schedule to follow to keep your baking on track.
Ingredients You Need
The great thing about sourdough bread is that it only requires a few ingredients.

- Bread flour: Opt for unbleached flour (like King Arthur) for a high-quality sourdough loaf.
- Whole wheat flour: I also really love using the King Arthur whole wheat flour for this recipe. If you're not a fan of whole wheat or don't have any on hand, you can substitute this for more bread flour.
- Fine sea salt: Without salt, bread will taste flat. I like to use fine sea salt (instead of kosher salt) since it better distributes throughout the dough.
- Water: Every bread recipe needs water. When flour mixes with water, it forms gluten. Ensure that the water is at room temperature so that your sourdough loaves rise properly.
- Active sourdough starter: Before you begin baking, you'll need to "feed" or refresh your sourdough starter to get it active and bubbly. If you created your starter from scratch, it's really important that the starter is well-established and fully active before attempting a bread recipe.
- White rice flour: This is used to dust the proofing baskets. It prevents the dough from sticking to the fabric basket liner better than regular flour.
Check out the recipe card below for specific measurements.
How To Make This Recipe
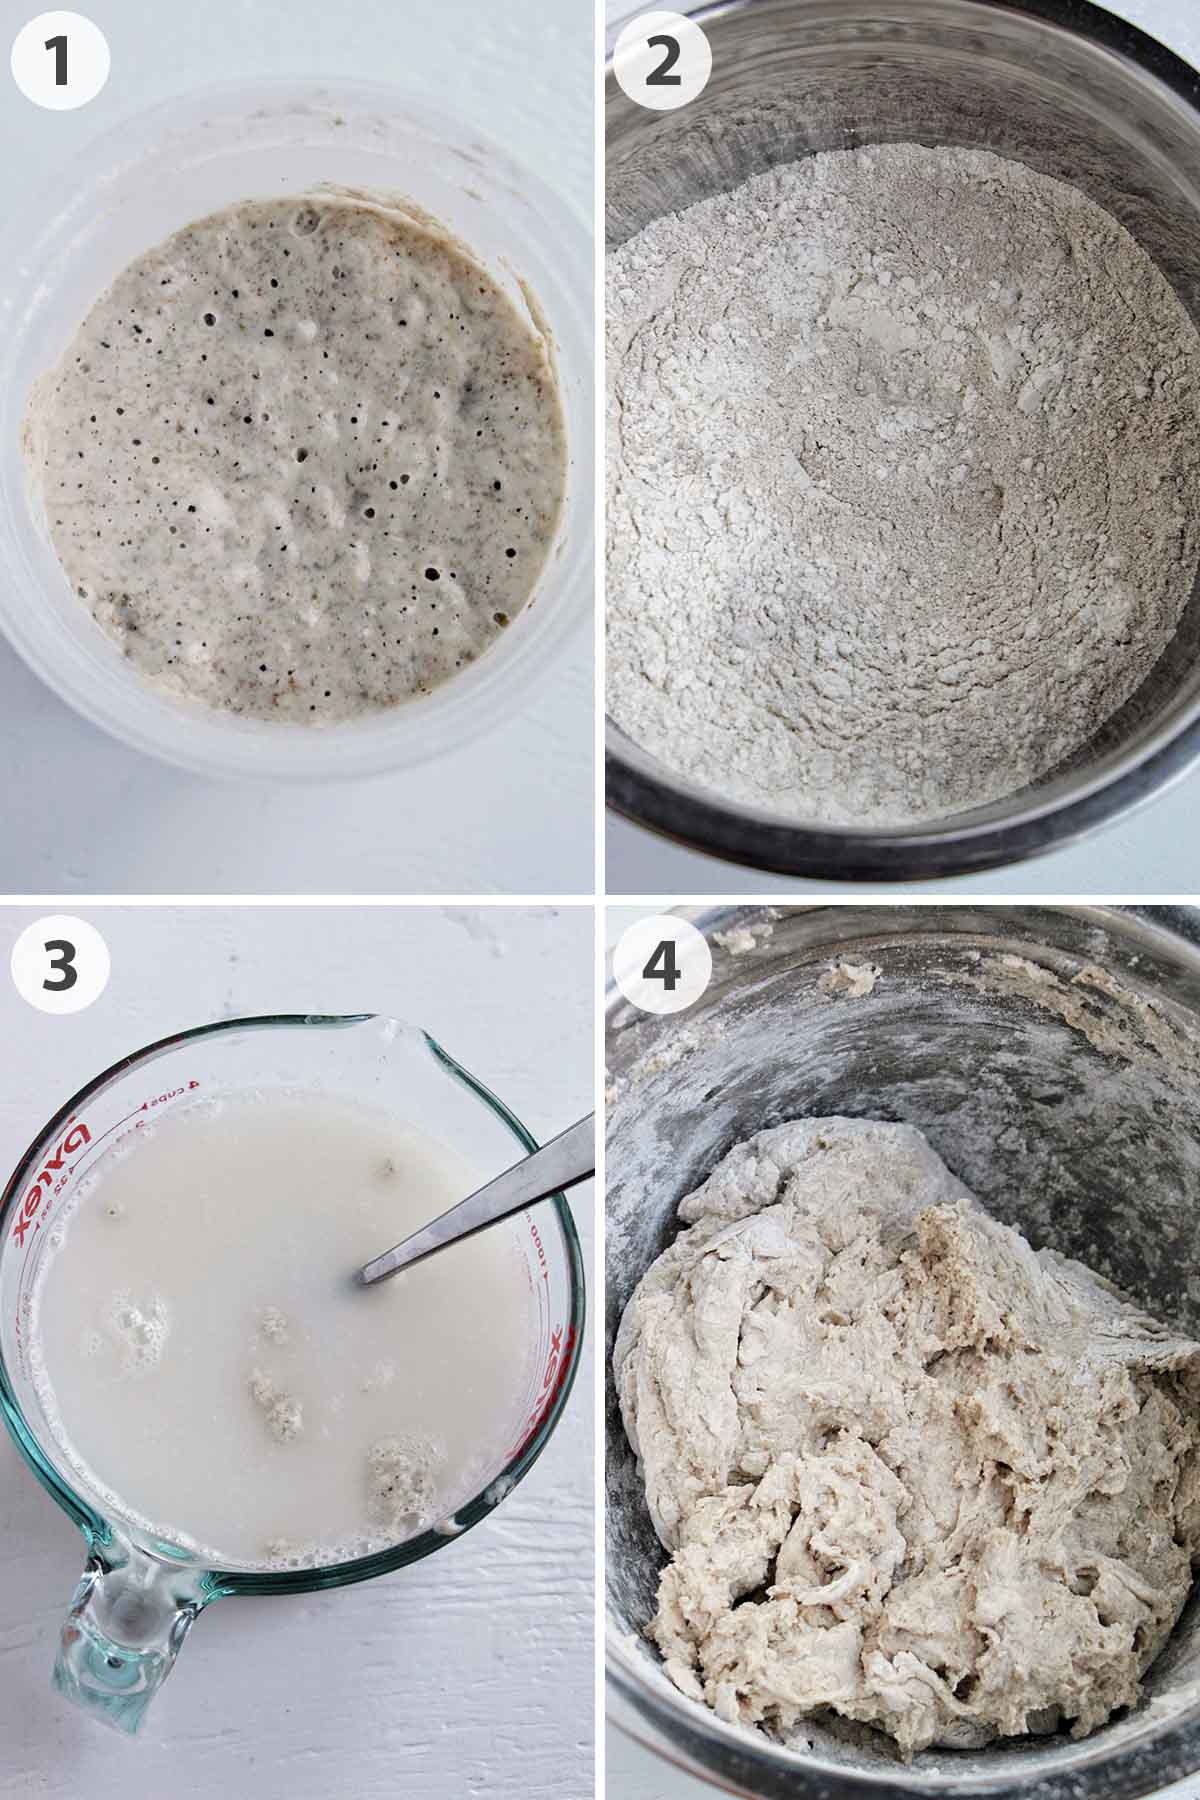
1. Before you bake using your starter, you’ll need to feed it to make it bubbly and active. I feed my sourdough starter with a one-to-one ratio of flour and water (by weight). I typically use ½ rye flour and ½ bread flour for my starter. My standard sourdough feeding is 50 grams of water, 25 grams of rye flour, and 25 grams of bread flour.
The two best ways to tell if the sourdough starter is ready are:
- The starter has doubled in size 4–8 hours after a feeding.
- There are many visible bubbles throughout the starter.
2. Whisk bread flour, whole wheat flour, and salt together in a large mixing bowl.
3. In another mixing bowl, whisk water and sourdough starter.
4. Pour the water mixture into the flour, and mix with your hands or a wooden spoon until a shaggy dough forms. Cover with plastic wrap, and allow to sit for 1 hour.
This step is referred to as autolyse. During this stage, the flour has time to absorb the water, helping the dough to become stretchy and easy to handle.
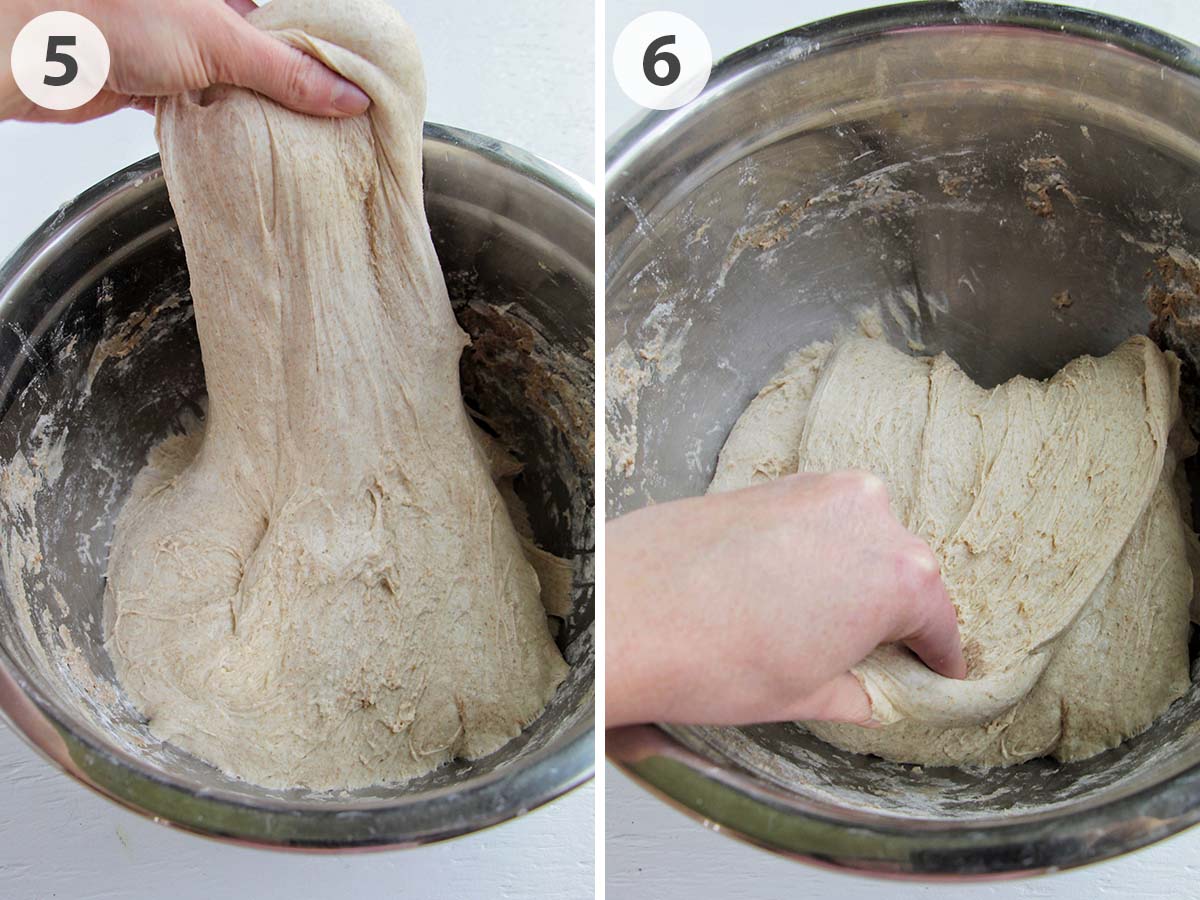
5. Next, it's time to begin the stretch and fold process. This step helps strengthen the dough, give the bread structure, and develop gluten.
Grab the edge of the dough, and stretch it as far as it can go without ripping.
6. Then, place it on the opposite side of the dough. Repeat this four times (on the top, bottom, and sides of the dough).
Allow the dough to sit for 1 hour, then continue these stretch and folds three additional times each 1 hour apart. After the last stretch and fold, allow the dough to rest for one additional hour.
Once these stretch and folds are done, the dough should no longer rip when you stretch it, and it should have doubled in size.
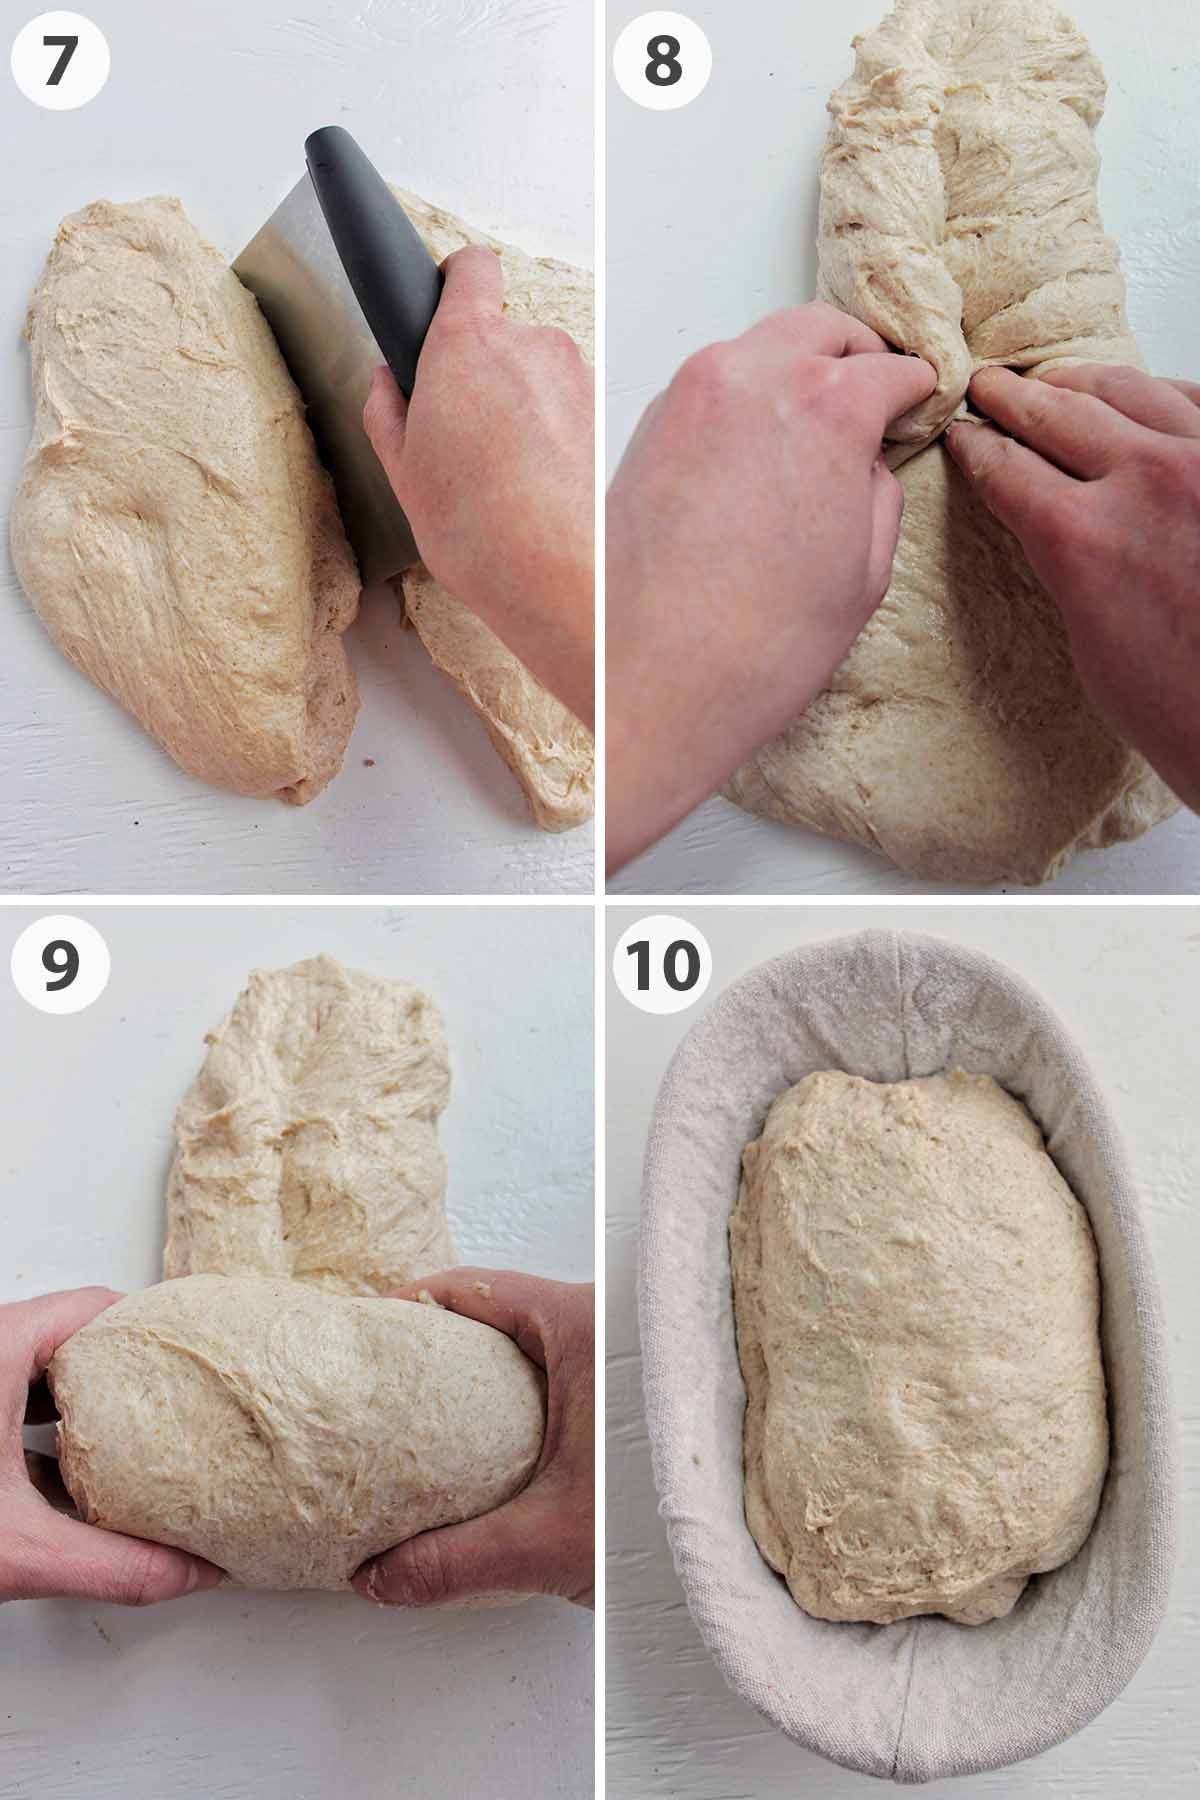
7. Once you've finished the stretch and folds, transfer the dough to a clean, lightly floured work surface, and cut it into two even pieces using a bench scraper or knife.
8. Shape the dough into a batard (oval) shape. First, flatten the dough, then grab the sides, and pinch them into the middle (this helps to create tension in the dough).
It's really important to properly shape the dough if you want it to maintain shape during the proofing and baking process.
9. Tightly, roll the dough.
10. Finally, place it into batard-shaped proofing baskets. Make sure that the fabric liner has been generously sprinkled with white rice flour to avoid the dough sticking.
Tightly, cover the baskets with plastic wrap, and place them in the refrigerator to proof for 18–24 hours or overnight. This proofing stage will help the bread develop even more flavor!
11. Place a dutch oven in the center rack of the oven then heat to 450°F (230°C). Allow the oven to preheat for at least 30 minutes.
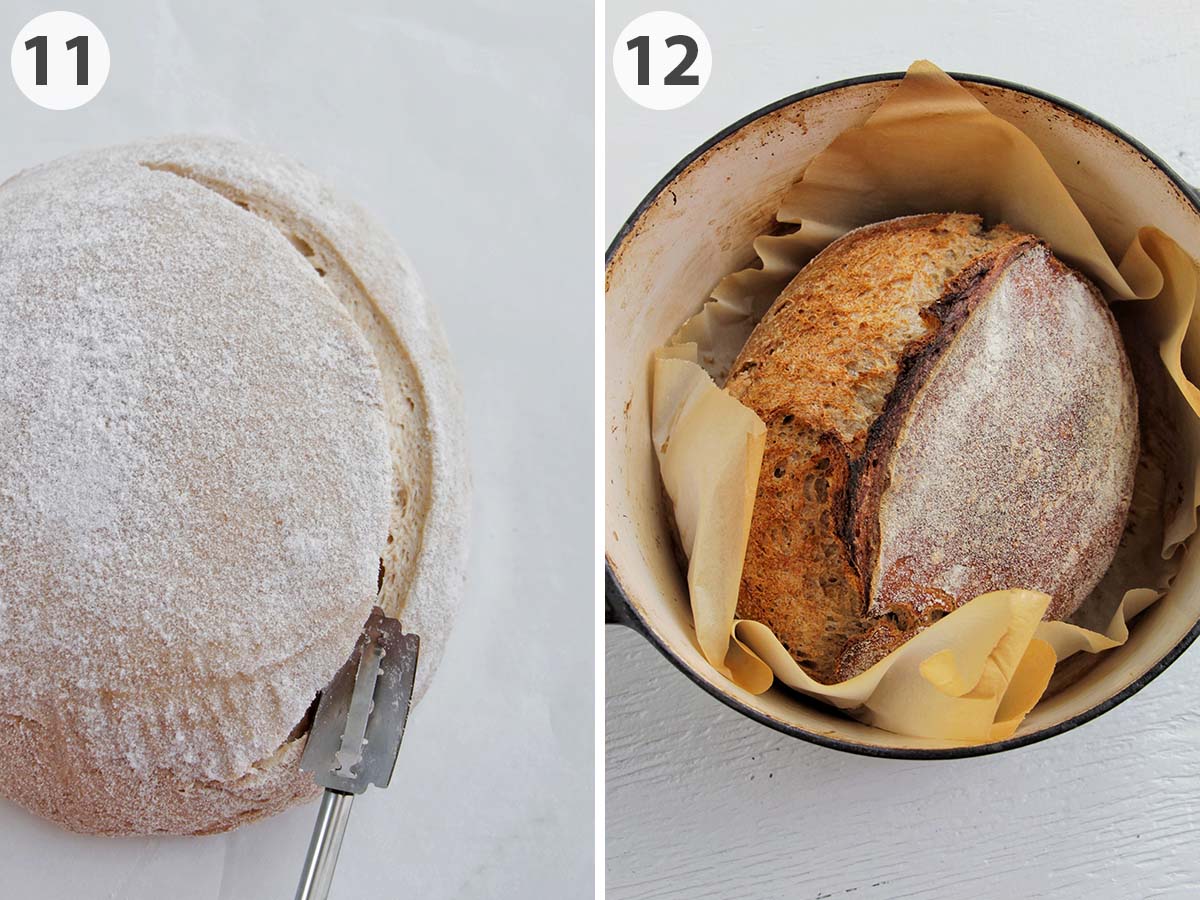
Once the oven is hot, remove one basket of bread from the refrigerator. Flip the dough onto a piece of parchment paper, and score the bread with a lame or sharp knife.
In order to get a nice ear (the part of the bread that sticks up after baking), it's important to score a long enough length of the dough. I typically score an entire half of the loaf.
12. Transfer the dough to the preheated dutch oven, and bake for 30 minutes with the lid on. Remove the lid, and bake for an additional 10–15 minutes until the bread is golden brown on top. Repeat this process for the second loaf.
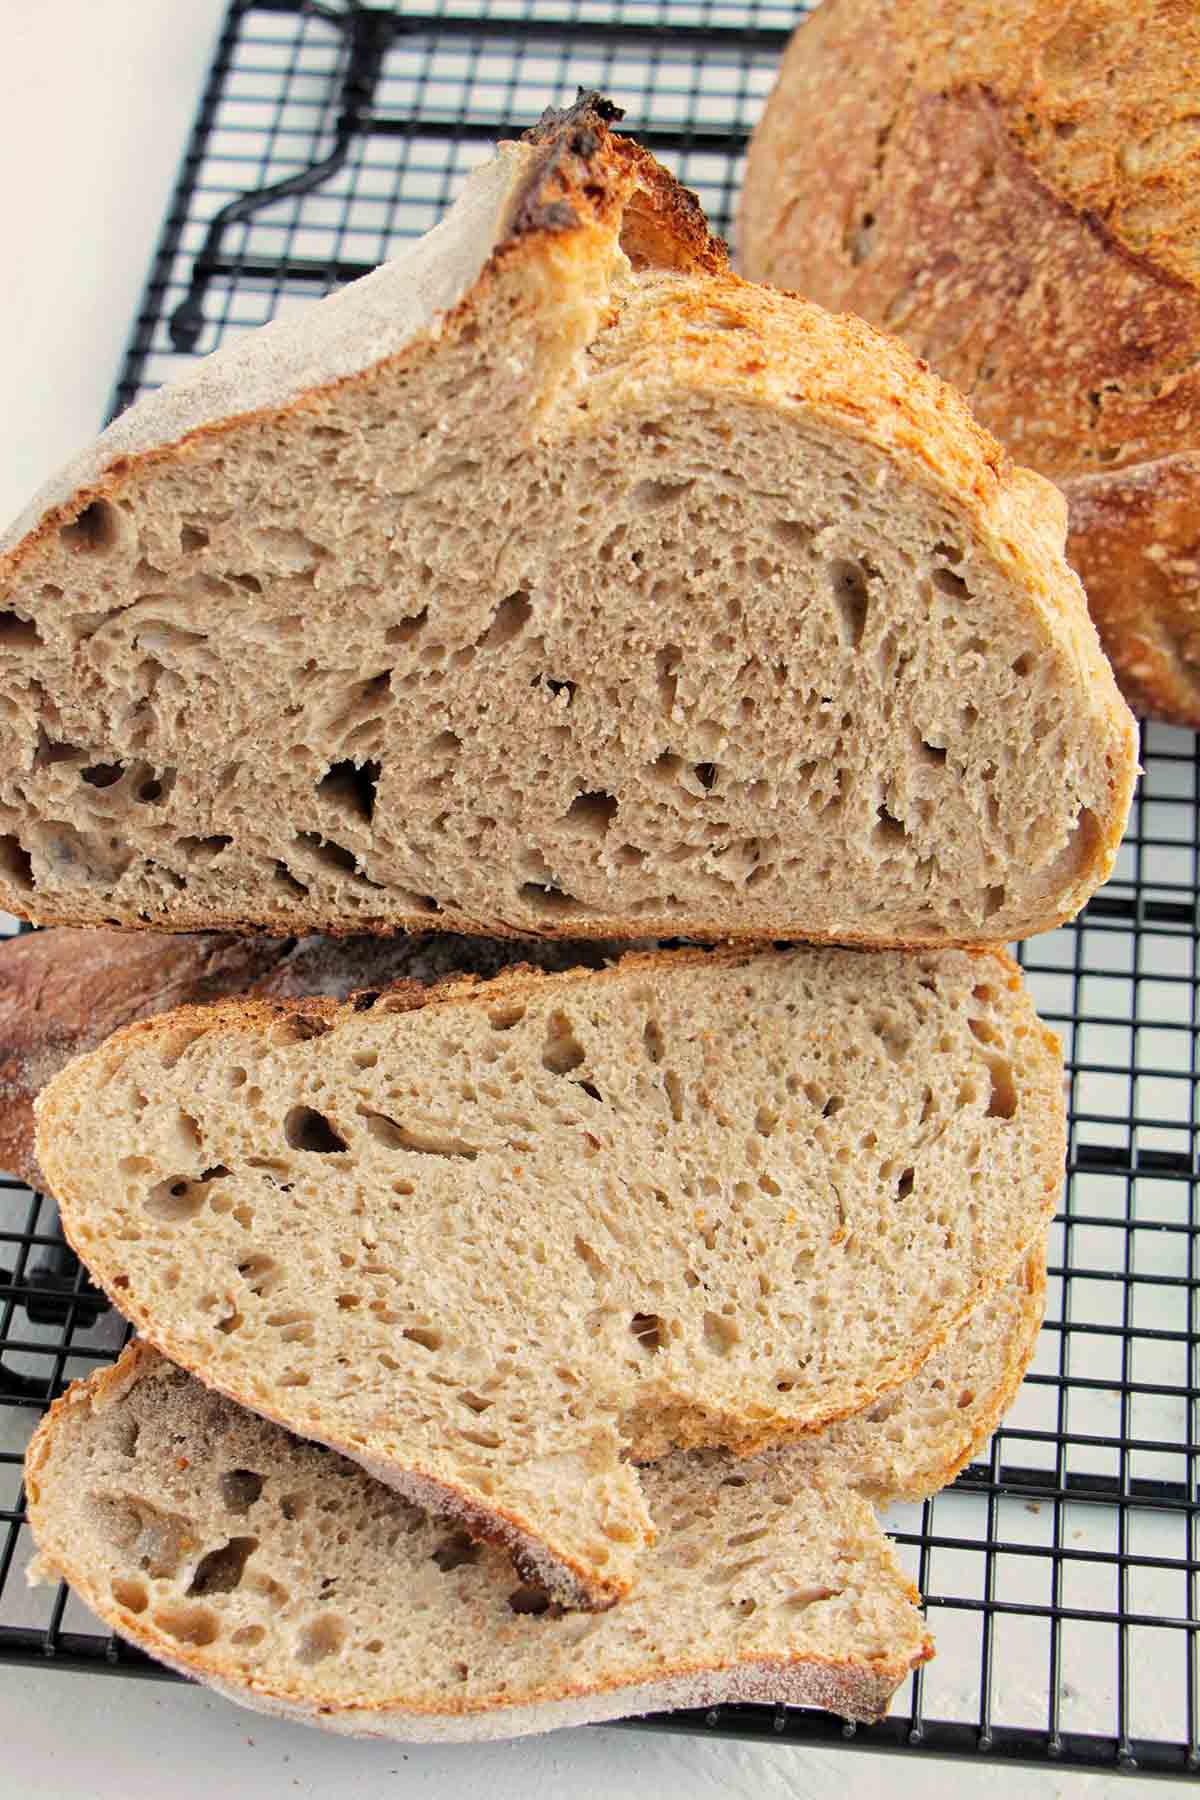
Always allow the dough to fully cool before cutting into it.
Expert Tips
- Storage: Sourdough loaves can be stored at room temperature for up to 4 days. To freeze, slice the sourdough, and place it on a parchment lined baking sheet. Freeze until bread has just frozen though, then place in an airtight bag. Frozen bread will last 2+ months. I suggest toasting to reheat.
- It's always best to weigh the ingredients with a kitchen scale when baking bread. It helps to ensure accuracy so there are not excess ingredients, which often happens (especially with flour) when measuring ingredients volumetrically.
- Baking sourdough takes a bit of time. It's best to create a schedule to help you stay on track. Here's the schedule I like to use:
- Day 1 - 11:00 pm: Feed sourdough starter.
- Day 2 - 7:00 am: Autolyse (Mix the dough then allow the flour to absorb the water).
- Day 2 - 8:00 am: Four sets of stretch and folds.
- Day 2 - 1:00 pm: Shape loaves, and place them in the refrigerator to proof.
- Day 3 - 8:00 am: Preheat oven.
- Day 3 - 8:30 am: Cook and cool sourdough loaves.
Recipe FAQs
The most common problem is that your sourdough starter is not active enough. If you made your sourdough from scratch, it might not yet be well-established (active) enough for baking.
If you have an established and active starter, then check that it was at its peak after before starting the sourdough. Also check that your dough properly rose during the stretch and folds stage.
Finally, to ensure the bread has proper oven spring (the final rise when the bread goes into the oven), double-check that your oven is heating to the proper temperature with an oven thermometer.
You need to work on the scoring. Make sure you've scored deep enough and a long enough length of the dough. I typically score an entire half of the loaf.
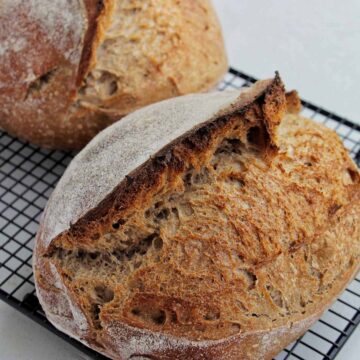
Yes, adding whole wheat flour to the sourdough leaves us with a tighter crumb.
First, check that your oven temperature is properly heating by using an oven thermometer. Next, you can allow the bread to bake slightly longer with the lid removed to get that golden brown crust.
More Bread Recipes


Love this recipe? Please leave a 5-star ⭐⭐⭐⭐⭐ rating in the recipe card below. Have questions as you're cooking? Leave a comment below, and I'll help!
Whole Wheat Sourdough Batard (2 Loaves)
Equipment
- kitchen scale
- batard proofing basket
- bread lame
- Dutch oven
Ingredients
- 5 ⅓ cups bread flour
- 3 cups whole wheat flour
- 3 teaspoons fine sea salt
- 3 cups plus 2 tablespoons room temperature water
- ½ cup active sourdough starter
- white rice flour for dusting
Instructions
- Whisk bread flour, whole wheat flour, and salt together in a large mixing bowl. In another mixing bowl, whisk water and sourdough starter. Pour the water mixture into the flour, and mix with your hands or a wooden spoon until a shaggy dough forms. Cover with plastic wrap, and allow to sit for 1 hour.
- Begin the stretch and fold process. Grab the edge of the dough, stretch it as far as it can go without ripping, then place it on the opposite side of the dough. Repeat this four times (on the top, bottom, and sides of the dough). Allow the dough to sit for 1 hour, then continue these stretch and folds three additional times each 1 hour apart. After the last stretch and fold, allow the dough to rest for one additional hour. The dough should double in size during this time. If not, allow the dough to continue bulk fermenting until doubled in size.
- Transfer the dough to a clean, lightly floured work surface, and cut into two even pieces using a bench scraper or knife. Shape the dough into a batard (oval) shape. First, flatten the dough, then grab the sides, and pinch them into the middle (this helps to create tension in the dough). Tightly roll the dough, and place it into batard proofing baskets that have been generously sprinkled with white rice flour.
- Tightly, cover the baskets with plastic wrap so that they are airtight, and place in the refrigerator to proof for 18–24 hours, or overnight.
- Place a dutch oven in the center rack of the oven then heat to 450°F (230°C). Allow the oven to preheat for at least 30 minutes.
- Once the oven is hot, remove one basket of bread from the refrigerator. Flip the dough onto a piece of parchment paper, and score the bread with a lame or sharp knife.
- Transfer the dough to the preheated dutch oven, and bake for 30 minutes with the lid on. Remove the lid, and bake for an additional 10–15 minutes until the bread is golden brown on top. Repeat this process for the second loaf.
- Place the sourdough on a wire cooling rack, and allow to fully cool before slicing with a bread knife.
Notes
- Day 1 - 11:00 pm: Feed sourdough starter.
- Day 2 - 7:00 am: Autolyse (Mix the dough, then allow the flour to absorb the water).
- Day 2 - 8:00 am: Four sets of stretch and folds.
- Day 2 - 1:00 pm: Shape loaves and place them in the refrigerator to proof.
- Day 3 - 8:00 am: Preheat oven.
- Day 3 - 8:30 am: Cook and cool sourdough loaves.
- The starter has doubled in size 4–8 hours after a feeding.
- There are many visible bubbles throughout the starter.


Steph
I've made this recipe every week for my family for weeks now! So delicious, especially with the whole wheat.