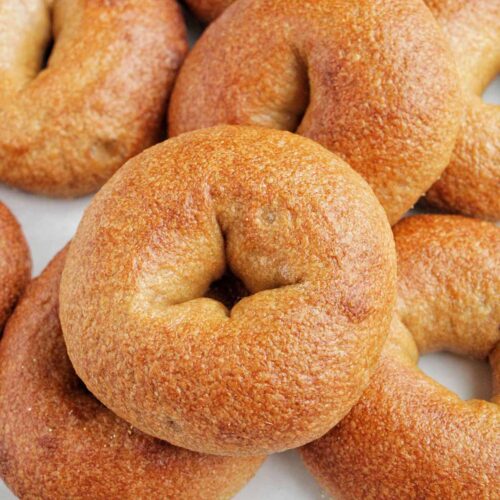
Soft, chewy, and super flavorful, bagels in the comfort of your own home. This sourdough bagel recipe produces the best sourdough bagels you could ever imagine.
Want To Save This Article?
Enter your email below and we'll send it straight to your inbox. Plus, you'll receive new weekly recipe inspiration.
I have become obsessed with baking using a sourdough starter because of the rich, sour, and complex flavor it adds to the baked product. This overnight sourdough bagel recipe is no exception to that amazing unique flavor.
While I love a classic bagel, the use of a sourdough starter takes the bagel from great to out of this world.
If you’re just starting out with sourdough baking and want to try this recipe out, I suggest picking up some sourdough discard from a friend or a local bakery. This will ease your entrance into the sourdough baking world and provide a quality end product.
Jump to:
What You'll Learn In This Recipe
- The importance of measuring ingredients by weight.
- The science behind chewy bagels and how to achieve them at home.
- A simple trick to know if you have kneaded the dough long enough.
For more tips and tricks to help level up your baking game, check out my top 10 secrets to becoming a better baker.
Ingredients You Need
For the best crunchy and chewy bagels, the right ingredients and quantities are essential. Use my tips and suggestions to help you perfect your bagel-making.
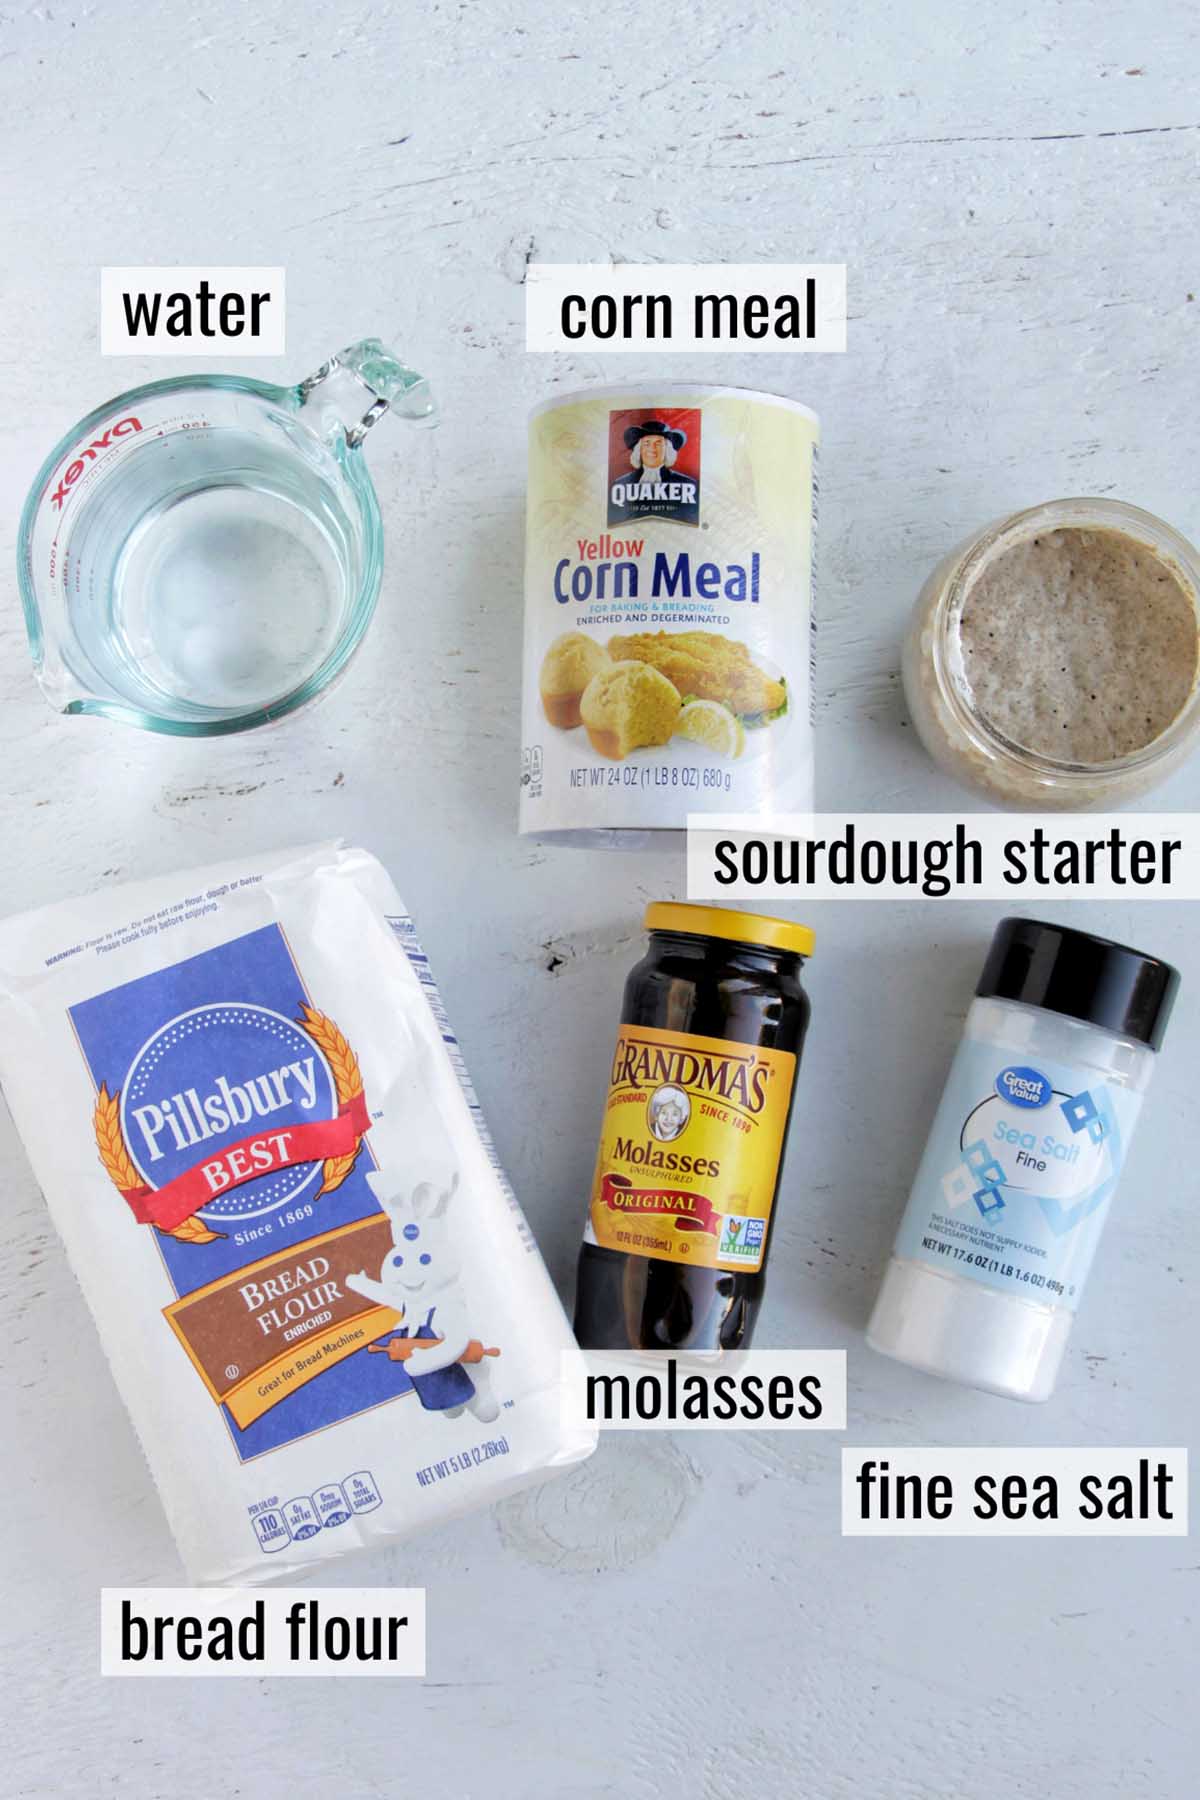
High-Protein Flour: A high-protein flour is essential for achieving the correct texture in a bagel. High-gluten or high-protein means the flour has a higher protein percentage than your standard all-purpose flour. Because of this, the flour will create a chewy and crusty product like these easy sourdough bagels or even a French baguette. Ideally, look for a high-gluten flour with around 13.5-14.5% protein. Breads such as baguettes, crusty bread, and bagels use this type of flour.
As I searched for high-gluten flour, I struggled to find anything in my local stores. As an alternative, I opted to order King Arthur bread flour. This has a protein content of around 12%.
Do not be tempted to use all-purpose flour for this recipe. All-purpose flour typically has a protein content of around 10% which is much too low if you are trying to make a lovely chewy and crunchy product.
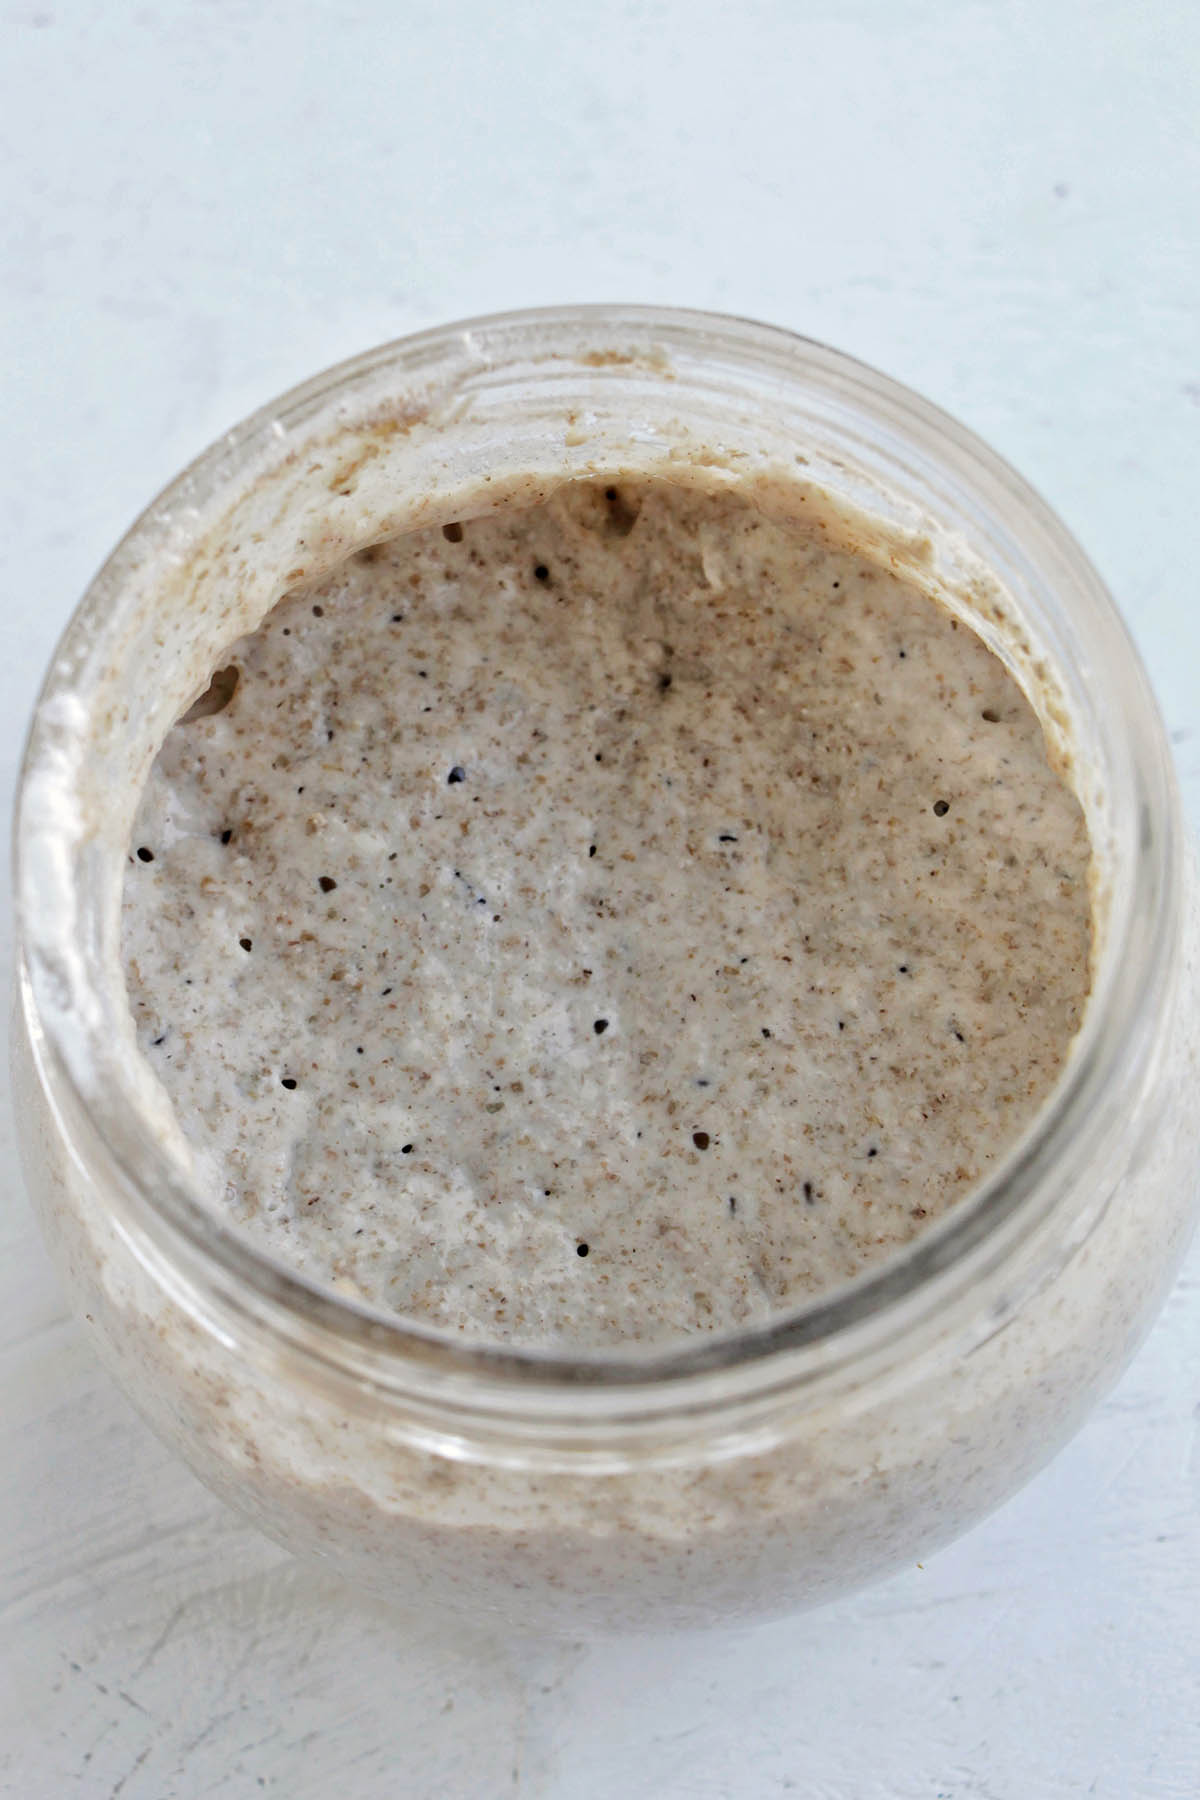
Active Sourdough Starter: It's pretty obvious that to make a sourdough bagel, you’re going to need a sourdough starter.
Sourdough starter (also referred to as levain), is a complex group of microbes that help leaven (rise) the bagels.
Although store-bought baker’s yeast is also a leavening agent, it does not add any noticeable flavor to the dough. Sourdough starter adds a beautiful, complex, sour flavor. The unique flavor comes from what you use to feed the starter as well as the environment your starter survives in.
Before you bake using your starter, you’ll need to feed it to make it bubbly and active. I feed my sourdough starter with a one-to-one ratio of flour and water (by weight). I typically use ½ rye flour and ½ whole wheat flour for my starter. My standard sourdough feeding is 50 grams water, 25 grams rye flour, and 25 grams whole wheat flour.
The two best ways to tell if the sourdough starter is ready are:
- The starter has doubled in size 4 - 8 hours after a feeding.
- There are many visible bubbles throughout the starter.
Molasses: Many bagel recipes use barley malt syrup, but I chose to use molasses instead because it is much easier for people to get their hands on. This ingredient enhances the recipe by adding a mild sweetness, and the sugar caramelizes during baking, giving that beautiful brown crust to the bagels.
Water: Nearly all bread recipes have water involved. Water hydrates and forms the dough. Different breads and doughs have different levels of hydration. The higher the percentage of hydration, the more delicate the dough is for handling.
This bagel recipe with sourdough starter has a low hydration percentage, about 30%.
Fine sea salt: Salt is in nearly all baking recipes. Salt is a flavor enhancer, making all the other flavors in the dough stand out. This is especially nice with sourdough because of that unique tangy flavor. Additionally, incorporating salt helps tighten the gluten net (making the dough stronger).
In nearly all my baking recipes, I use fine sea salt because it distributes much more evenly than coarse salt.
Coarse cornmeal: Cornmeal is needed to keep the bagels from sticking to the baking sheet after forming the dough. Additionally, it gives the bagels a nice crunchy texture after the bake.
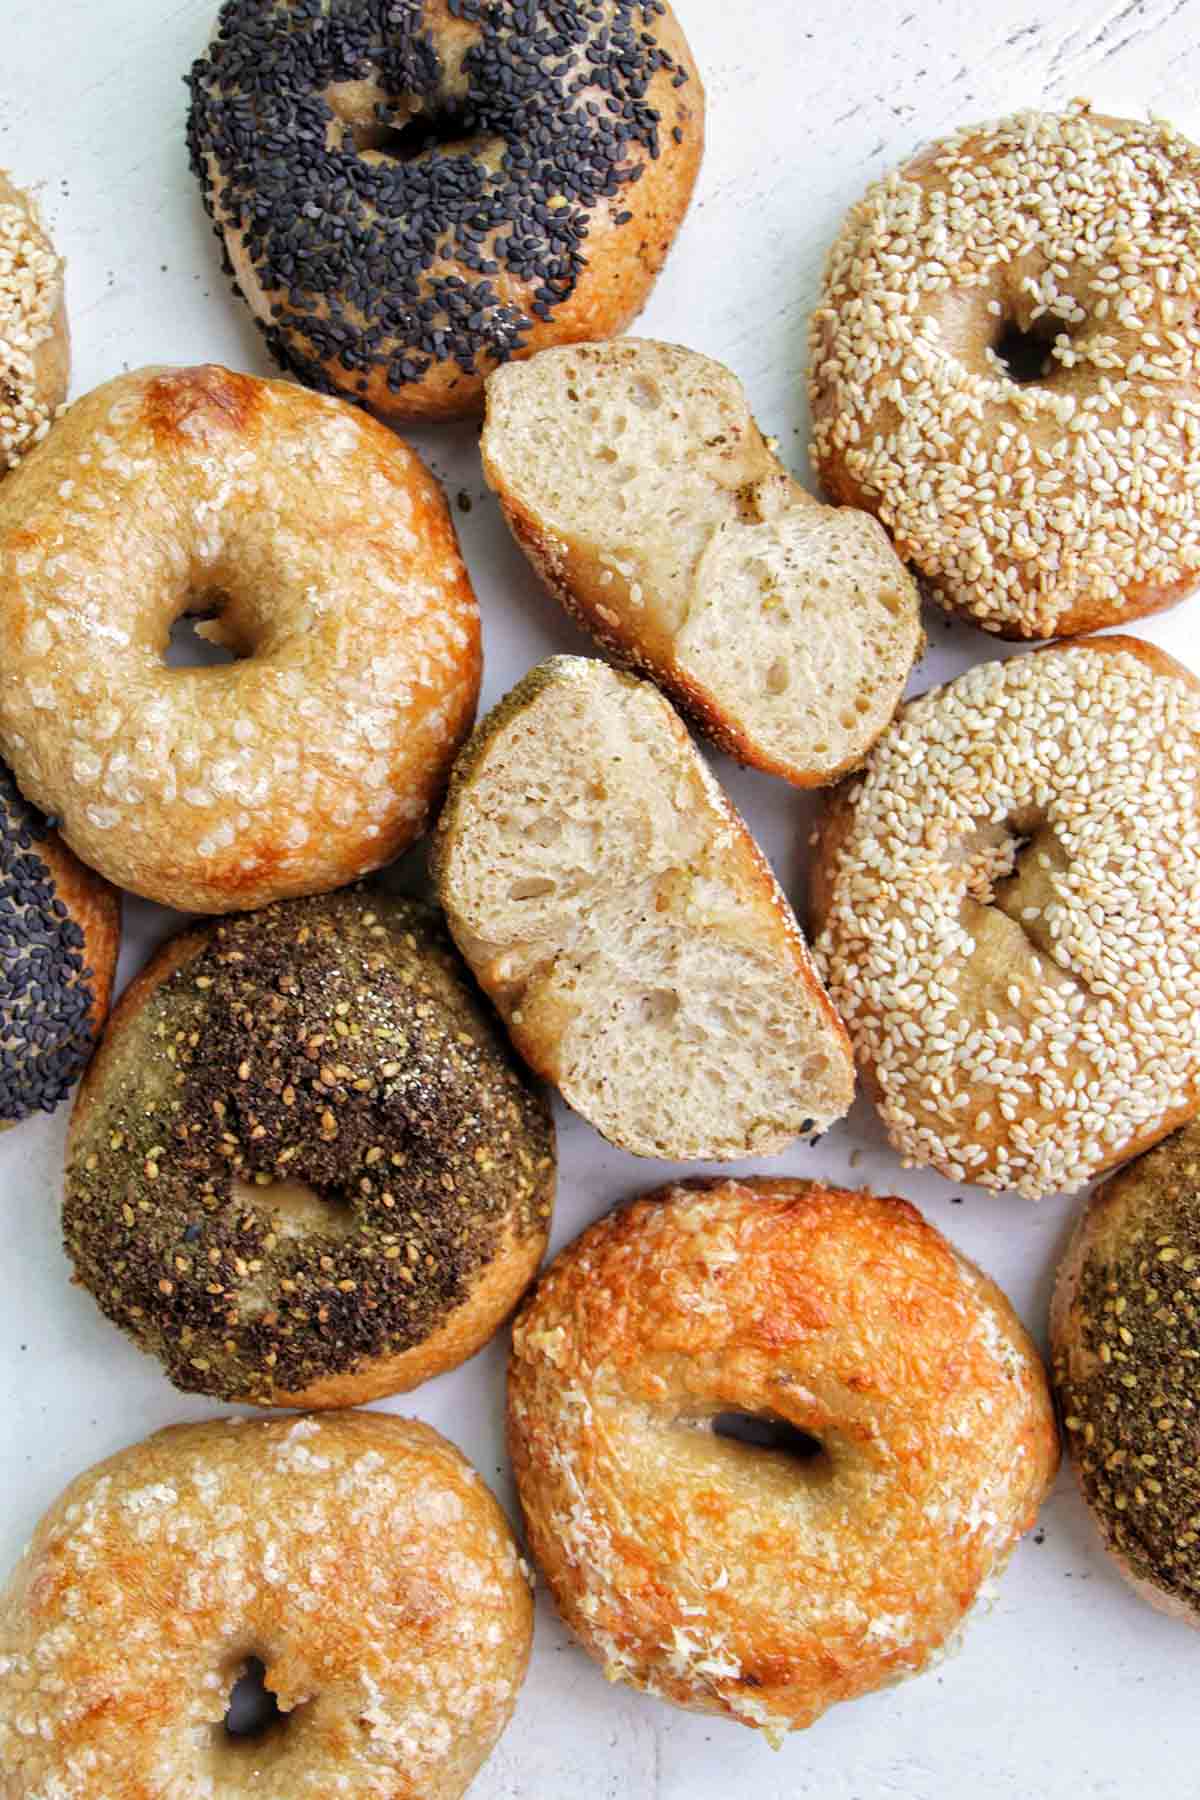
Toppings (optional): Everything seasoning, sesame seeds (black and/or white), poppy seeds, minced onion seasoning, Za’atar seasoning, flakey sea salt, and parmesan cheese are just some of the nearly endless options for bagel toppings. This is the best way to customize your homemade bagels to satisfy any of your cravings.
Sourdough Baking Schedule
I will warn you now that this recipe takes some time to make. Most of the time is spent waiting for the dough to rise and proof. However, you do need to plan ahead to properly prepare.
In order to make the sourdough bagels, here is the schedule I follow:
- Day 1 - 10:00 pm: Feed sourdough starter.
- Day 2 - 8:00 am: Mix bagel dough. Then, cover and allow to rise in a warm area until doubled in size, about 7 - 8 hours. The time it takes to double in size can vary depending on the climate and temperature of your house.
- Day 2 - 4:00 pm: Divide and shape bagel dough. Cover and allow the dough to proof overnight in the refrigerator for 12 - 18 hours.
- Day 3 - 8:00 am: Preheat the oven and baking stone. Boil the bagels.
- Day 3 - 8:30 am: Cook and cool the bagels.
How To Make This Recipe
Making any type of bread can seem intimidating. But, with this simple step-by-step guide, you'll get the help you need to feel confident baking sourdough bagels at home.
Scale The Ingredients
As with any baking recipe, you should always start with mise en place. This is a French phrase known throughout the culinary world, meaning 'to put in place.'
You'll first want to measure out all of your ingredients, and gather all of the kitchen tools that you'll use for this recipe. The best way to measure your ingredients accurately is with a kitchen scale.
In addition to physically gathering all your ingredients, I always recommend reading through the recipe before starting, especially with baking recipes. This way, you get an idea of what you have to do throughout the recipe.
Mix The Dough

Now it's time to mix everything together. Begin by combining the wet ingredients (water, sourdough starter, and molasses). In a separate bowl, use a whisk to stir together the bread flour and salt.
One of the great things about this recipe is that you don't even need a stand mixer. You can mix everything together with a little muscle.
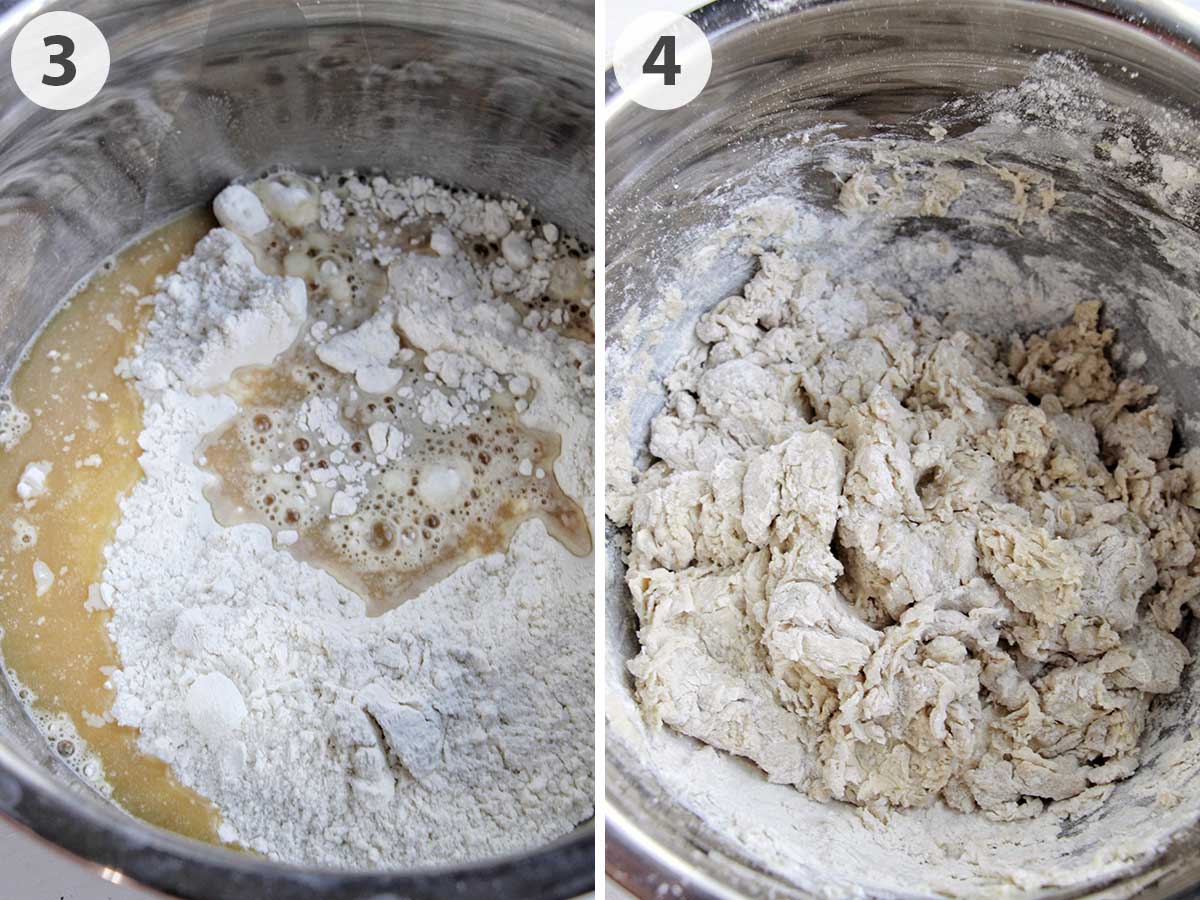
When you're first combining the wet and dry ingredients, it's helpful to use a bowl scraper. This will help keep your hands and fingers from getting sticky. Plus it’s great for making sure all the wet and dry ingredients are incorporated and nothing is sticking to the bowl. Once a shaggy dough has formed, you can use your hands.
Now it's time for one of the hardest parts- kneading the dough. This step takes approximately 15 minutes, during which you are helping with gluten formation.
To better understand what we are doing during this kneading process, an understanding of baking science will clarify the importance of gluten formation.
In order to activate the proteins (glutenin and gliadin) in the flour, water must be incorporated. In addition to water, flour needs to be worked or kneaded for long periods of rest time to make the gluten elastic and therefore malleable enough to shape. For this bagel recipe, we're putting in some elbow grease to get the dough to the proper stage.

For those new to baking who are a bit intimidated by hand kneading, here are a few helpful steps that will ease your journey through the kneading process. After a shaggy dough is formed, it is pretty much a repeated process of pushing and folding. Push down on the dough, and don’t be shy to use all your strength. Fold the dough over itself from the corners.
Repeat this process, and you will see the dough go from shaggy to solid in a few minutes. Sometimes, you will have to stretch the dough a bit before you fold it over onto itself. For this particular recipe, there's no need to be afraid of overworking the dough. This sourdough bagel recipe has very resilient dough, and it is better to err on the overworked side than the underworked side.
There are many signs to look for in this bagel dough to show that you have kneaded long enough for proper gluten formation. Below is a list of those signs to look for after you've finished hand kneading for 15 minutes:
- The dough is flexible when kneaded
- The dough is bouncy to the touch
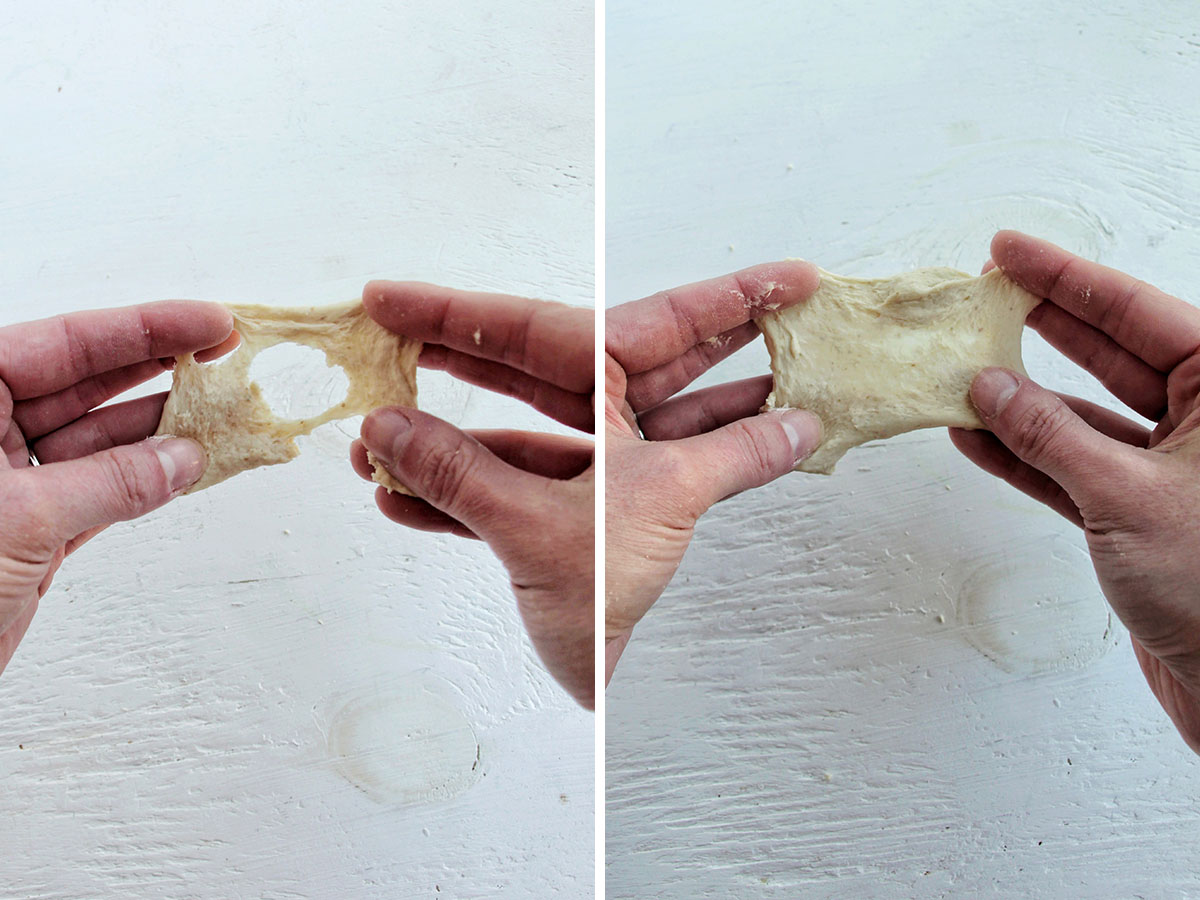
To be extra safe, grab a piece of dough between your fingers, stretch it, and see the web fibers that have developed. You should be able to pull the dough thin enough that light shines through. You want the dough to be able to stretch rather than tear. This is often referred to in the bread-making world as the windowpane test.
Bulk Fermentation
Bulk fermentation is the time that we allow the entire dough to rise. During this time, the sourdough starter is converting sugars into carbon dioxide and alcohol.
Bulk fermentation is crucial to making delicious bagels because it helps with the production of leavening gasses which allows our bagels to puff up and be airy when baking. It also helps to develop flavor and strengthen the gluten.
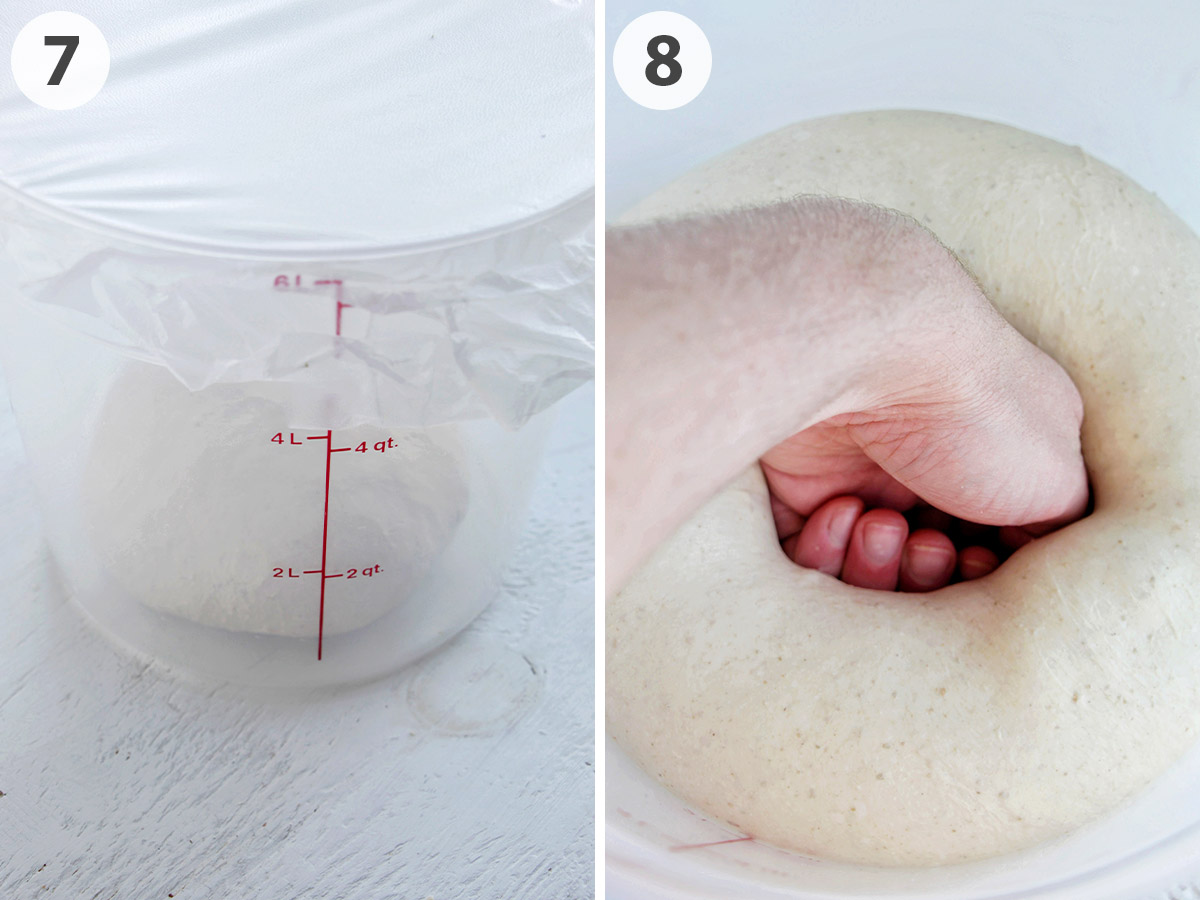
At this stage, you are looking for the dough to nearly double in size. This shows us that it has bulk fermented long enough. Depending on the time of the year and the temperature of your house, the time it takes the dough to double in size can vary. Generally, a colder environment will result in longer bulk ferment times- the opposite is true for a warmer environment.
If your kitchen is very cold, my suggestion is to turn on your oven to 200ºF (93ºC). Once you have achieved the proper dough consistency, move the dough to a clean bowl and cover it with plastic wrap. Then, allow the dough to rise on the top of the warm oven (not in the oven) until it’s nearly doubled in size.
Shape The Bagels

Now that your dough has doubled in size, it's time to turn your dough into bagels.
Begin by punching down the risen dough. This releases some of the gas bubbles that formed during the bulk ferment stage. The reason we do this is to redistribute the yeast cells, so they can rise during the proofing stage that comes after this one.
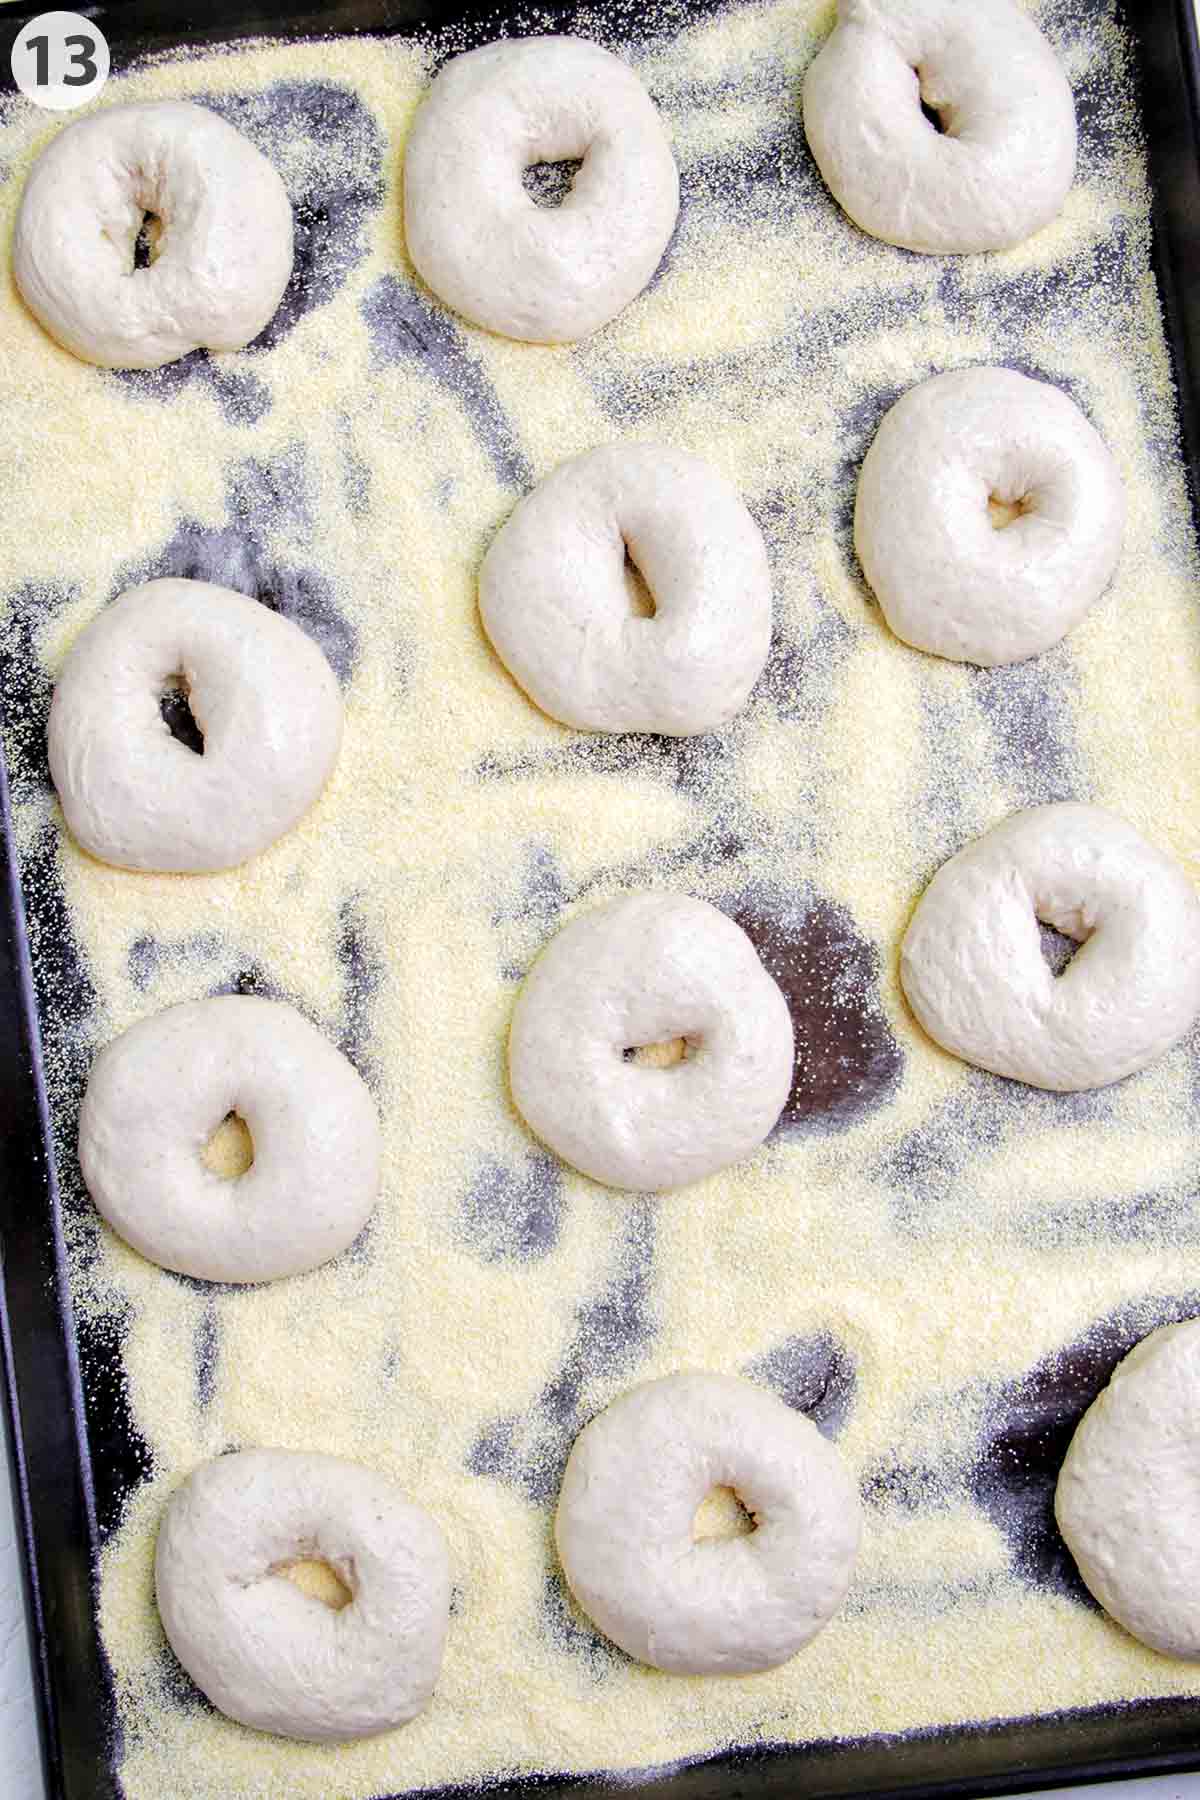
To make 12 bagels, divide the dough into about 107 grams (3.77 ounces) pieces. I use a kitchen scale for this process to ensure they're all the same size.
Once the dough has been divided, it is time to shape. Grab a ball of dough, and gently push through the center of the ball using both thumbs to make a hole. With the hole made, continue to use your thumbs to stretch the bagel out until it reaches about 4 inches (10 cm) across. If the bagels are made too small, they will end up closing during the boiling and baking process.
The best way to check the size of your bagel during this shaping process is to use a ruler.
Place your shaped bagels on a baking sheet with a thin layer of cornmeal underneath. The cornmeal will prevent sticking and add a lovely texture to the bagels when they bake.
Throughout this process, you'll want to keep the bagels covered with a tea towel or plastic wrap, so the dough doesn't dry out.
Proof The Dough
It's time to allow the pre-shaped bagels to proof overnight in the refrigerator. The overnight proofing process that happens in a cold environment is iconic for making high-quality bagels. This step does three key things to the bagels. It adds lots of flavor, produces more leavening gasses, and strengthens the gluten.
Tightly wrap the bagels in plastic wrap before placing them in the refrigerator overnight. If you don't place the plastic wrap securely around the bagels, you'll end up with a hard, crusty dough when you take it out of the refrigerator.
I like to pull the plastic wrap around the top of the sheet pan, underneath the pan, then back around to the top. This ensures no air can get in.
Boil The Bagels
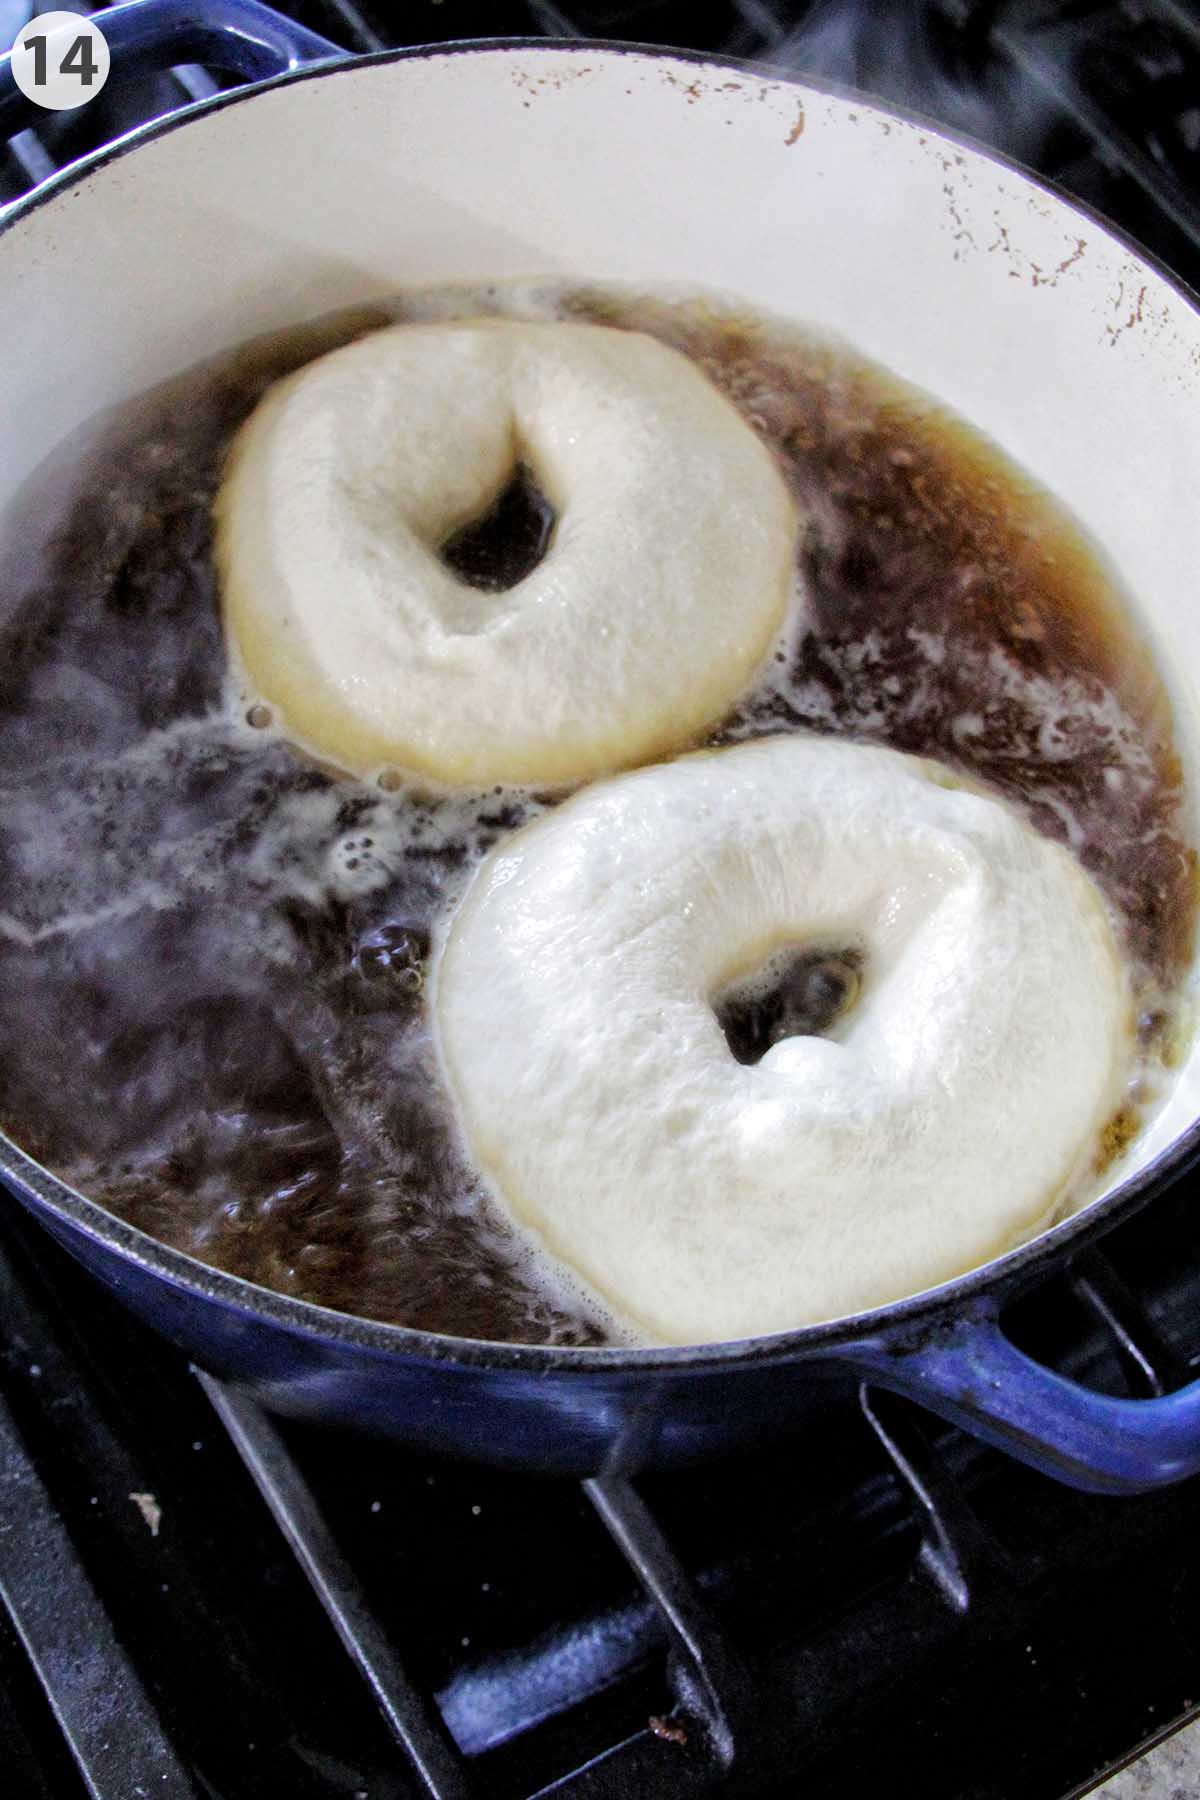
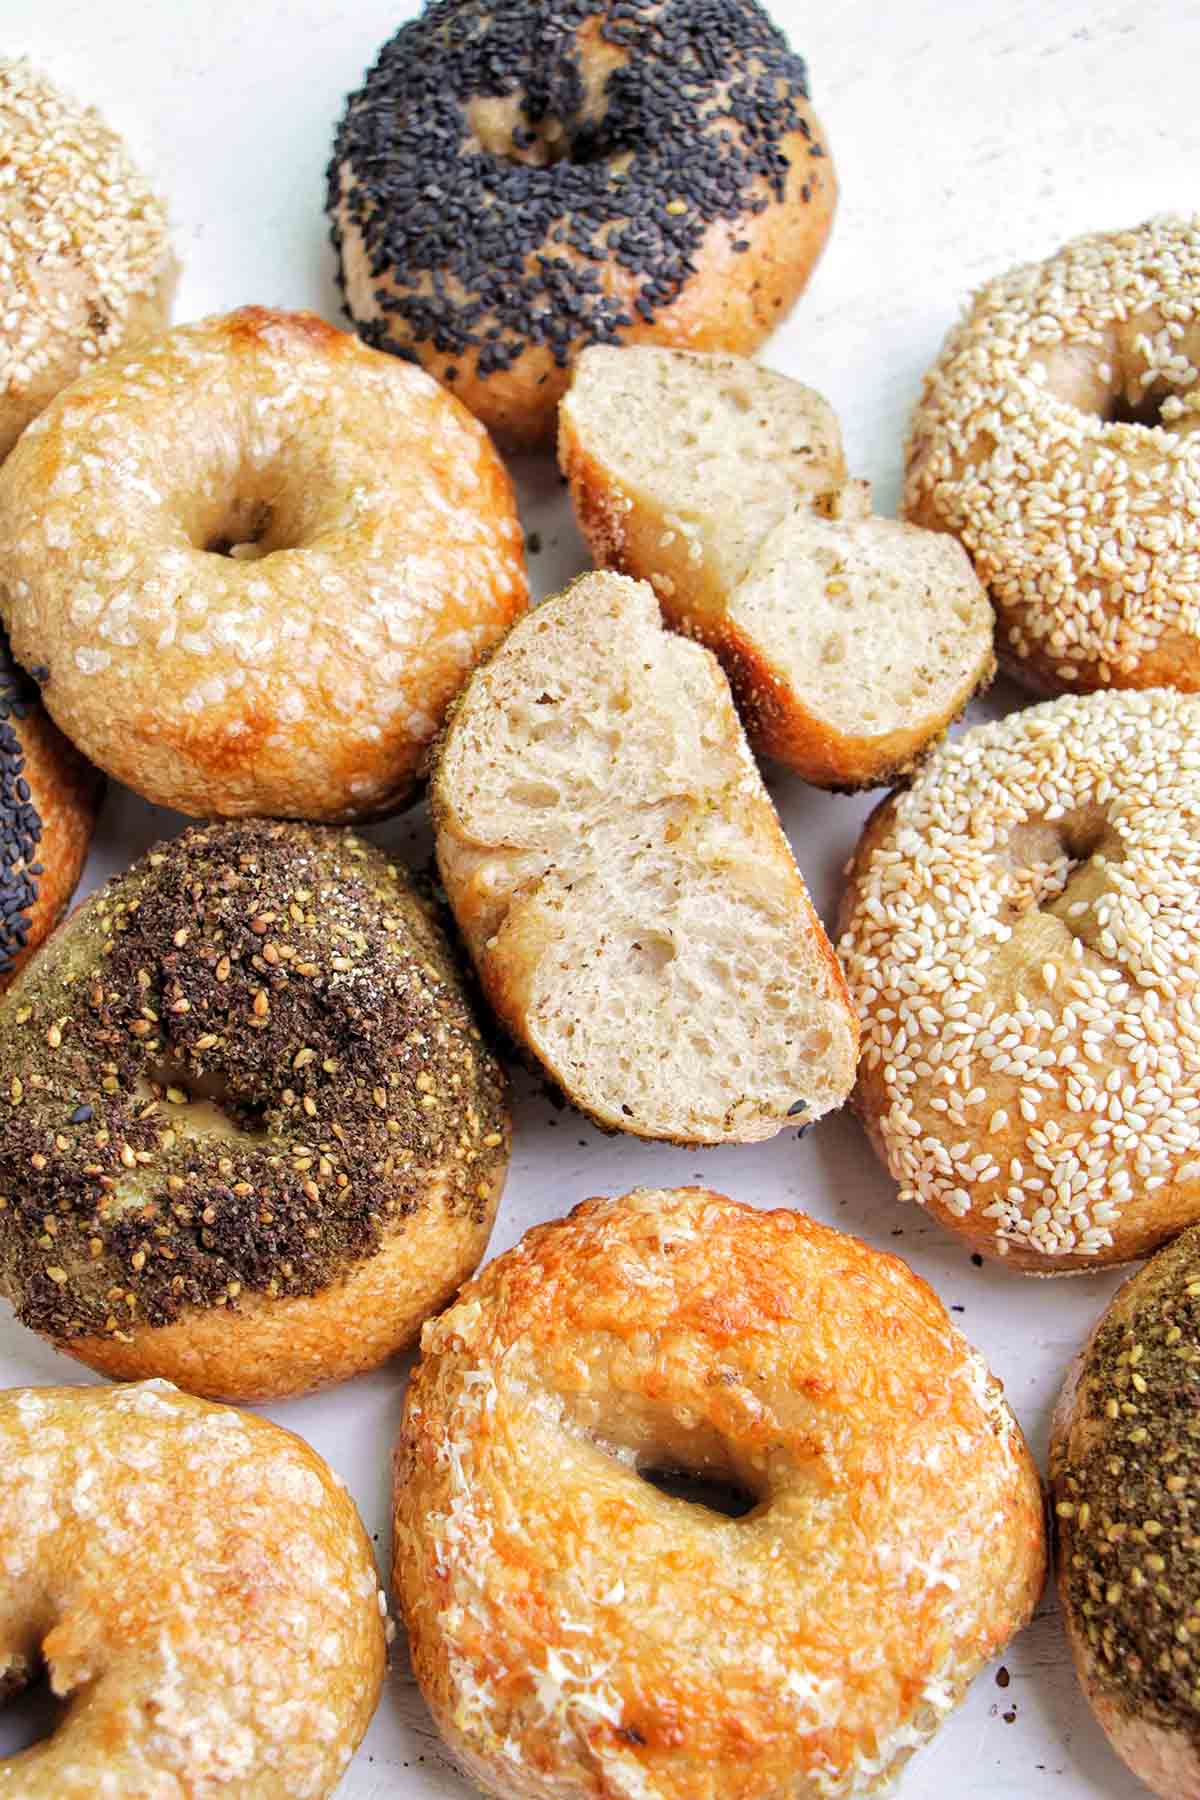
Another iconic step in the bagel-making process is boiling the bagels before they're baked. The reason bagels are boiled is because it gives that iconic shiny and chewy exterior layer to the bagel. The longer you boil the bagel, the thicker and chewier the outside crust will be.
The boiling time also affects the interior texture of the bagel. A longer boil will result in a more dense bagel. To achieve the texture that I prefer, I boil my bagels for about 30 seconds on each side, providing a chewy, but not too tough, texture.
For the boil, bring the same water from the float test up to a steady boil. Once boiling, add in molasses 1 tablespoon at a time until the water turns a dark brown-black tea color. After the molasses is in, you can begin to boil your bagels. If the temperature of the water drops after adding molasses, allow it to come back to a steady boil before placing the bagels in the water.
Add as many bagels as you can comfortably fit into the pot at once without them being on top of each other. Use a slotted spoon or a spider-strainer to flip the bagels. Take the boiled bagels, and place them on a wire rack to cool.
Add Toppings & Bake
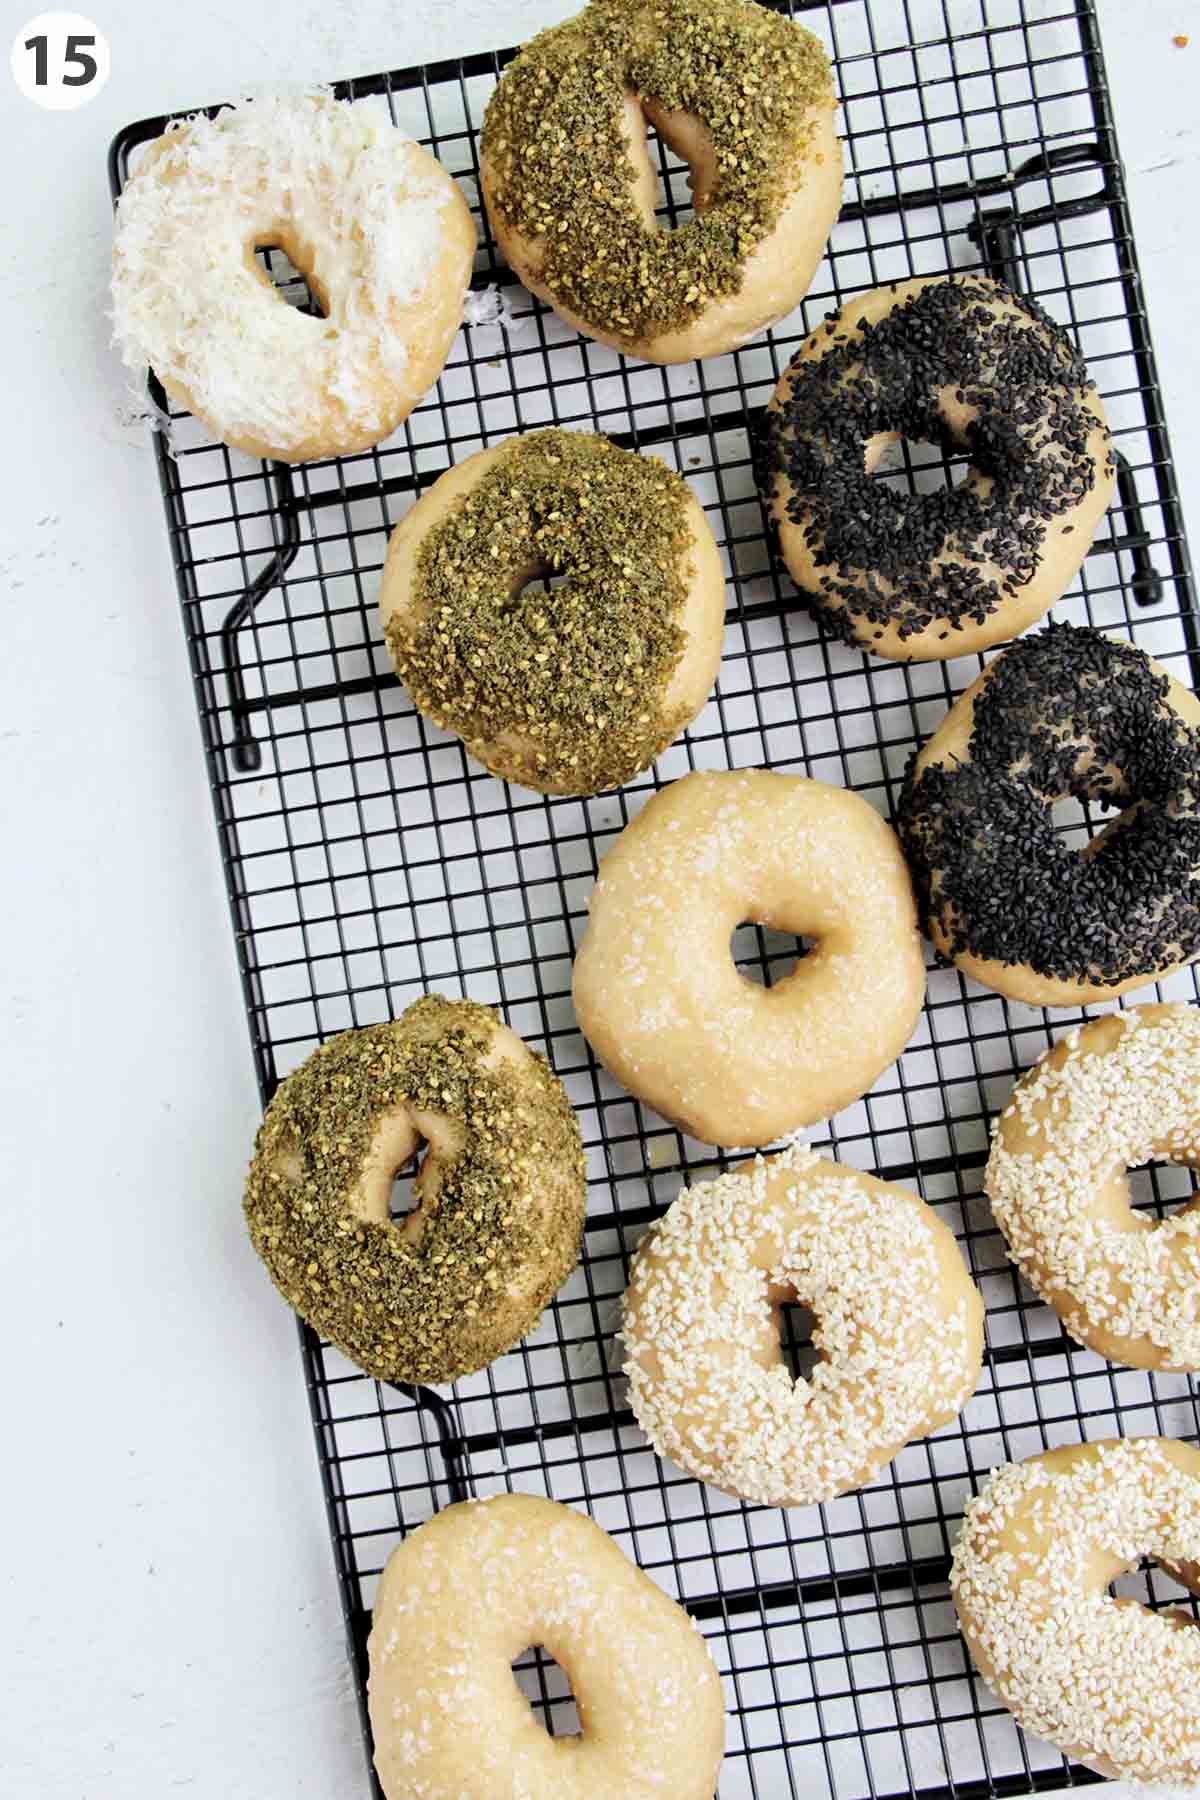
While the bagels are still wet and a bit warm and sticky from the boiling process, dunk the tops into your toppings of choice to make any bagel flavor your heart desires. Here are some of my favorite flavor ideas:
- Everything seasoning: Use ¾ cup (126 grams) of everything seasoning blend. Immediately after the bagel has been removed from the water, gently dunk the top of the bagel into the everything seasoning.
- Sesame seeds: Use ¾ cup (96 grams) of sesame seeds. Immediately after the bagel has been removed from the water, gently dunk the top of the bagel into the sesame seeds.
- Poppy seeds: Use ¾ cup (84 grams) of poppy seeds. Immediately after the bagel has been removed from the water, gently dunk the top of the bagel into the poppy seeds.
- Sea salt flakes: Use 3 teaspoons (9 grams) of Maldon flakey sea salt. Immediately after the bagel has been removed from the water, gently dunk the top of the bagel into the Maldon flakey sea salt.
- Za'atar seasoning: Use ¾ cup (78 grams) za'atar seasoning. Immediately after the bagel has been removed from the water, gently dunk the top of the bagel into the za'atar seasoning.
- Cheddar cheese: Use 1 ½ cups (384 grams) finely shredded cheddar cheese. Immediately after the bagel has been removed from the water, top the bagel with 2 tablespoons (16 grams) of shredded cheddar cheese.
- Asiago cheese: Use 1 ½ cups (312 grams) finely shredded Asiago cheese. Immediately after the bagel has been removed from the water, top the bagel with 2 tablespoons (13 grams) of shredded Asiago cheese.
- Oatmeal: Use ¾ cup (108 grams) old fashioned oats. Immediately after the bagel has been removed from the water, gently dunk the top of the bagel into the oats.
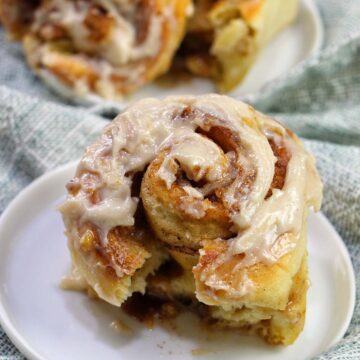
- Cinnamon and sugar: Mix ½ cup (107 grams) firmly packed dark brown sugar, 6 tablespoons (45 grams) bread flour, 3 tablespoons (37 grams) granulated sugar, 3 tablespoons (42 grams) melted unsalted butter, and 3 teaspoons (8 grams) ground cinnamon in a small mixing bowl until combined. In a separate bowl, whisk 1 large (50 grams) egg and 1 tablespoon (14 grams) of water to make an egg wash. Immediately after the bagel has been removed from the water, brush the bagel with egg wash and top with cinnamon sugar mixture (about 1 tablespoon or 15 ml).
Once you've added on the topping flavors, it's time to bake.
To get that nice browned, glossy top on your bagels, you'll need to have a high oven heat. I've found that using a baking stone helps get that crusty outer texture that we all look for in bagels. Make sure to preheat the baking stones for about 30 minutes, so they have enough time to properly heat up.
Be sure to rotate the baking stones around during the baking process. Most home ovens have hot spots, so rotating ensures that you will achieve an even crust on all of your bagels.
The bagels should take about 22 - 25 minutes to bake. Keep an eye on them (without opening the oven) to make sure they don't get too dark. Once out of the oven, allow the bagels to fully cool a wire rack before cutting into them.
Even though it's tempting to slice into a hot, freshly baked bagel, give it time to completely cool on a wire rack. This ensures the internal structure can settle and evaporate any excess moisture.
From here you can eat them, or freeze them for later (something most people forget they can do). Check out these full bagel storage instructions.
Expert Tips
- Wondering how to store sourdough bagels? They can be stored for up to 4-6 days in an airtight container at room temperature. I suggest toasting to reheat. Bagels can also be frozen for up to 6 months. I recommend slicing them in half before you freeze them. Then, you can simply pop the frozen bagel straight into the toaster.
- 15 minutes may seem like a long time to knead dough, but don't cut this time short. Kneading bagel dough is an important step in the bread-making process because it helps to create a strong gluten net. This gluten net is what holds the bread together and provides the proper resilience and texture to your bagels.
- Do you have a favorite bagel flavor? Switch out the bagel toppings to completely change the flavor. You can make everything bagels or even use cinnamon and sugar as sweet toppings for bagels.
Recipe FAQs
First off, be sure that you allowed the dough to bulk ferment for enough time. This time can vary depending on the temperature of your house. Generally, the colder your environment, the longer time it will take the dough to double in size.
You'll also want to check that your starter is active and strong enough to bake with. A weak starter could also prevent your dough from doubling in size.
Yes, the dough should be proof overnight in the refrigerator. The best quality bagels are given plenty of time to ferment slowly in a cold environment. The slow fermentation allows the flavor to deepen, creating a delicious and unique taste to the bagels.
No. Many people think bagels will last longer in the fridge. This is not true because the fridge promotes staling.
Boiling the bagels creates a shiny, chewy exterior to the bagel. Additionally, it helps make the inside of the bagel a bit more dense. The longer you boil the bagel, the chewier the exterior and the denser the interior will be.
After the bagels have been proofed, they will be full of air. Be careful when handling the bagels after this stage, otherwise, you will push the air out and the bagels can become flat.
How To Eat Sourdough Bagels
There are endless possibilities for how to use your sourdough bagels. Here are just a few of my favorite ideas:
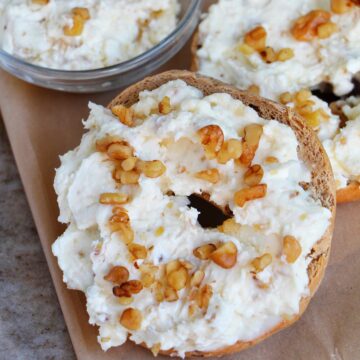
- Top with butter or cream cheese for a simple breakfast.
- Make a breakfast sandwich with eggs, cheese, and bacon.
- For an easy lunch, use them as the base of an open-faced tuna melt.
- Top with Nutella and fruit for a sweet treat.
- Make bagel pizzas for a kid-friendly dinner.
- Add a smear of peanut butter and banana slices.
- Bagels and lox are a classic pairing. I layer cream cheese, smoked salmon, capers, red onion, and dill on mine.
- Don't forget about avocado toast. Add some smashed avocado, lemon juice, salt, and red pepper flakes for the perfect combination.
More Bagel Recipes

Love this recipe? Please leave a 5-star ⭐⭐⭐⭐⭐ rating in the recipe card below. Have questions as you're cooking? Leave a comment below, and I'll help!

Overnight Sourdough Bagels
Ingredients
- 2 cups water (75°F)
- ½ cup active sourdough starter
- 1 tablespoon molasses plus several tablespoons for boiling
- 6 ½ cups bread flour
- 1 ½ teaspoons fine sea salt
- coarse cornmeal for dusting
Instructions
- Whisk water, sourdough starter, and 17 grams of molasses in a medium sized bowl until combined.
- In a separate large bowl, combine bread flour and salt. Pour the wet ingredients into the flour and combine using your hands or a bowl scraper, just until a shaggy dough forms.
- On a clean, un-floured surface, remove the dough from the bowl. Begin kneading the dough by hand for a full 15 minutes (don’t cut this time short). You'll know the dough is done kneading when it is flexible and bouncy to the touch. To check that you've kneaded long enough, grab a piece of dough between your fingers, stretch it, and see the web fibers that have developed. You should be able to pull the dough thin enough that light shines through. If your dough rips as soon as you start pulling, you need to keep kneading the dough. You want the dough to be able to stretch rather than tear.
- Place the dough in a clean glass bowl and cover with plastic wrap. Allow the dough to rise in a warm area until it’s doubled in size, about 7-8 hours. The time it takes to double in size can vary depending on the climate and temperature of your house.
- While the dough is rising, prepare two baking sheets generously sprinkled with cornmeal. Set aside.
- Gently punch down the risen dough a few times to release some of the gas that formed. On a clean, un-floured surface, remove the dough from the bowl. Using a bench scraper, divide the dough into pieces weighing about 107g each.
- Working with one piece of dough at a time, and keeping the others covered with a tea towel, roll the dough into a ball. Push through the center of the ball using both thumbs to make a hole. Then, continue to stretch the bagel out until it reaches about 4 inches (10 cm) across. Be sure not to flatten the bagel too much throughout this process. Place completed bagels about 2 inches (5 cm) apart on the previously prepared baking sheets, and cover with plastic wrap. Repeat until all pieces of the dough have been shaped.
- Securely cover the bagels with plastic wrap, so no air can get into the baking sheet. Allow dough to proof overnight in the refrigerator for 12–18 hours.
- Arrange the oven racks to the upper and lower thirds of the oven. Place a pizza stone on each of the racks, then heat oven to 450°F (230°C). Allow the oven and pizza stones to preheat for at least 30 minutes.
- Fill a large pot or dutch oven about halfway full with water. Place over high heat to boil. Once the water is at a rolling boil, add in molasses, a tablespoon at a time, until the water is dark brown.
- Remove the bagels from the refrigerator. They will have puffed up slightly overnight. Gently, place as many bagels into the boiling water as will comfortably fit without over crowding the pot or dutch oven. Allow the bagels to boil for 30 seconds on the first side, then flip, and boil for an additional 30 seconds on the second side. Using a slotted spoon, remove the bagel from the boiling water and place on a wire rack to cool. Repeat until all of the bagels have been boiled.
- Carefully, remove the hot baking stones from the oven. Transfer the cornmeal from the original baking sheets to the hot pizza stone to prevent sticking. Place bagels on the stone about 2 inches apart. Bake for 22 - 25 minutes, rotating shelves halfway through until bagels are deeply browned and shiny on top. Keep an eye on your bagels (without opening the oven door) to ensure they're not getting too dark. Remove from the oven, and let cool completely on a wire rack.
Notes
-
- Day 1 - 10:00 pm: Feed sourdough starter.
-
- Day 2 - 8:00 am: Mix bagel dough. Then, cover and allow to rise in a warm area until doubled in size, about 7 - 8 hours. The time it takes to double in size can vary depending on the climate and temperature of your house.
-
- Day 2 - 4:00 pm: Divide and shape bagel dough. Cover and allow the dough to proof overnight in the refrigerator for 12 - 18 hours.
-
- Day 3 - 8:00 am: Preheat the oven and baking stone. Boil the bagels.
-
- Day 3 - 8:30 am: Cook and cool the bagels.
- Everything seasoning: Use ¾ cup (126 grams) of everything seasoning blend. Immediately after the bagel has been removed from the water, gently dunk the top of the bagel into the everything seasoning.
- Sesame seeds: Use ¾ cup (96 grams) of sesame seeds. Immediately after the bagel has been removed from the water, gently dunk the top of the bagel into the sesame seeds.
- Poppy seeds: Use ¾ cup (84 grams) of poppy seeds. Immediately after the bagel has been removed from the water, gently dunk the top of the bagel into the poppy seeds.
- Sea salt flakes: Use 3 teaspoons (9 grams) of Maldon flakey sea salt. Immediately after the bagel has been removed from the water, gently dunk the top of the bagel into the Maldon flakey sea salt.
- Za'atar seasoning: Use ¾ cup (78 grams) za'atar seasoning. Immediately after the bagel has been removed from the water, gently dunk the top of the bagel into the za'atar seasoning.
- Cheddar cheese: Use 1 ½ cups (384 grams) finely shredded cheddar cheese. Immediately after the bagel has been removed from the water, top the bagel with 2 tablespoons (16 grams) of shredded cheddar cheese.
- Asiago cheese: Use 1 ½ cups (312 grams) finely shredded Asiago cheese. Immediately after the bagel has been removed from the water, top the bagel with 2 tablespoons (13 grams) of shredded Asiago cheese.
- Oatmeal: Use ¾ cup (108 grams) old fashioned oats. Immediately after the bagel has been removed from the water, gently dunk the top of the bagel into the oats.
- Cinnamon and sugar: Mix ½ cup (107 grams) firmly packed dark brown sugar, 6 tablespoons (45 grams) bread flour, 3 tablespoons (37 grams) granulated sugar, 3 tablespoons (42 grams) melted unsalted butter, and 3 teaspoons (8 grams) ground cinnamon in a small mixing bowl until combined. In a separate bowl, whisk 1 large (50 grams) egg and 1 tablespoon (14 grams) of water to make an egg wash. Immediately after the bagel has been removed from the water, brush the bagel with egg wash and top with cinnamon sugar mixture (about 1 tablespoon or 15 ml).
Nutrition
Learn More About Making Bagels
If you're interested in learning more about the science and practice that goes into making really delicious bagels, check out these articles:
- I really enjoyed reading this article from the Institute of Culinary Education on '10 Tips for Making Schmear-Worthy Homemade Bagels.'
- An interview with Daniela Moreira on how to make better bagels at home. Super interesting and an easy read!
- Another good article on the secrets of bagel making.


Meg
I have made these twice and both times turned out perfect... This will now be my go to recipe for rolls...I want to add more sugar to make a sweet dough for cinnamons rolls next... The texture of these rolls are so tender... I can not wait!!
Jessica Mode
Meg - so glad to hear you love this recipe! Cinnamon roll bagels so amazing - I can't wait to see how they turn out 🙂
Vincent
I just finished making these and they are so flavorful and delicious! This is the perfect use for my sourdough. Can't wait to make these again next weekend.
Areli García Zaldívar
Ok but how good is this recipe?!
It’s 100% worth the time invested.
Super easy to follow
Jessica Mode
Areli - I'm so glad you loved the recipe 🙂