
Highlight the flavor of apples with this simplified cinnamon apple pie recipe. It uses an all-butter pie crust (filled with tons of flaky layers), along with Honeycrisp and Granny Smith apples and the perfect touch of cinnamon and brown sugar.
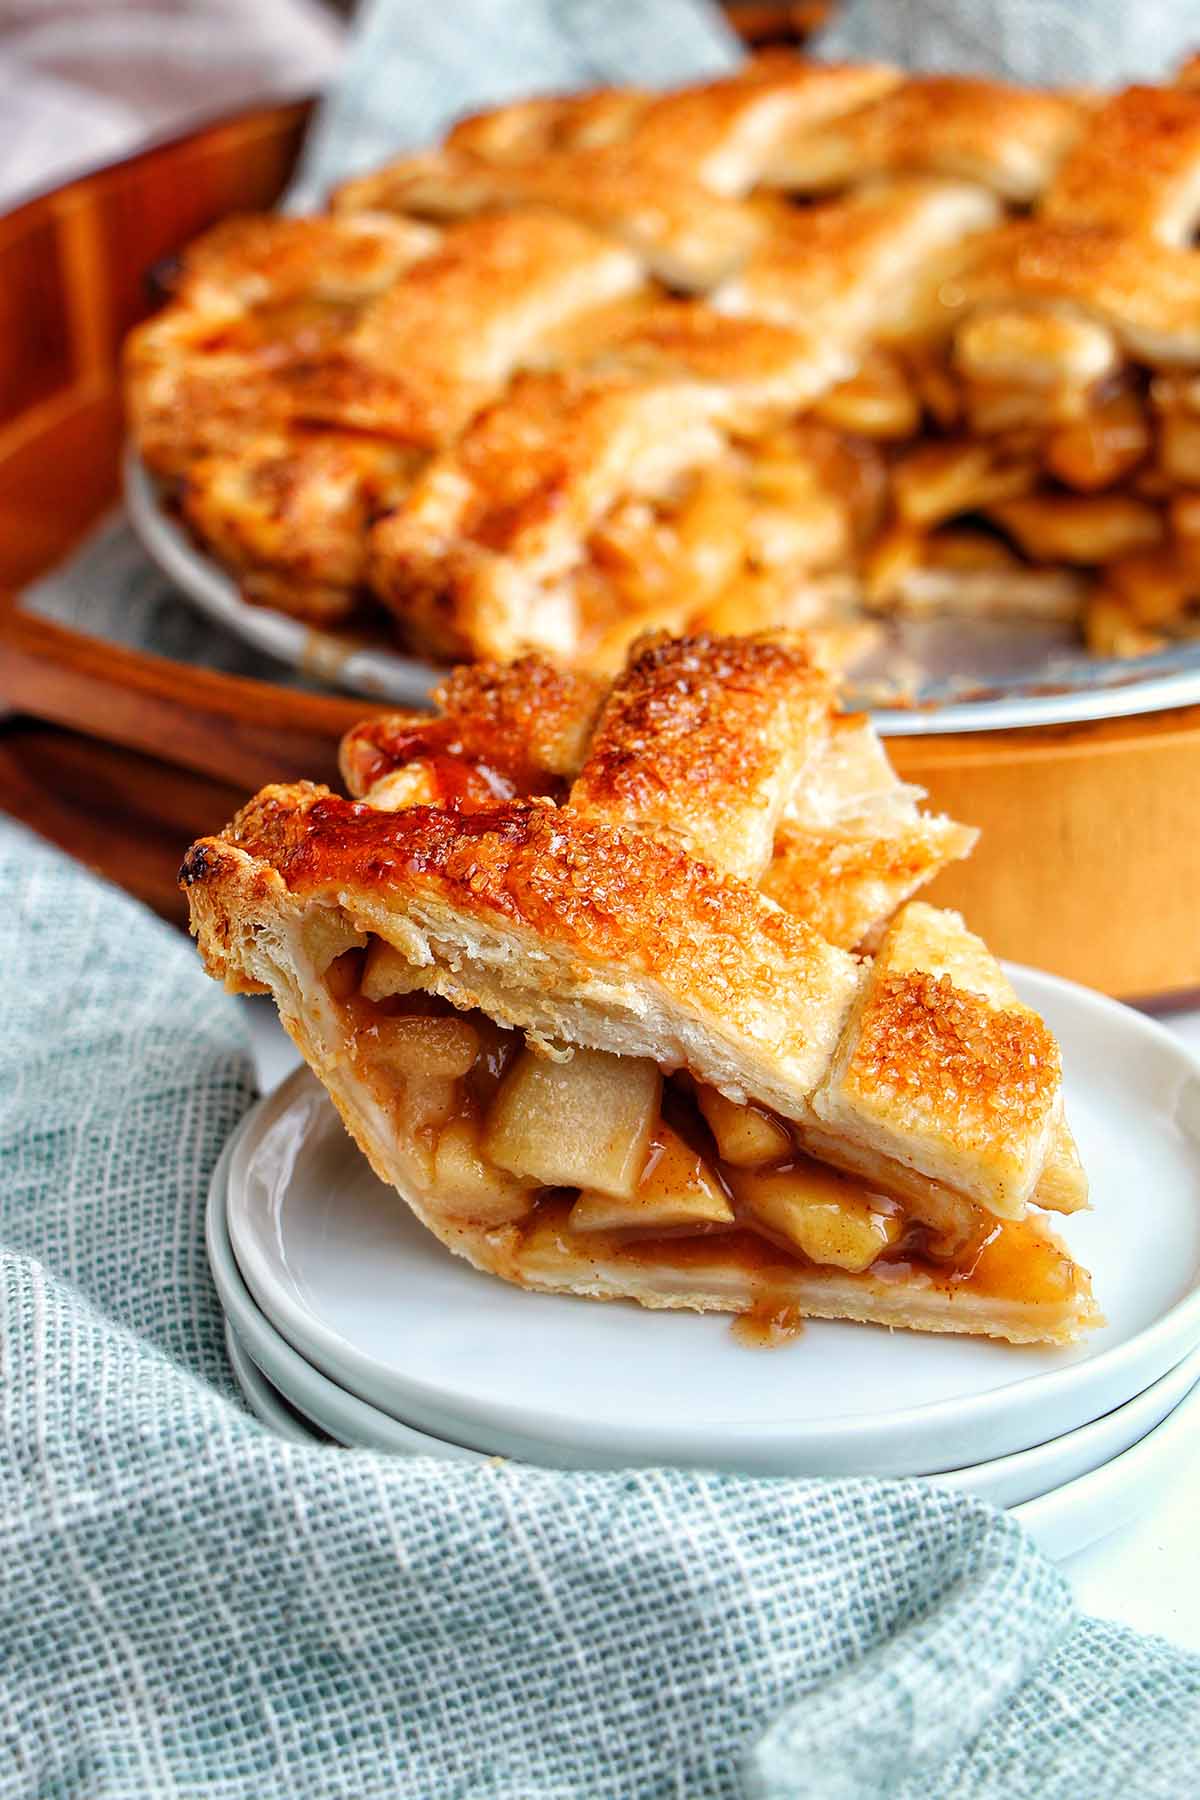
Quick Look: Cinnamon Apple Pie
- Servings: 8 servings (one 9 inch or 23 cm pie)
- Kitchen Timing: About 1 hour of active time in the kitchen, but 5 hours 29 minutes with chilling and baking
- Flavor Profile: Sweet, tart, and filled with cinnamon notes
- Leftover Tips: Reheat any leftovers in an oven until warmed through and the crust is crispy.
- Skill Level: Intermediate
- What You'll Learn: How to make the flakiest all-butter pie dough and from-scratch apple pie filling.
- Why You'll Love This Recipe: You'll finally understand the technique for making pie crust by hand and tips to make a super flavorful apple pie from scratch.
SUMMARIZE AND SAVE THIS POST ON
If you're ready to finally master apple pie from scratch, this is the recipe for you! After attending Italian culinary school, I became obsessed with mastering techniques in the kitchen that make me a better chef.
That's exactly what this recipe will help you with! You'll be able to master pie dough from scratch, which will allow you to make everything from apple hand pies to quiche, tarts, and galettes.
You'll also learn some really important techniques for creating Thanksgiving and holiday pies. As you're learning, you can always leave a comment below if you need help.
I've got other recipes like mini cranberry pies and sweet potato pocket pies, if you want to keep growing your baking skills.
Ingredients You Need
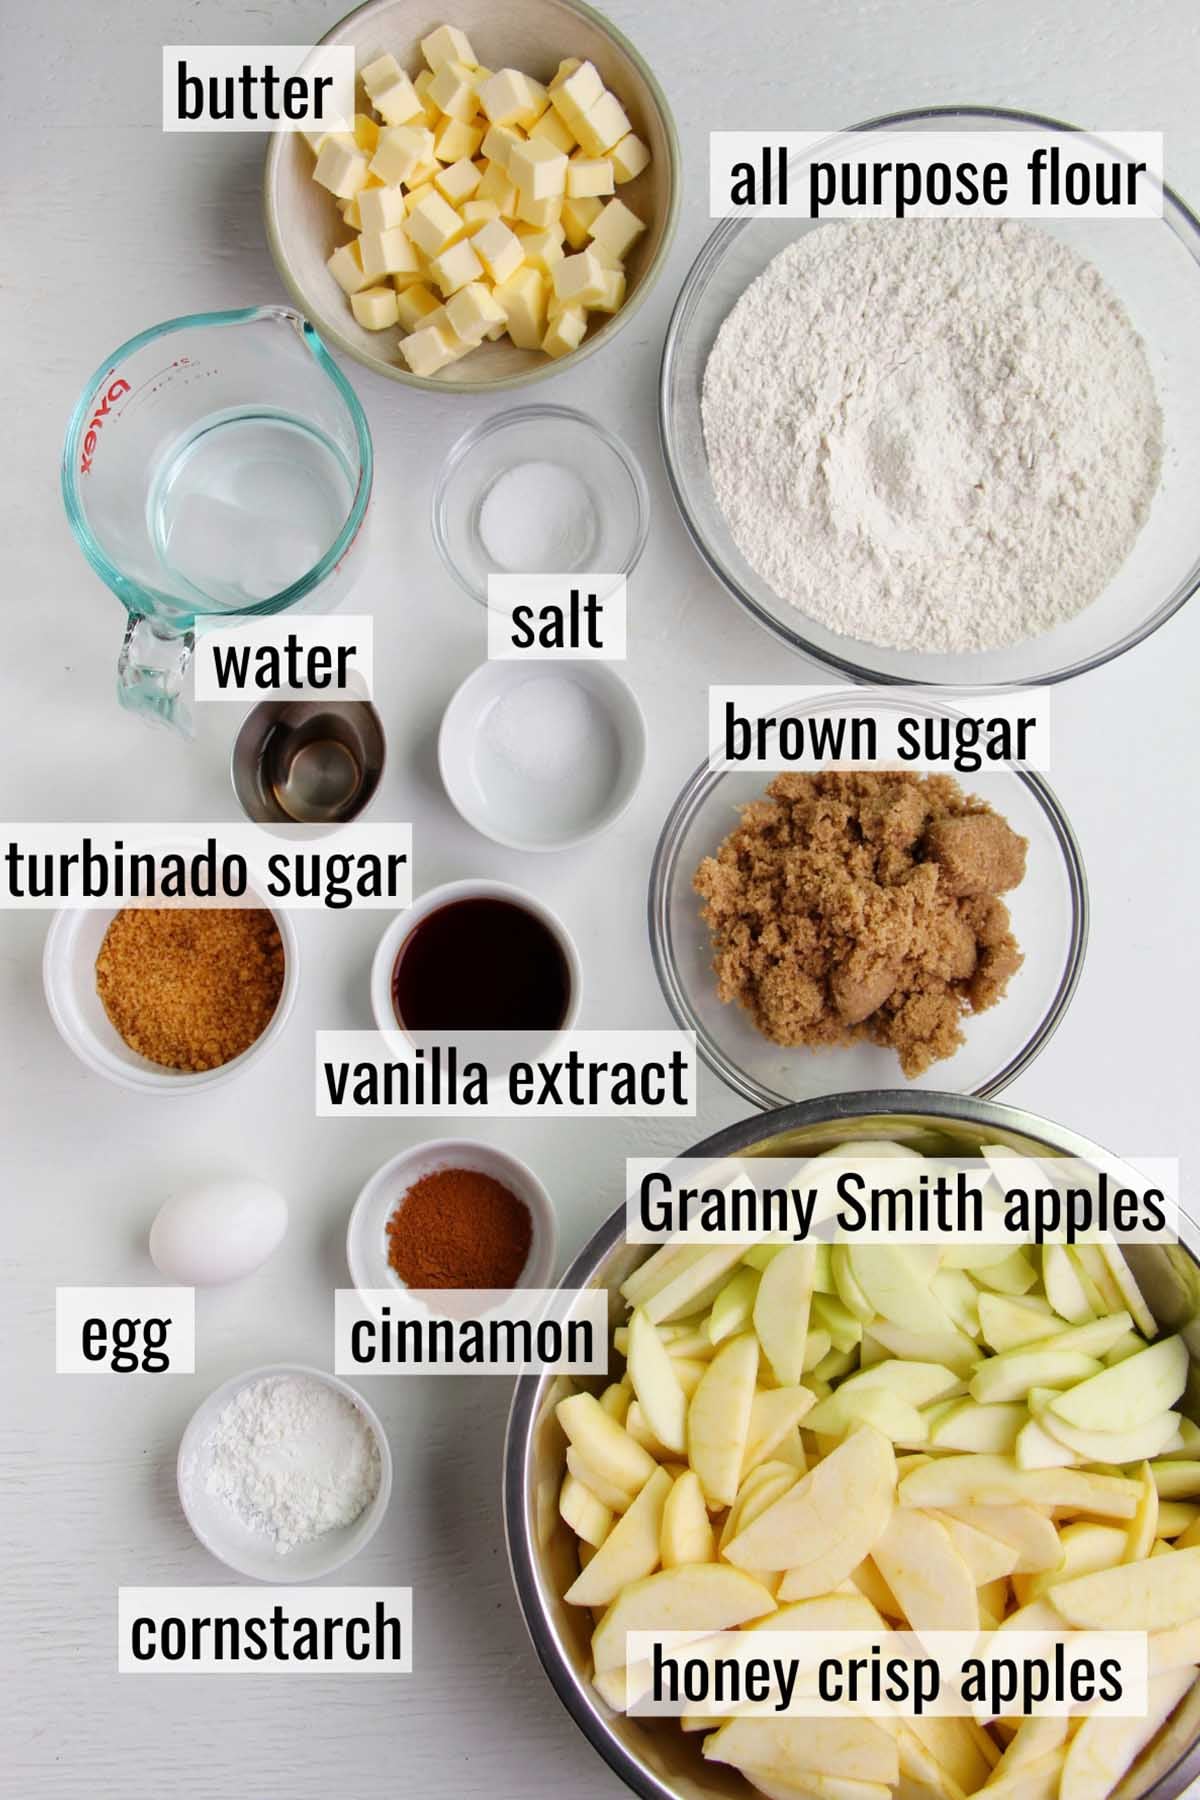
- All purpose flour
- Unsalted butter: Make sure to keep the butter super cold until you're ready to make the pie crust. You'll need to cut it into ½ inch (1 cm) pieces.
- Cold water: Since the key to pie crust is keeping everything nice and cold, I like to add a few ice cubes to my water. Don't add these to the pie dough.
- Apples: The combo of Granny Smith and Honeycrisp apples adds the perfect balance of tart and sweet.
- Light brown sugar
- Vanilla extract
- Ground cinnamon: While this recipe only uses cinnamon, if you'd like to add additional fall spices (like a more classic apple pie), see the recipe notes below.
- Fine sea salt
- Cornstarch: An important ingredient used to thicken the apple pie filling.
- Egg: We'll mix this with some water to create an egg wash.
- Turbinado sugar: This is often referred to as sugar in the raw or turbinado cane sugar. It makes a great crunchy crust.
Check out the recipe card below for a full list of ingredients and exact measurements.
How To Make Cinnamon Apple Pie
Pie Crust
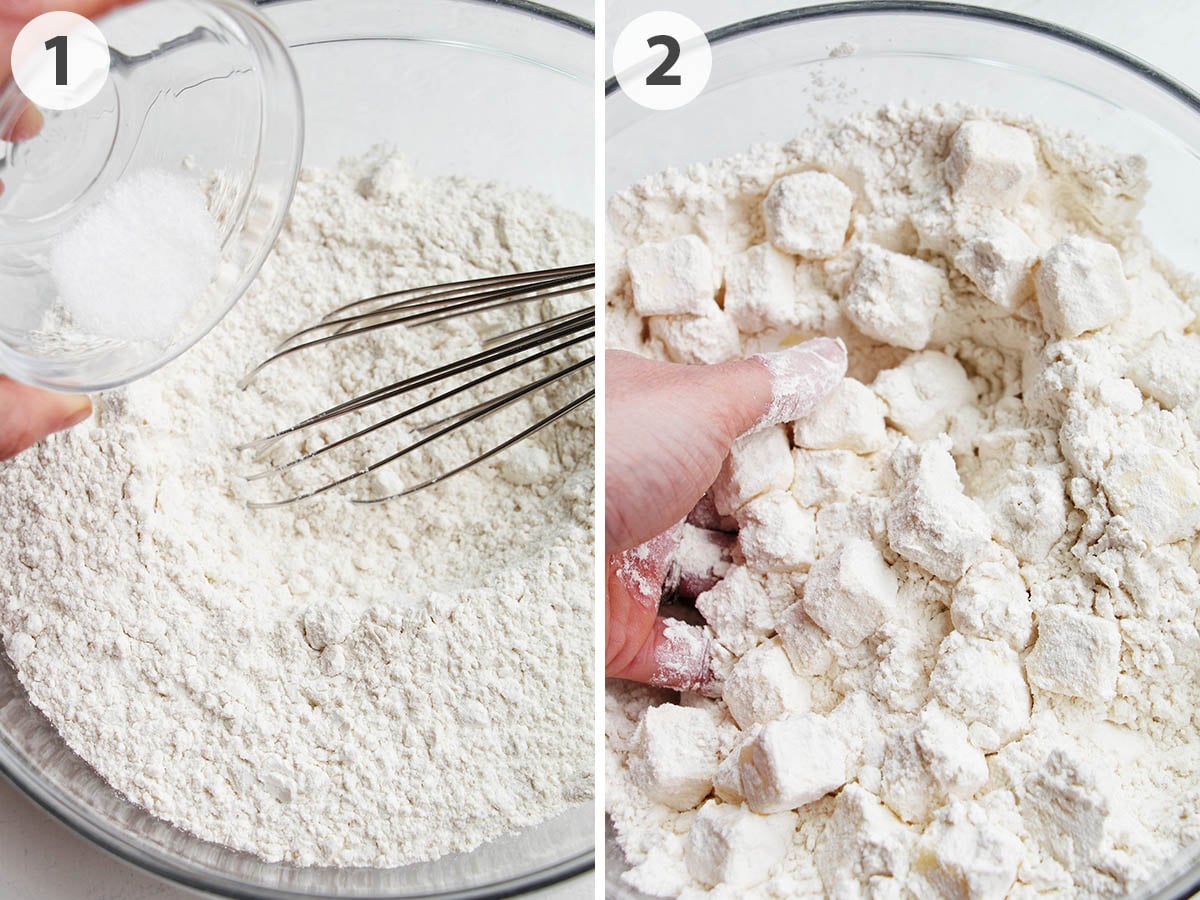
Step 1: To start, whisk the flour and salt together.
Step 2: Toss the butter in the flour until it's well coated. This step helps to minimize gluten formation (which can cause a tough crust).
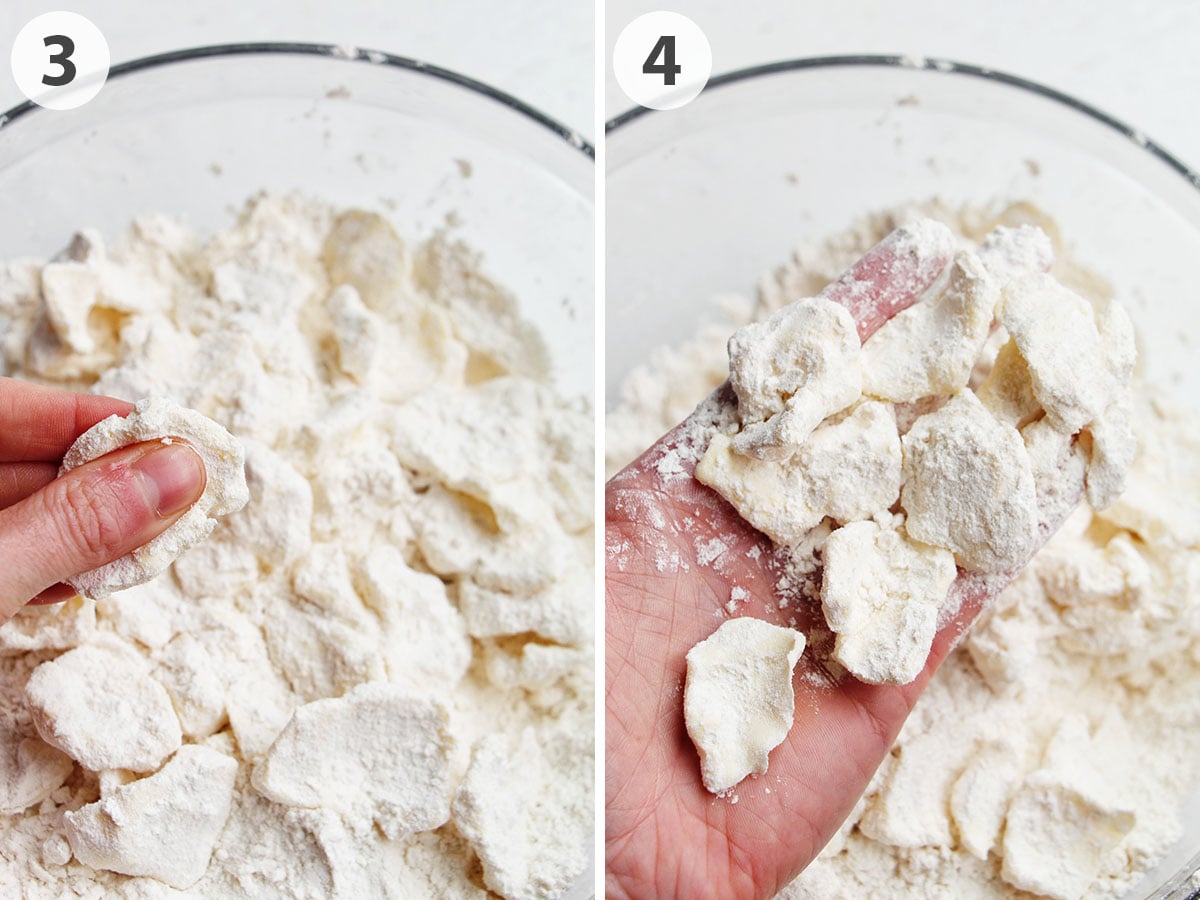
Step 3: With clean hands, flatten each piece of butter with your fingers. Don't worry too much about the specific size of the butter. Some pieces may break, while others will stay very large.
Step 4: Once all the butter is flattened, ensure they are all coated in flour.
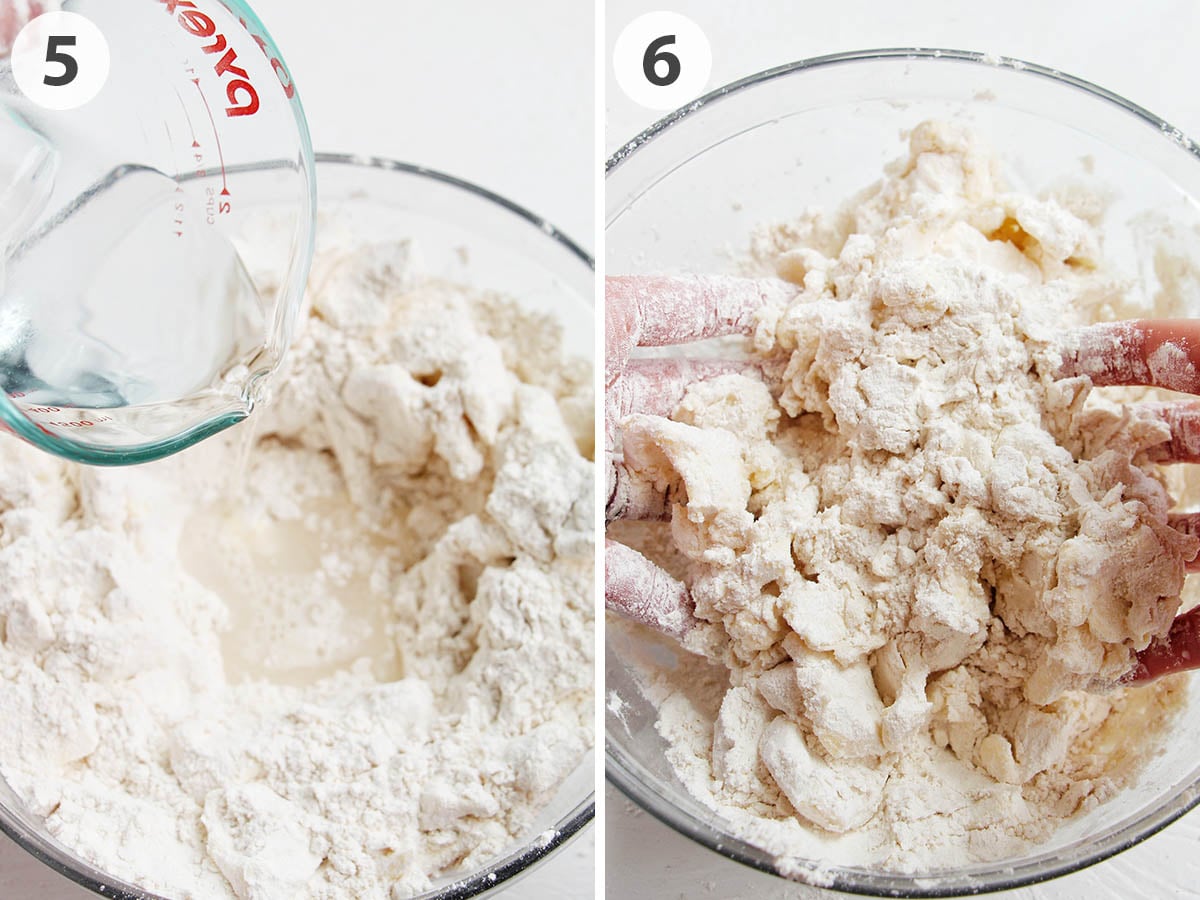
Step 5: Make a well, then add in ½ cup (114 grams) of water (but not any of the ice cubes).
Step 6: Use your fingers to gently toss the dough together. The goal here is to help the flour absorb the water without kneading the dough.
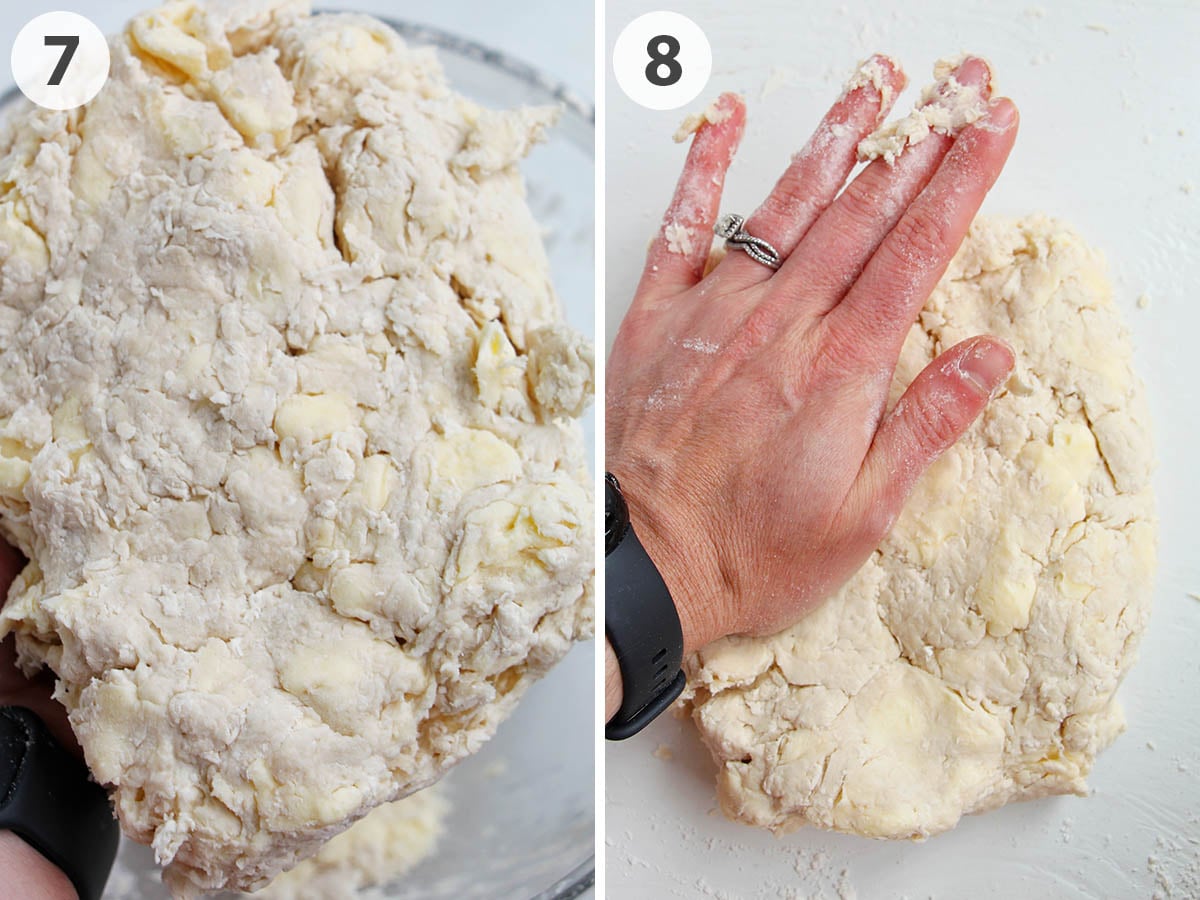
Step 7: Next, we'll need to check if more water is needed for the dough. Most likely, the answer is yes. To test, press the dough together and see how easily it sticks. If you notice it doesn't stay together well, or there are still large pockets of flour, you'll want to add additional water. Pour in only 1 tablespoon (14 grams) of water at a time until you notice the dough easily holds together. Be careful not to make the dough too sticky or wet.
Step 8: Pour the dough onto the counter and use your hand to pat in any excess flour. Shape it into a rectangle, then seal with plastic wrap. Before moving to the next step, allow the dough to chill for 30 - 60 minutes in the fridge until it has solidified.
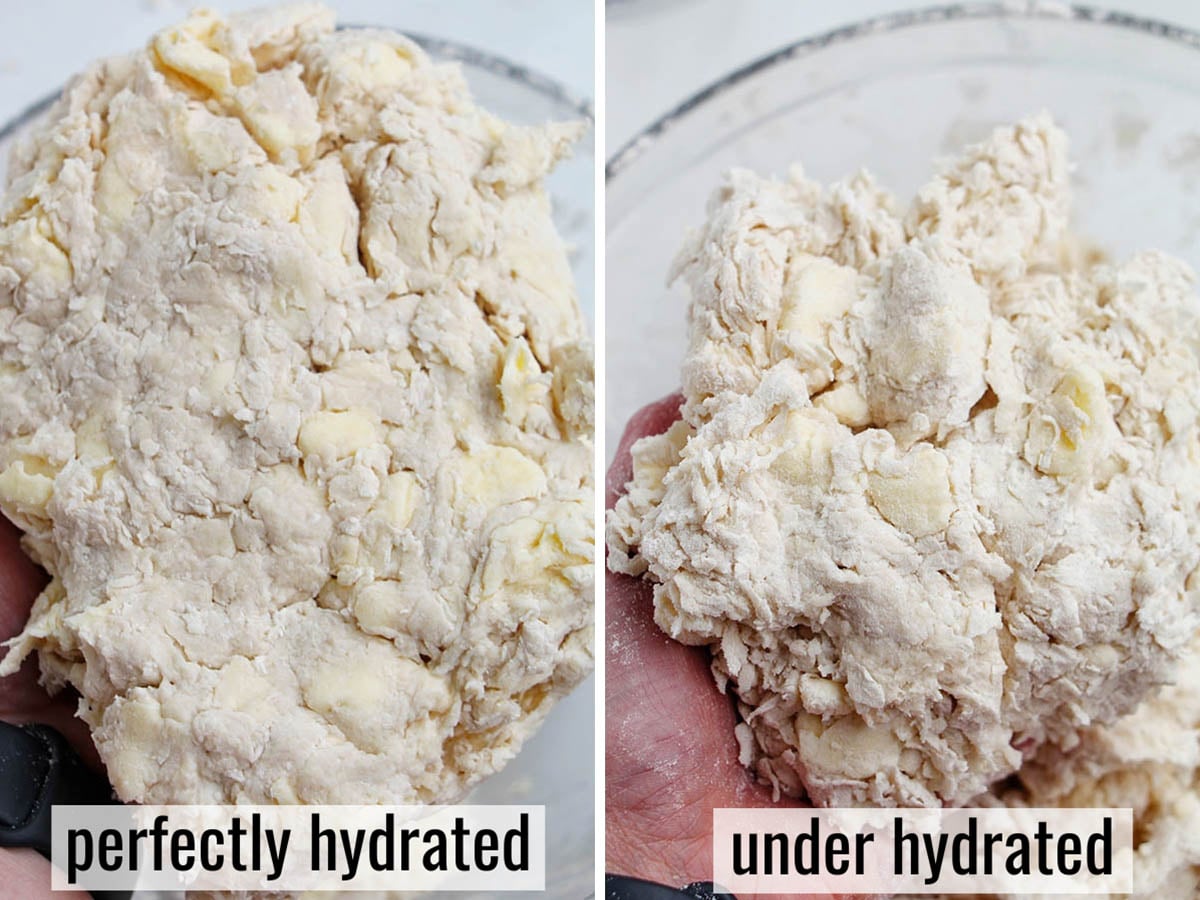
In order to understand what the pie dough should look like once you've added enough water, here's an example. You'll notice the under-hydrated dough still has pockets that look dry.
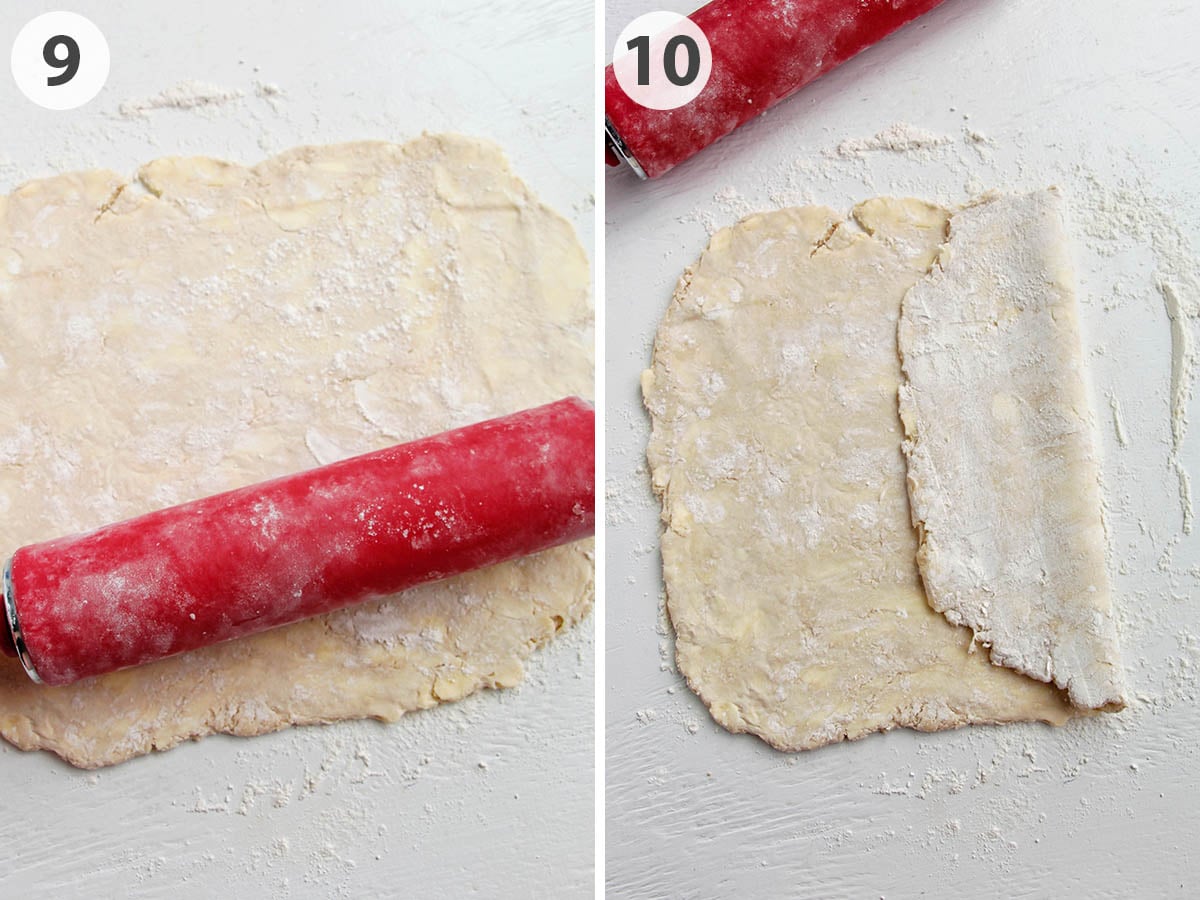
Step 9: This next step, called lamination, is important, as it prevents the butter from leaking from the pie dough. On a lightly floured surface, roll the dough until it's a large rectangle, about ¼ inch (6 mm) thick.
Step 10: Fold one side of the dough to the middle. I like using a bench scraper to help me with this step.
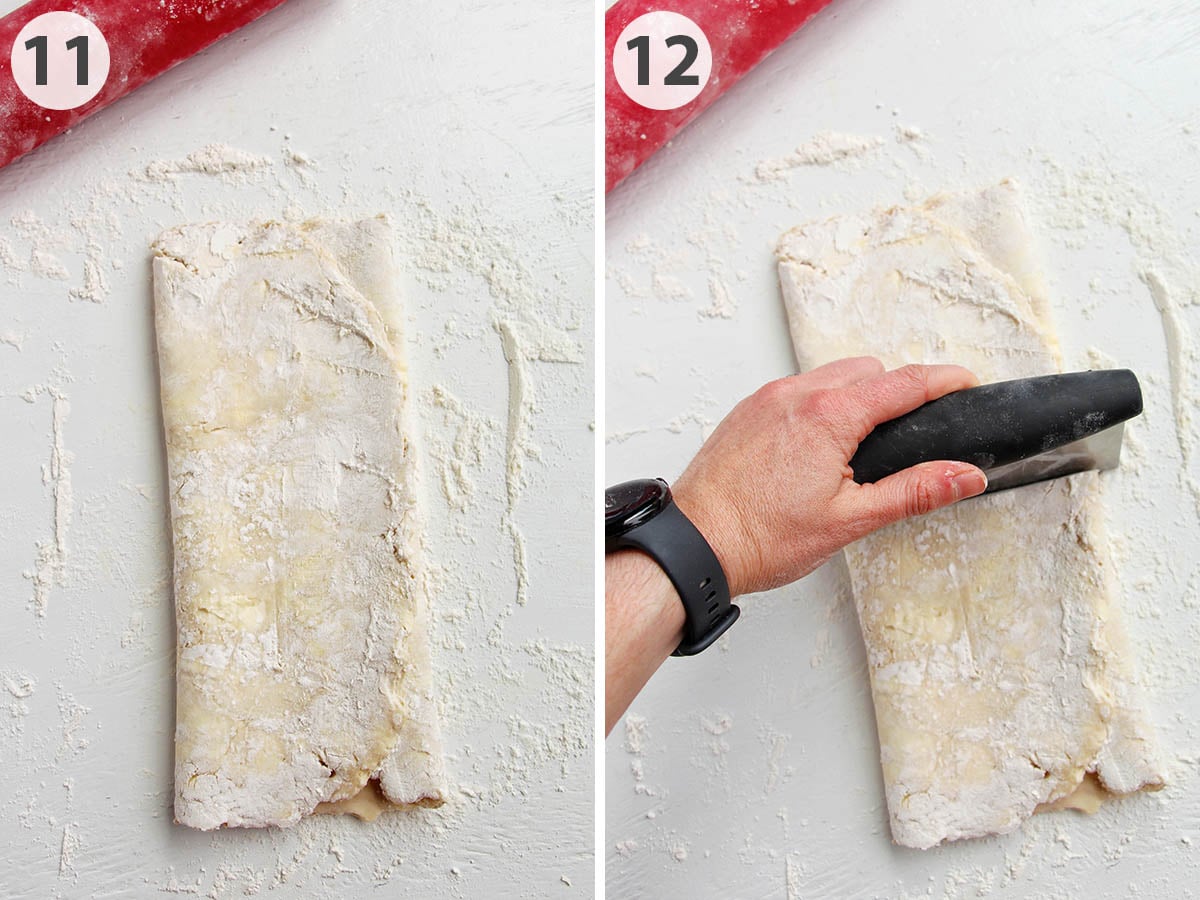
Step 11: Then finish folding the dough in thirds by flipping and overlapping the left side of the dough on top.
Step 12: Cut the dough in half.
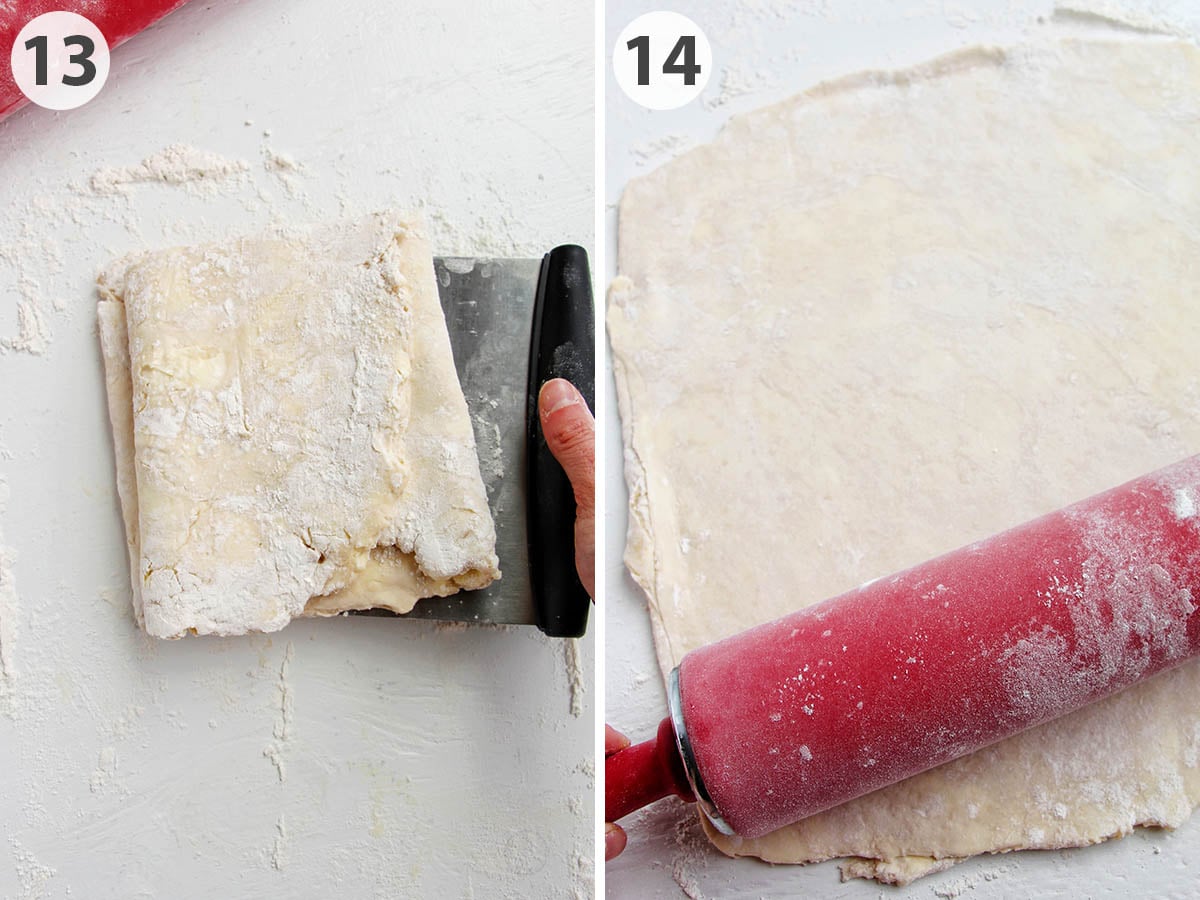
Step 13: Place the two smaller rectangles of dough on top of each other.
Step 14: We'll repeat this same lamination process one more time. If you notice the dough sticking to the counter, you can add a little more flour.
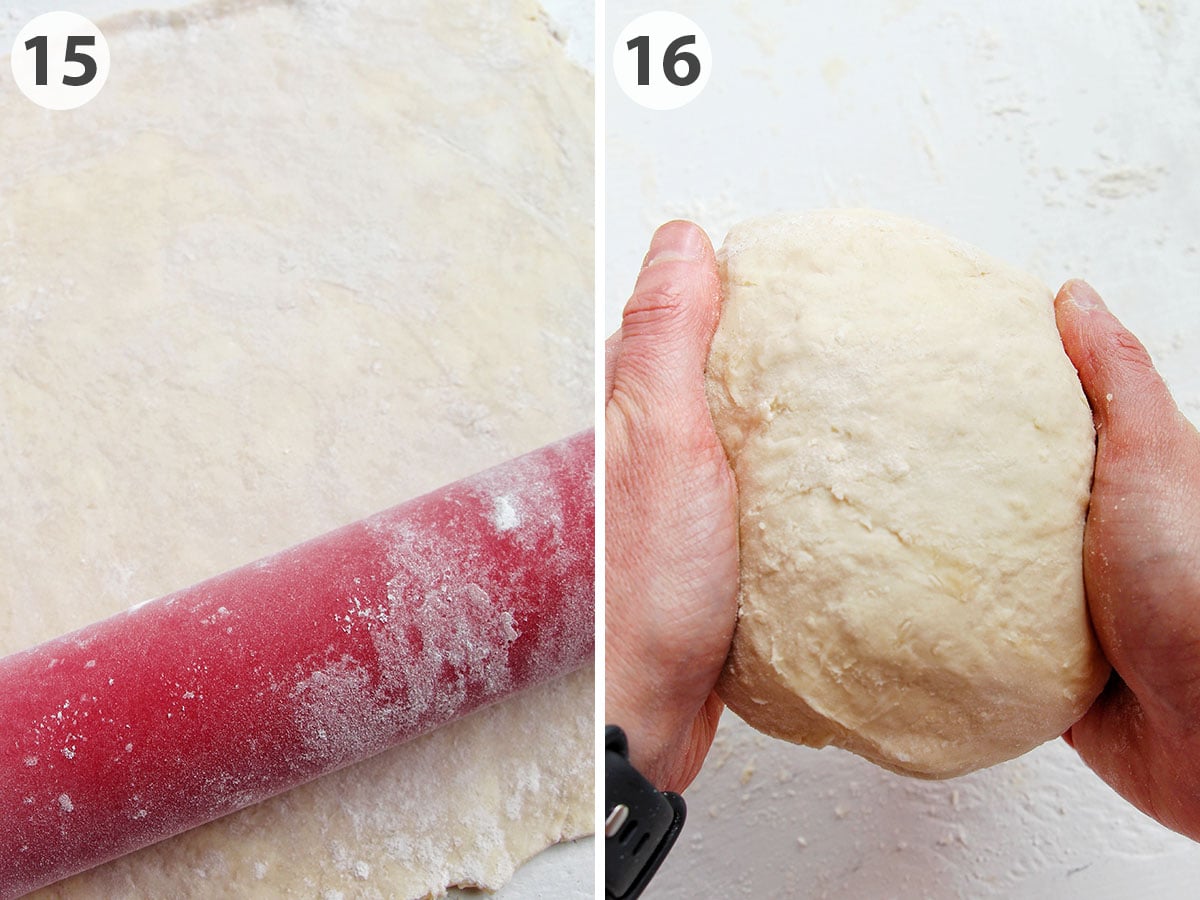
Step 15: Once you finish lamination, the butter should be evenly distributed within the dough.
Step 16: From here, cut the dough in half and shape each piece into a circle. I like to make one half slightly larger, since the bottom crust often needs a little more dough. Tightly wrap them in plastic wrap, then rest them in the fridge for at least 1 hour or overnight, until the butter has fully chilled.
Apple Pie Filling
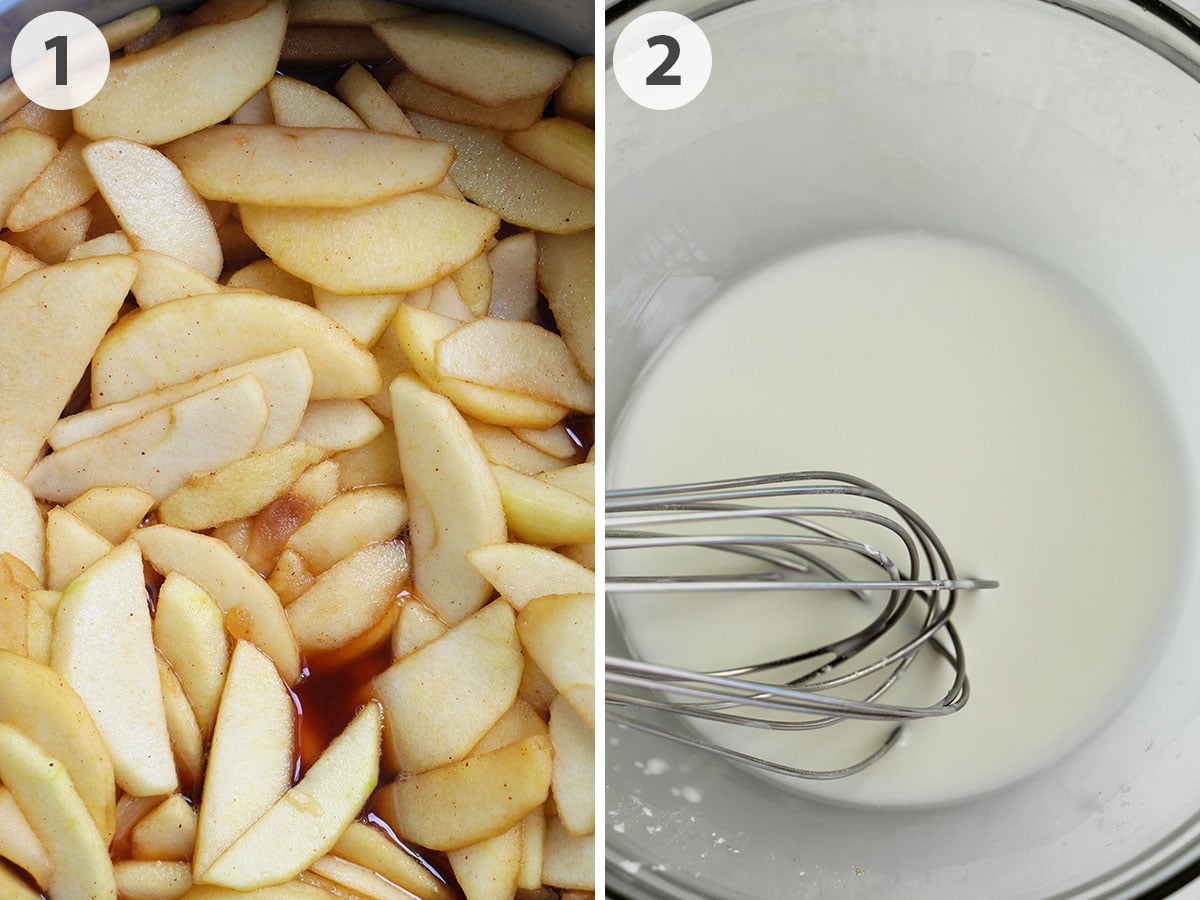
Step 1: For the apple pie filling, add the apples, brown sugar, vanilla extract, cinnamon, and salt in a large saucepan. Cook everything together for about 15 minutes over medium heat until the apples become tender.
Step 2: Next, whisk cornstarch and water together to create a slurry. Add it to the apple mixture and cook for an additional 2 - 4 minutes until the filling has thickened. Allow the filling to fully cool before moving on to the next step.
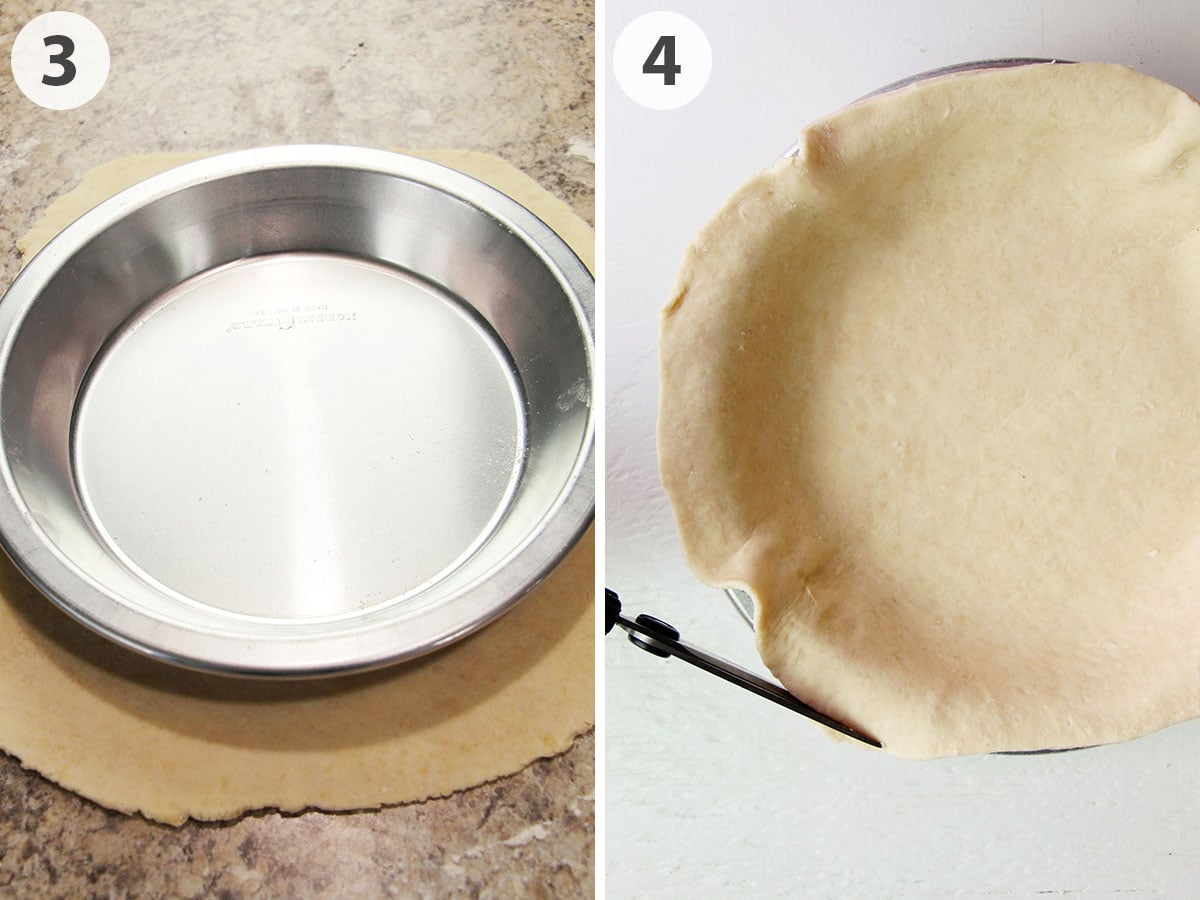
Step 3: Once the filling has cooled, it's time to start assembling. Grab the larger piece of pie dough and begin rolling it out on a floured work surface. You'll want to roll until it's slightly larger than your pie dish and ¼ inch (6mm) - ⅛ inch (3mm) thick.
Step 4: Once it's large enough, transfer to the pie plate. I always recommend using a metal pie dish as it results in the most evenly cooked pie. And most importantly, no soggy crust. Take some kitchen scissors or a sharp paring knife and trim off any excess dough, leaving about ½ inch (1- 2 cm) of overhang.
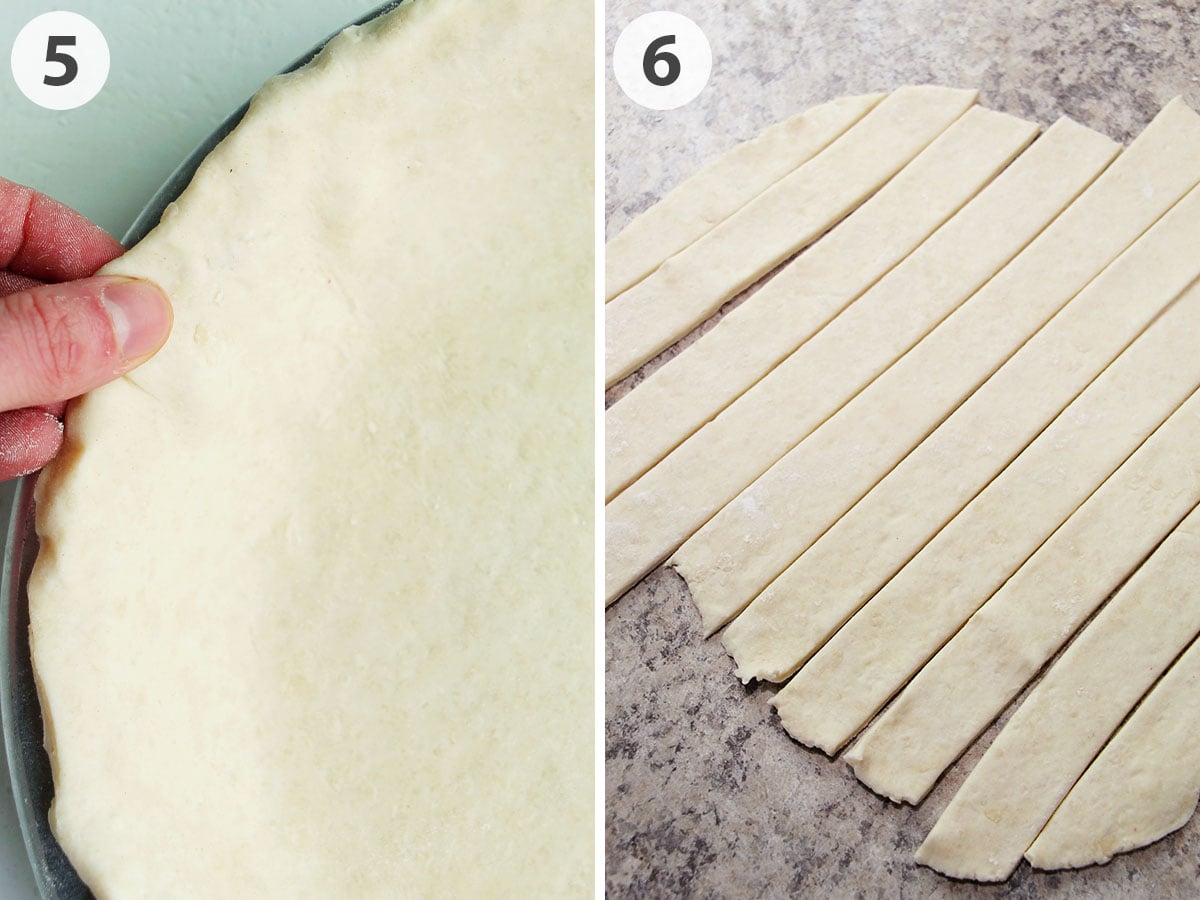
Step 5: Fold the ends of the crust underneath itself and press them together. This will give you a crust that's even with the edge of the pie plate. I like to loosely cover the crust with plastic wrap and keep it chilling in the fridge while I work on the top crust.
Step 6: Grab the other piece of pie dough and roll it out in a circle a little larger than the pie plate, exactly like the last piece. We'll need to make 8 total lattice pieces. I like to use a pastry wheel or pizza cutter to cut 1 inch (3 cm) strips of dough.
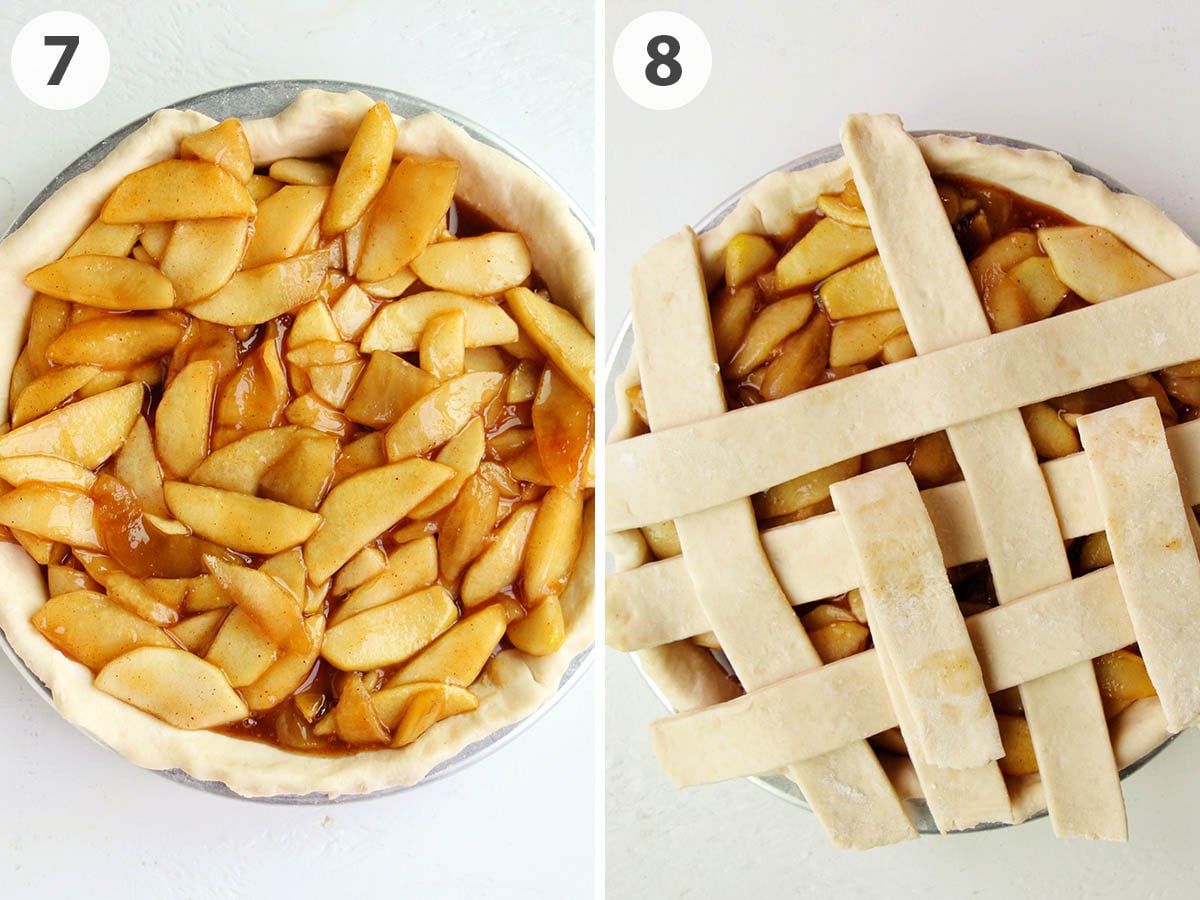
Step 7: Add the cooled apple pie filling into the bottom crust.
Step 8: To create the over-and-under lattice pattern, fold every other vertical strip of dough back halfway. Lay a horizontal strip across the pie, then fold the vertical strips back down over it. Use the long pieces for the middle of the pie, and the shorter pieces for the ends of the pie.
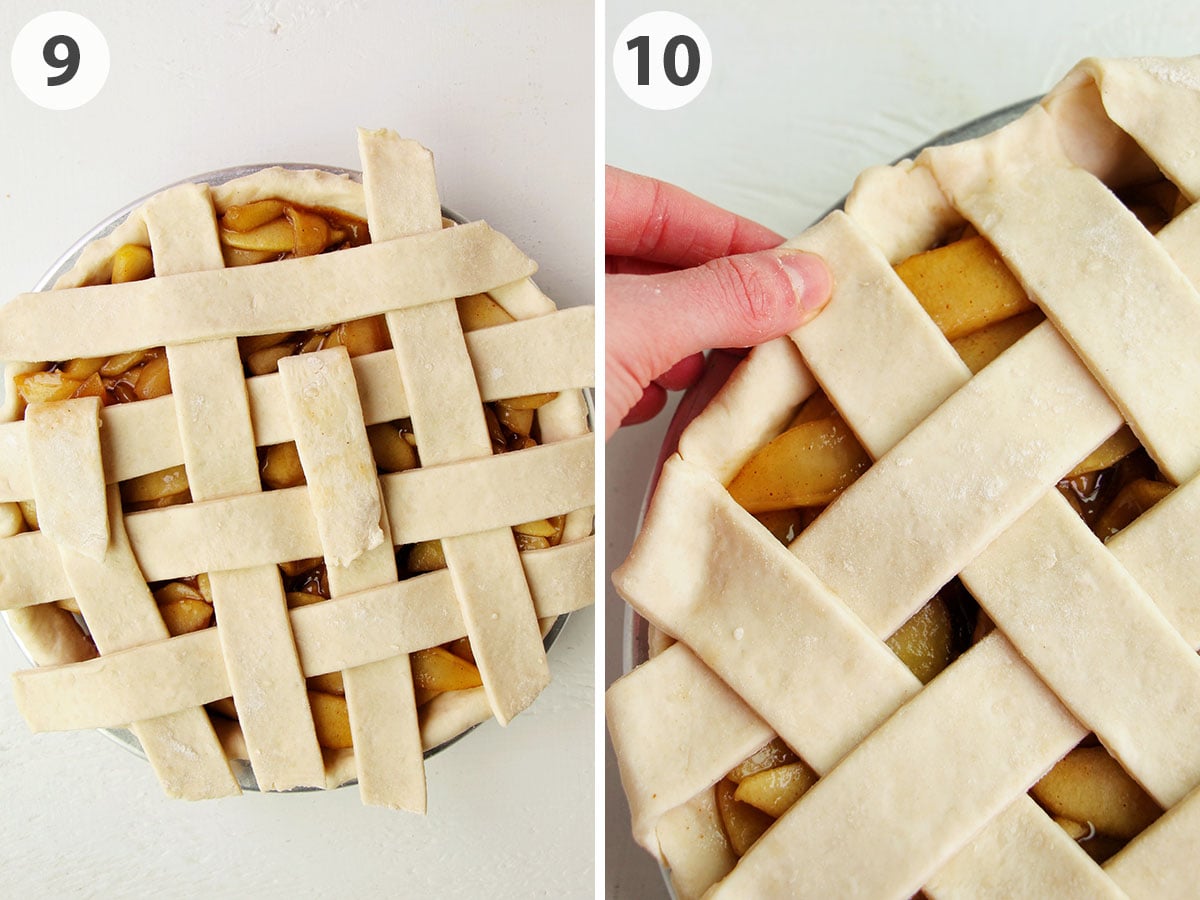
Step 9: Next, fold up the remaining vertical strips, lay another horizontal strip across, and fold them back down. Repeat this process, alternating which vertical strips you fold back each time, until the entire pie is covered.
Step 10: Trim any excess dough so they line up with the pie plate and crimp the edges to seal.
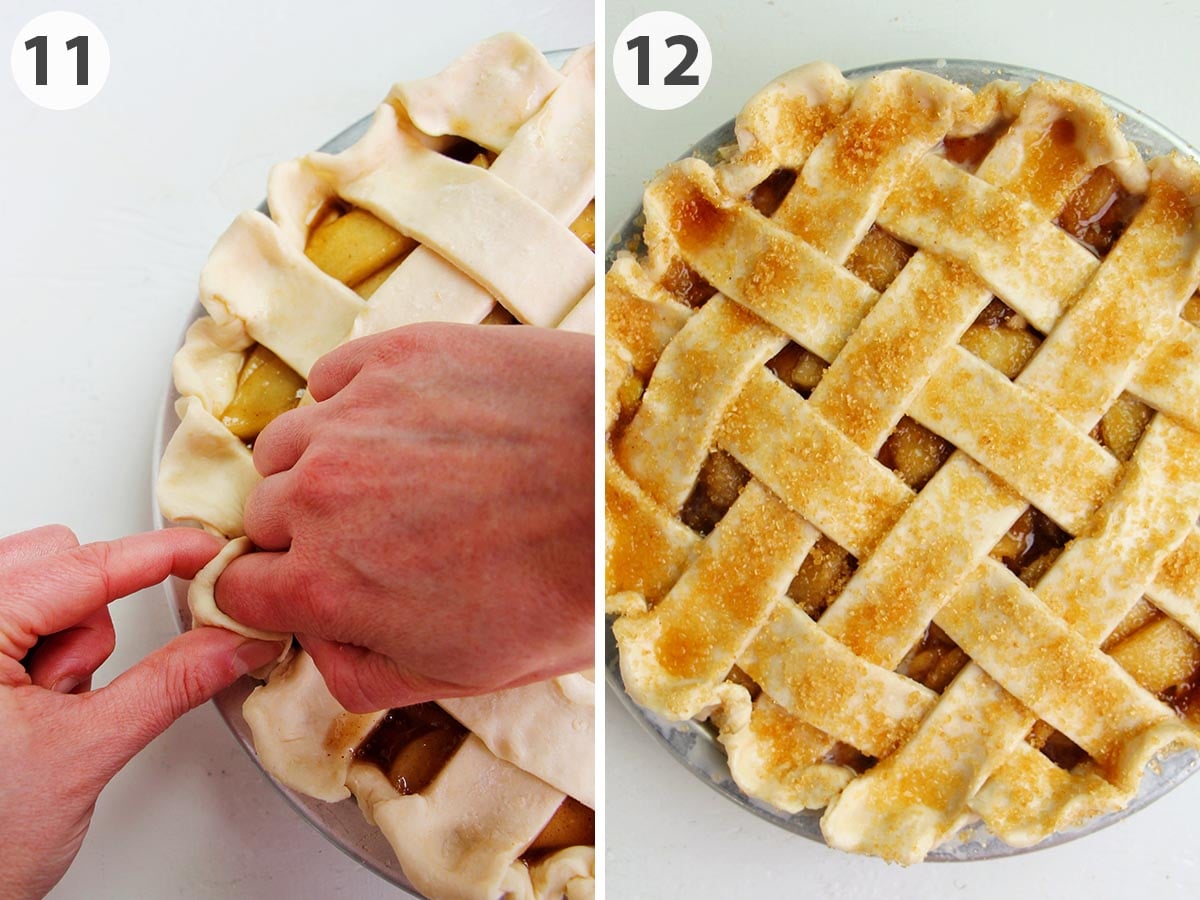
Step 11: For a beautiful presentation, I like to make fluted edges. Use your knuckle to gently push the dough from the inside toward the outside, pressing it right between the thumb and index finger to form a distinct V shape.
Step 12: Allow the dough to chill in the fridge for about 30 - 45 minutes while the oven is preheating. Then, you can egg wash the top and sprinkle with turbinado sugar before baking.
Jessica's Expert Tips
- I know it's tempting to cut the rest time short, but it's really important to allow the dough to properly chill in the fridge. This gives the gluten time to relax (which prevents shrinkage) and helps the butter to re-solidify.
- If there's one thing to remember when making pie, it's that you want to keep the ingredients cold at all times. When in doubt (if the dough feels warm), allow it to rest in the fridge. It's important to keep the butter super cold so it melts in the hot oven and creates steam. This is what pushes the layers of dough up and creates beautiful, flaky dough.
- Never put the apple filling into the pie dough while it's warm. This will cause the butter in your crust to melt. If you need to speed up the cooling time, check the recipe notes below for freezer instructions.
FAQs for Cinnamon Apple Pie
I've tested apple pie in metal, ceramic, and glass pie plates, and I'd always recommend using a metal pan (Nordic Ware is my preferred brand).
Ceramic and glass have a harder time fully baking the crust, often leaving you with a soggy bottom crust. This is because they don't conduct heat as well as an aluminum pan. You may need to increase the baking time once the pie is baking at 375°F (190°C) in order for the crust to fully bake and become crispy, if you decide to use a ceramic or glass pie plate.
If your pie dough isn't holding together well, you'll need to add additional water until everything sticks together. Slowly add in water (a tablespoon at a time) to any pockets of flour. Remember, the flour will continue to hydrate with the water as it chills in the fridge, so don't overdo this.
If you're noticing that the pie dough is wet and sticks to the counter, you can slowly add in more flour as you're rolling out the dough. Dust the counter with a heavy hand of flour, then allow the pie dough to absorb it as you're rolling it out.
If it's just cracking a little as you're rolling out the dough, this is very normal. If you see large cracks that aren't holding together, this is likely an indicator that you didn't add enough water. To fix this, add in a few more drops of water (dunk your hand in water, and flick tiny drops onto the pie dough), then fold the dough over on itself to cover the water and use the heel of your hand to help gently knead and hydrate the dough.
More Pie Recipes
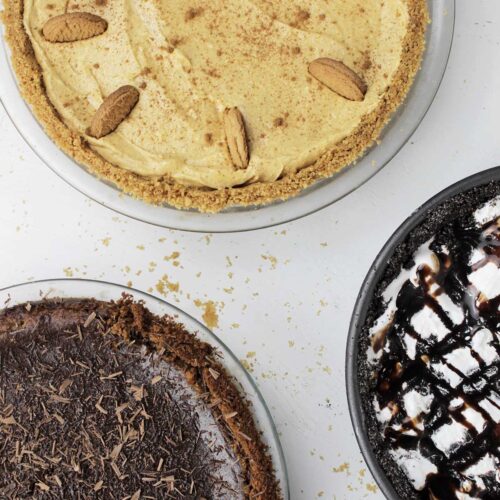
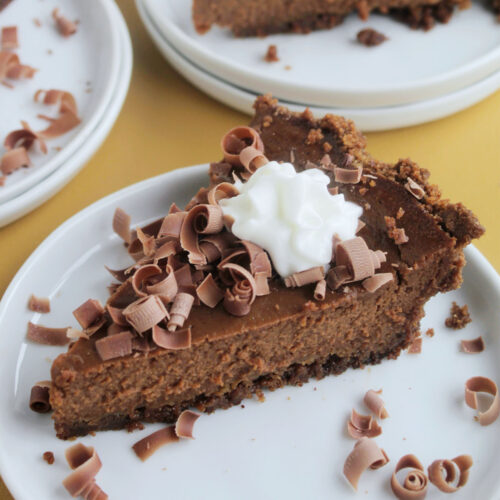
Love this recipe? Please leave a 5-star ⭐⭐⭐⭐⭐ rating in the recipe card below. Have questions as you're cooking? Leave a comment below, and I'll help!

Cinnamon Apple Pie
Equipment
- bench scraper
- Rolling Pin
- 9 inch (23 cm) aluminum metal pie plate
- kitchen scissors or sharp paring knife
- large saucepan
- wooden spoon
- wheel pastry cutter or pizza wheel cutter
- light colored baking sheet
- aluminum foil (as needed)
- wire cooling rack
Ingredients
Pie Crust
- 3 ¼ cups all purpose flour
- ½ teaspoon fine sea salt
- 1 cup (2 sticks) cold unsalted butter cut into ½ inch (1 cm) pieces
- ½ cup cold water plus more as needed (add a few ice cubes to keep the water cold)
Apple Filling
- 5 medium Granny Smith apples peeled, cored, thinly sliced into ¼ inch (7mm) pieces (about 6 cups)
- 5 medium Honeycrisp apples peeled, cored, thinly sliced into ¼ inch (7mm) pieces (about 6 cups)
- 1 cup firmly packed light brown sugar
- 2 tablespoons vanilla extract
- 2 teaspoons ground cinnamon
- ½ teaspoon fine sea salt
- 2 tablespoons water
- 2 tablespoons cornstarch
- 1 large egg
- turbinado sugar for garnish
Instructions
For Pie Crust
- Add flour and salt to a large mixing bowl and whisk to combine. Add cold, cubed butter and toss to coat each piece in flour.
- Using clean hands, work the butter and flour together by flattening the butter with your fingers. Once all the butter is flattened, ensure all pieces are coated in flour.
- Add ½ cup (114 grams) of water (no ice) to the flour and butter mixture and toss to combine. Push the dough together to check the hydration level. The dough should easily hold together, but not feel too wet or sticky. You'll need to add more water if the dough isn't holding together or you notice dry patches of flour. Add an additional 1 tablespoon (14 grams) of water at a time until no dry spots remain.
- Pour the dough onto a clean work surface. Pat any excess flour into the dough, then shape into a rectangle and tightly wrap with plastic wrap. Rest in the refrigerator for 30 minutes - 1 hour, until the dough has fully chilled.
- Lightly flour a clean work surface. Roll the dough out into a large rectangle, about ¼ inch (6 mm) thick. Fold the dough in thirds, bringing the right side of the dough to the middle then overlapping the left side of the dough on top. Cut the dough in half with a bench scraper or knife (so you have two smaller rectangles) and stack them on top of each other. Repeat this process one additional time, at which point the butter should be evenly laminated within the pie dough (no large chunks remaining). If at any point during this process you notice the crust sticking to the counter or the rolling pin, add a light dusting of flour. Cut the dough in half and shape each piece into a circle and tightly wrap with plastic wrap. Rest in the refrigerator for at least 1 hour or overnight, until the butter has fully solidified and chilled.
For Apple Filling
- Add apples, brown sugar, vanilla extract, cinnamon, and salt in a large saucepan. Cook over medium heat stirring occasionally until the apples are softened and tender, about 15 minutes.
- Whisk water and cornstarch together until combined. Add to apple mixture, and continue to cook for about 2 – 4 minutes, until thickened. Allow the filling to fully cool before assembling the pie.
- Lightly flour a clean work surface. Grab one piece of dough at a time and roll into a circle that's slightly larger than a 9 inch (23 cm) aluminum metal pie plate and ¼ inch (6mm) - ⅛ inch (3mm) thick. Place the dough inside the pie plate. Use kitchen scissors or a sharp paring knife to trim any excess dough, leaving a ½ inch (1- 2 cm) of overhang. Tuck the end of the pie crust underneath itself and press together to make a uniform crust that's flush with the edge of pie plate. Lightly cover with plastic wrap and rest in the refrigerator.
- Remove the second piece of dough and roll into a circle that's slightly larger than your pie dish and ¼ inch (6mm) - ⅛ inch (3mm) thick. Cut 1 inch (3 cm) strips of dough using a wheel pastry cutter or pizza wheel cutter. You'll need at least 8 strips.
- Remove the pie plate from the refrigerator and fill with the cooled apple pie filling. Arrange the strips of pie dough into a lattice pattern, placing half of the strips parallel to each other across the pie. Weave the remaining strips horizontally over and under the first set until the pie is covered. Use longer strips in the center and shorter strips toward the edges. Use kitchen scissors or a sharp paring knife to trim any excess dough so the strips are flush with the bottom crust. Press the edges together to seal, then create a fluted edge by gently pushing the dough outward from the inside with your knuckle while pinching it between your thumb and index finger to form a distinct V shape. Refrigerate for 30–45 minutes, until the dough is thoroughly chilled.
- Heat oven to 425°F (220°C).
- Whisk egg with 1 tablespoon (14 grams) of water to create an egg wash. Brush on the pie crust with a pastry brush, then sprinkle with turbinado sugar.
- Place the pie on a parchment lined light colored baking sheet (to catch any drips). Bake on the middle oven rack for 25 - 30 minutes, until the pie crust has become golden brown. Reduce oven heat to 375°F (190°C) and continue to bake for 50 - 55 minutes, until the crust is very golden brown and the filling is bubbly. If you notice the pie is browning too much, place a piece of foil around the crust.
- Transfer the pie to a wire cooling rack until it reaches room temperature. Store leftovers covered in the refrigerator for up to 3 days.




Kyle
This pie is gloriously orgasmic! Best apple pie I’ve ever had! You gotta try it!
Lorelei Peete
i absolutely LOVE this pie!!! reading jessica’s recipe made it so much easier for me to make and it was SO delicious! you have to try it yourself!!