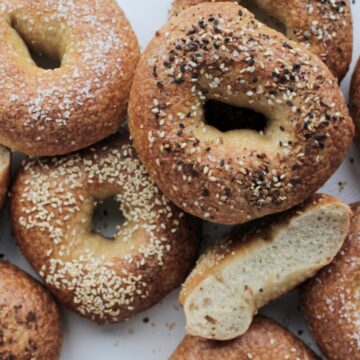
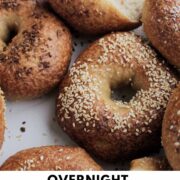
Craving that perfectly chewy and soft bagel, but don’t want to deal with heading to the store? It is time to learn the best overnight bagel recipe to satisfy that craving.
Want To Save This Article?
Enter your email below and we'll send it straight to your inbox. Plus, you'll receive new weekly recipe inspiration.
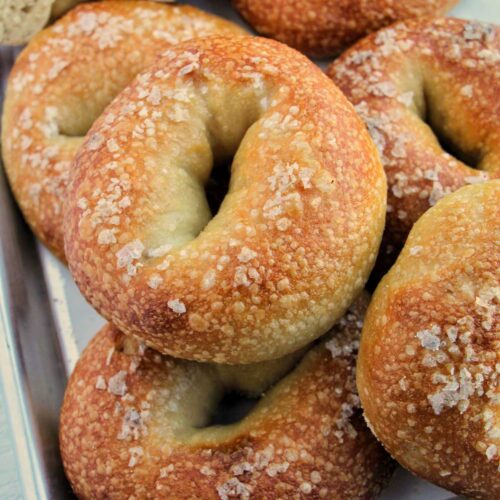
Enjoy the perfect bagels in the comfort of your own home. These overnight bagels are the perfect balance of soft, and chewy, with that iconic bagel crust.
Baking takes lots of practice and time to master. Although at-home baking might be a challenge, with the help of a detailed explanation and access to a step-by-step video, you’ll be mastering this overnight bagel recipe in no time.
If you prefer to use a sourdough starter in your traditional bagel recipe, check out this overnight sourdough bagel.
Jump to:
What You'll Learn In This Recipe
- Step-by-step guide for making bagels at home.
- Why an overnight proof is so important for bagels.
- My secret tips and tricks for making high-quality bagels, just like they do in New York.
- The reasoning behind why certain steps in the bread making process help with the texture of the final product.
If you like this recipe post and want to learn more about baking, check out my free guide to instantly become a better baker.
Ingredients You Need
For the perfect chewy New York-style bagels, it is important to pay attention to the ingredients. The ingredients and tips I have listed are the best way to achieve an amazing bagel.
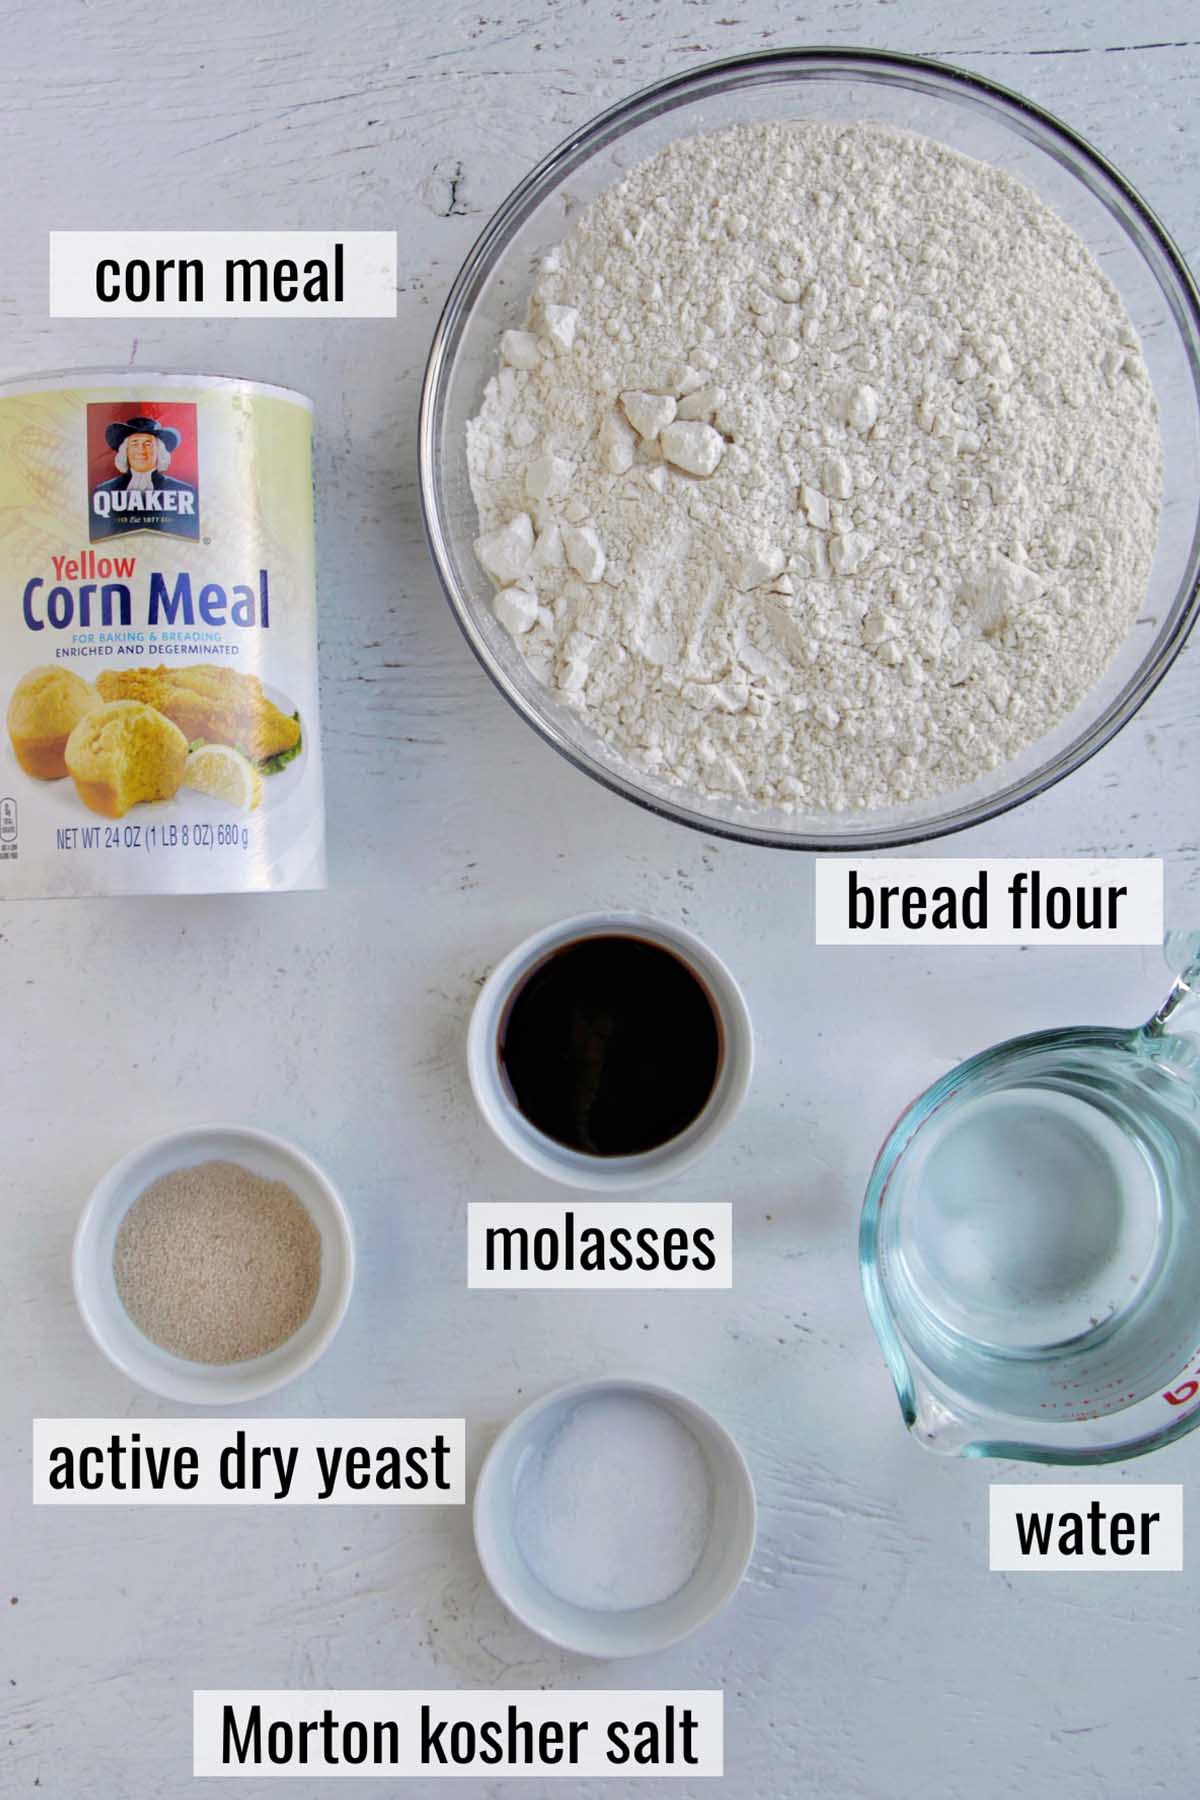
- High-Gluten Flour: A high-gluten flour is necessary for achieving the correct bagel texture. High gluten flour means the flour has a higher protein percentage. Because of this, the flour will create a chewy and crusty product like these bagels or even a French baguette. Ideally, look for a high-gluten flour with around 13.5-14.5% protein.
When I searched for high-gluten flour, I struggled to find anything in local stores. Instead, I choose to use bread flour such as King Arthur. This has a protein content of around 12%.
It is very important not to use all-purpose flour for this recipe. All-purpose flour usually has a protein content of around 10% which is far too low for achieving a lovely chewy and crunchy product.
- Active Dry Yeast: This is an essential part of nearly all dough recipes that involve rising. When making dough with active dry yeast, you can rehydrate it in water to ensure it is still active.
- Molasses: Typically for bagel recipes, barley malt syrup is used. I chose to use molasses instead because it is much easier for people to get their hands on. This ingredient enhances the recipe by adding a mild sweetness, and the sugar caramelizes during baking, giving that beautiful brown crust to the bagels.
- Fine sea salt: Salt is essential in just about any baking recipe. Salt helps enhance all the other flavors in the dough. On top of that, incorporating salt helps tighten the gluten net (making the dough stronger).
- Coarse cornmeal: Cornmeal is needed to keep the bagels from sticking to the baking sheet after forming the shapes. Additionally, it gives the bagels a nice crunchy texture on the bottom.
How to Make This Recipe
Let's dive in and see how to make this amazing overnight bagel recipe. There are lots of steps in baking recipes, so be sure to follow along for the best end product.
I heavily recommend reading baking recipes the way through before you begin making the product. This helps provide a full understanding of what you're doing and why you are doing it as opposed to jumping in blindly.
Scale The Ingredients
It is very important to stay organized when cooking and baking. This saves you from stress and lowers the chances of making mistakes later on in the baking process.
Using a food scale, measure out all the ingredients into different bowls or containers. If you're measuring the flour volumetrically, fluff up the flour gently with a spoon before moving it to a measuring cup or a bowl.
If you are using ingredients that look similar, be sure to label the container with a sticky note or tape with writing on it.
Proofing the Yeast
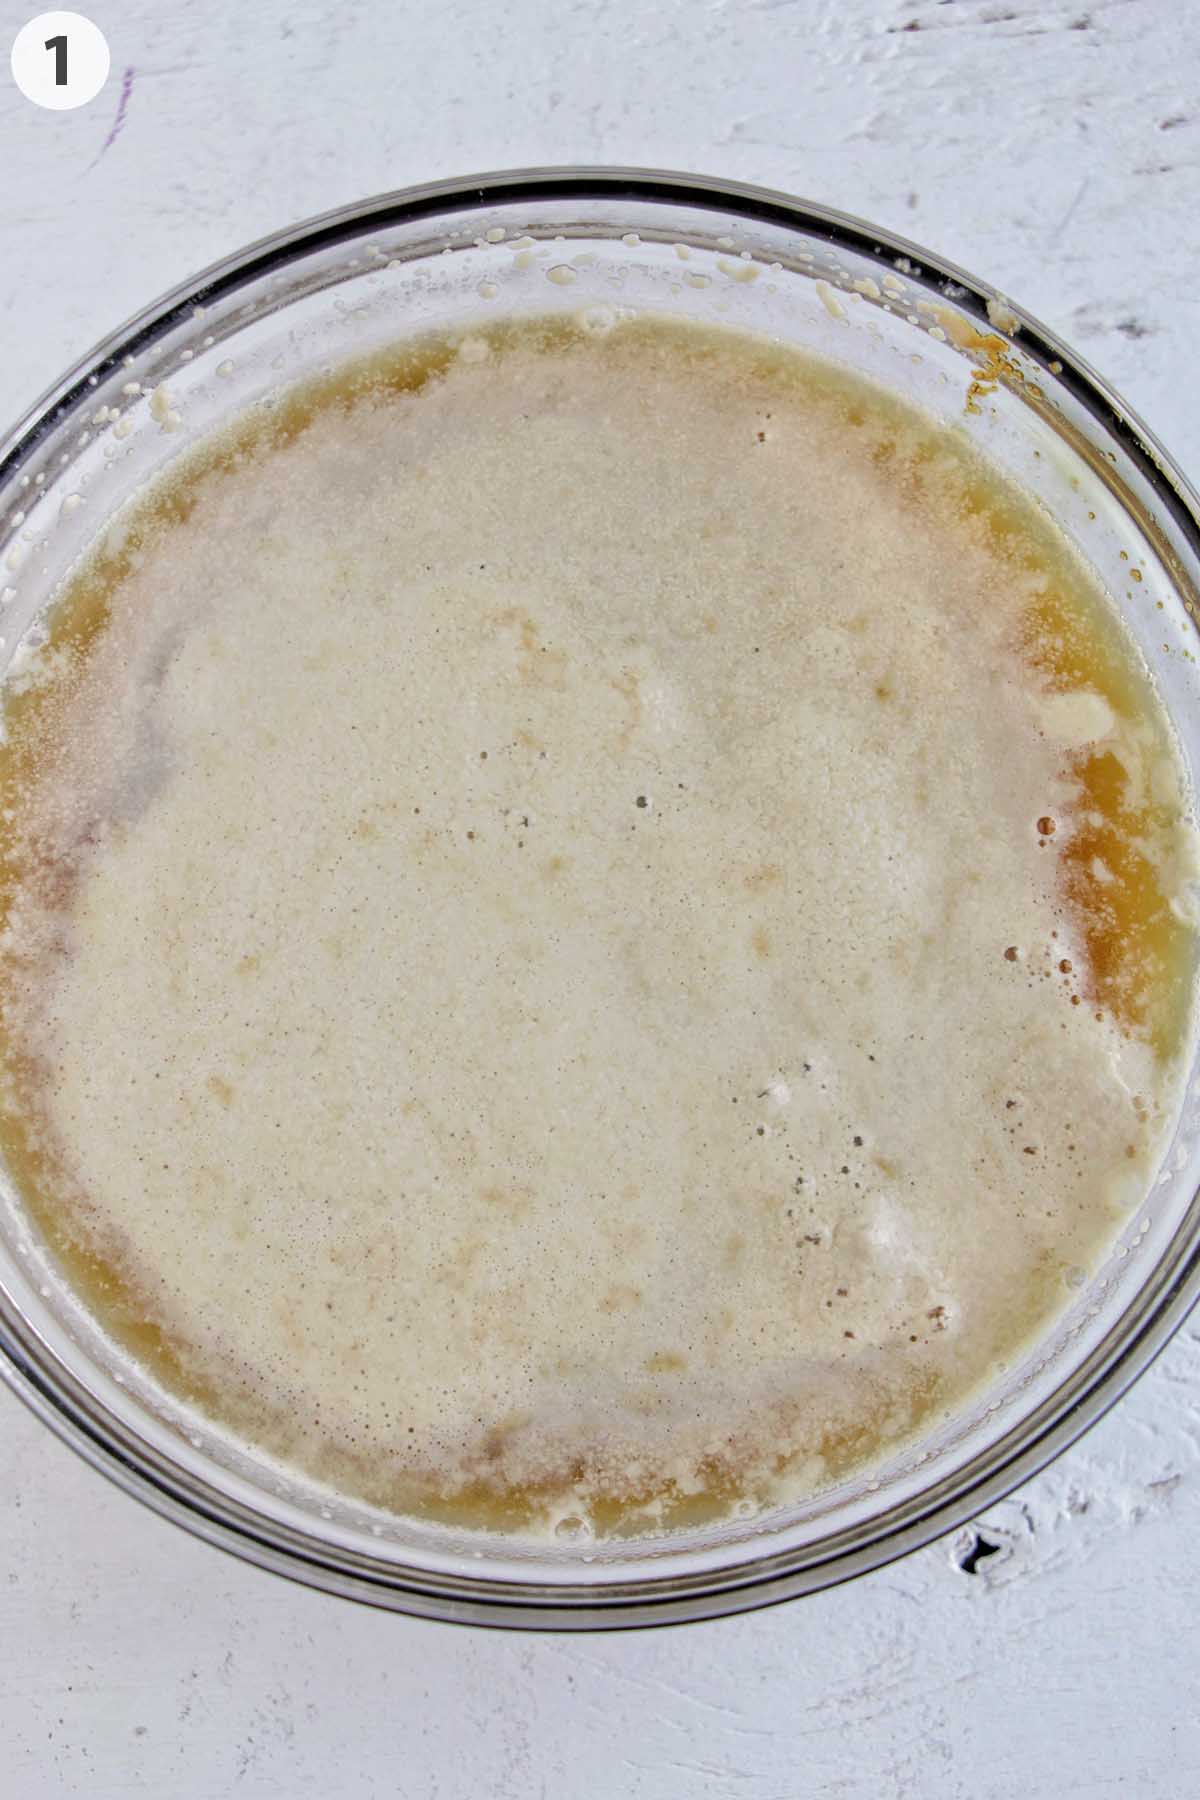
1. After getting organized, it is time to proof the yeast to make sure it is alive. For active dry yeast, it needs to be rehydrated to ‘wake up’ because it is dormant in its dry form.
During the proofing process, you will be able to see if the yeast is still alive or if it has expired. If the yeast becomes bubbly, it is good to bake with. However, if you don't see any foamy bubbles, the yeast has expired. It is essential to purchase new yeast and start over.
To proof the yeast, gently heat the water to 110º F (43º C). If the water is too hot, it can kill the yeast.
Once heated, add the water, molasses, and yeast to a bowl and allow it to sit for about 5 minutes until the mixture is visibly bubbly and foamy on top. The foam and bubbles are the indicators that the yeast is alive, active, and ready for use. If you don't see any bubbles after 10 minutes, take a trip to the grocery store to get more yeast.
Mixing the Dough

The best way to mix this dough is with a stand mixer. Unless you’re looking for an arm workout, a stand mixer is the way to go.
If you don't own a stand mixer, ask a family member or friend to borrow theirs. If you can't get access to a stand mixer at all, follow the recipe notes for hand kneading.
2. To begin, fix your stand mixer with a dough hook attachment and add in the flour and salt. Mix this together on a medium-low speed for a few seconds so the salt is evenly distributed.
Next, drop the speed to low and add in the yeast mixture. Allow this to mix until a shaggy dough forms. This step takes time, so be patient, and let the mixer do its work. As needed, use a silicone or rubber spatula to scrape down the sides of the bowl. When more of the flour starts to combine, you can begin to increase the speed.
3. After the dough starts to come together, set a 10-minute timer, and increase the mixer to medium-high speed. The reason for the increase in speed is that we are both developing the gluten and incorporating some air into the dough. Don’t worry about mixing the dough for too long, bagel dough is hard to over-mix.
In this situation, it is better to err on the side of over-mixing as opposed to under-mixing. Under-mixing your bagel dough will result in a batch of bagels with little rise, few blisters, and potentially improper texture.
Here are some ways you can check to see if your dough is ready. If you watch the step-by-step video, I show an example of what the do looks like at the 2-minute, 5-minute, and 10-minute mark.

4. The ideal dough is flexible and bouncy to the touch. To physically check for readiness, grab a piece of dough between your fingers, and slowly stretch it. If your dough rips as soon as you start pulling, it needs more kneading. If your dough stretches and stays together, it is ready.
Turn on your oven to 200ºF (93ºC). Once you have achieved the proper dough consistency, move the dough to a clean bowl, and cover it with plastic wrap. Allow the dough to rise on top of the warm oven (not in the oven) for 60 - 90 minutes until it’s doubled in size.
Shaping the Bagels
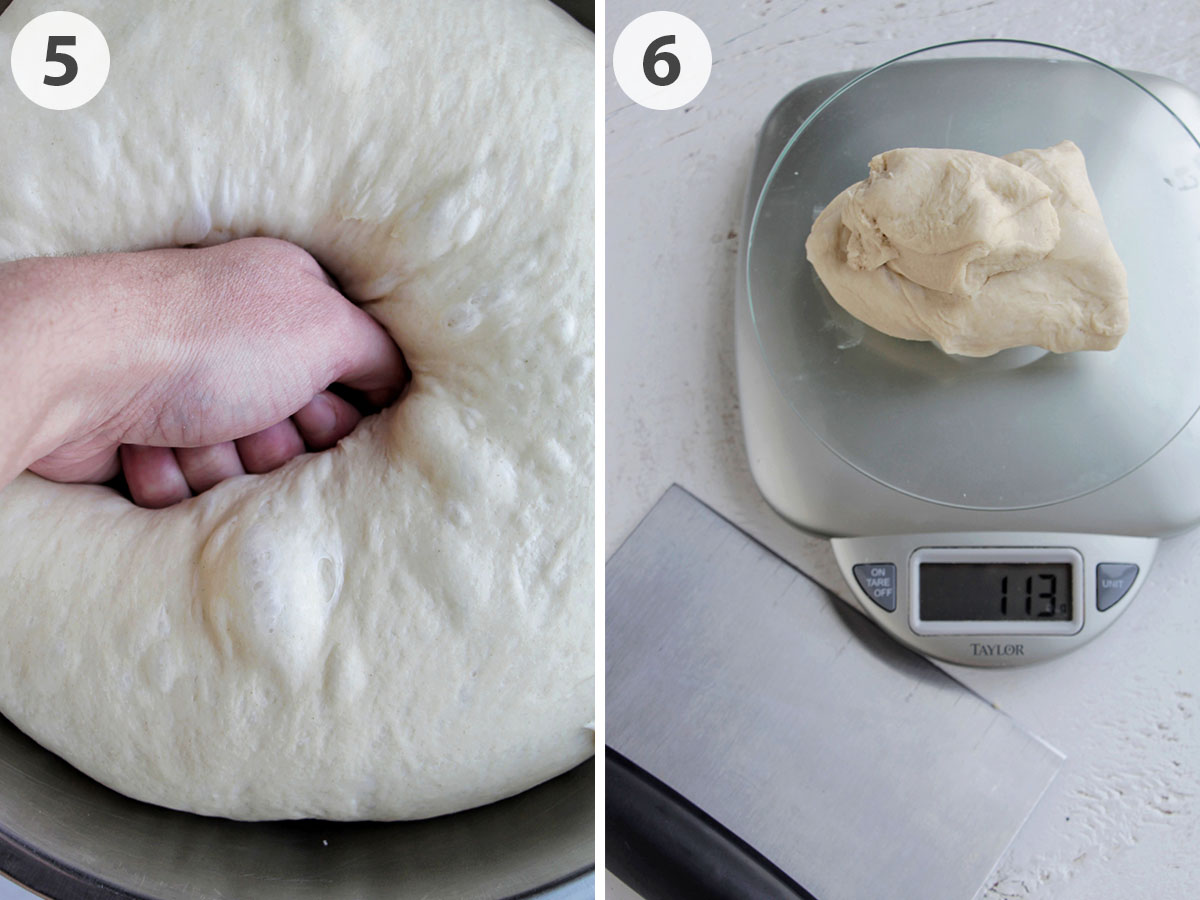
5. Once the dough has doubled in size, it is time to shape the bagels.
Gently punch the dough down. This releases some of the gas bubbles that were formed during the rising process. By knocking out some of these bubbles, it redistributes the yeast cells so they can rise again during the proofing stage.
6. Dump out the dough onto a clean, unfloured surface. To shape your bagels, you will need to grab your food scale. Measure out 113 grams (3.8 ounces) of dough and shape into balls. It is easiest to weigh and roll the balls of dough all at once before moving on to the shaping process.

7. Once you have all your dough rolled, grab a ball of dough. Gently push through the center of the ball using both thumbs to make a hole. Then, gradually stretch the bagel out until it reaches about 4 inches (~10 cm) across. Be sure not to flatten the bagel too much during this process.
The easiest way to check the size of your bagel during this shaping process is to use a ruler. If the bagels are made too small, they will end up closing during the boiling and baking process.
During this entire process of shaping the dough, keep the dough you are not working with covered with a tea towel. This will prevent the dough from drying out.
Proofing the Dough
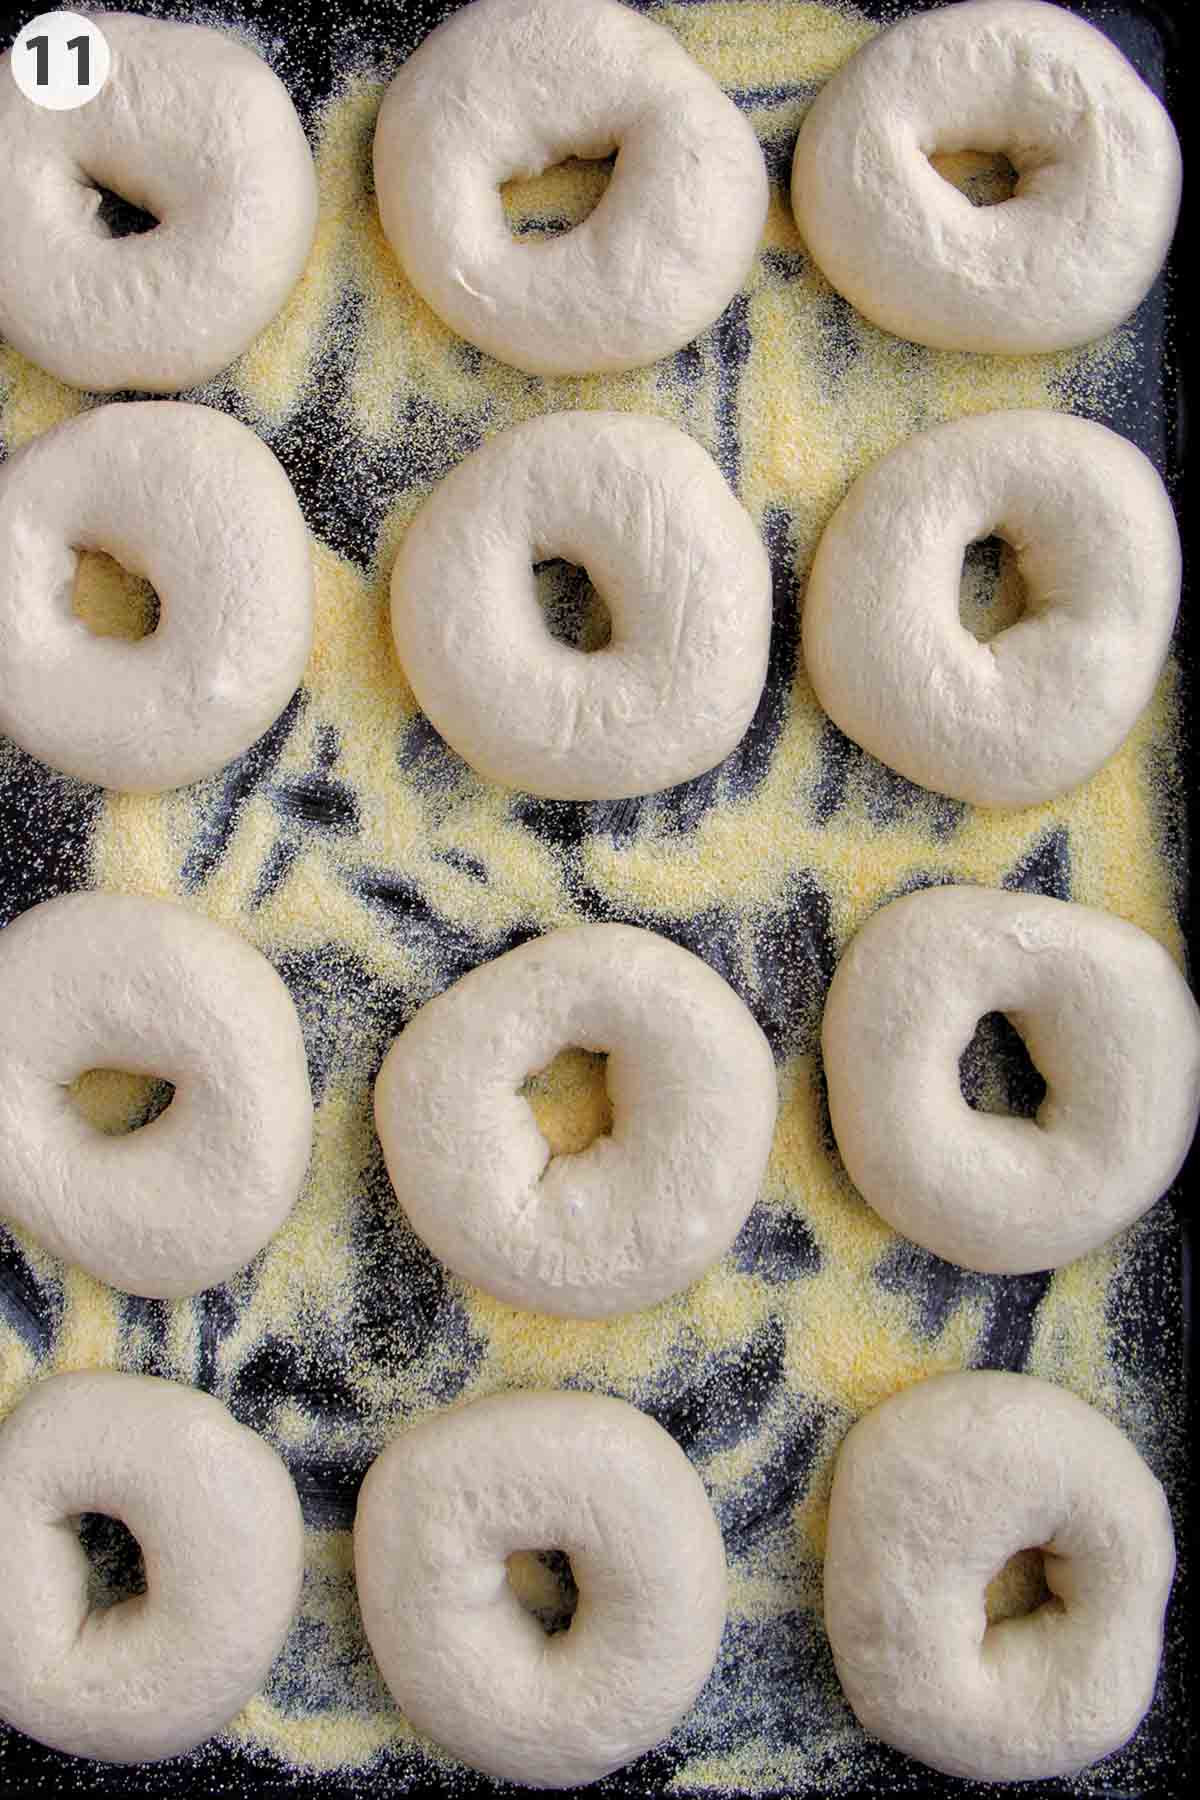
11. With the bagels shaped, it is time to move to the proofing stage. This is the final rise before baking. Be sure to place down a thin layer of cornmeal on your baking sheet to prevent sticking. The cornmeal also provides a really nice texture to the bagels.
Bagels have a unique proofing process compared to many other breads. The best bagels are given lots of time to slowly ferment in a cold environment. To do this, we allow the bagels to proof overnight (12-18 hours) in the refrigerator. This helps release additional flavor into the bagel.
During the proofing process, tightly wrap the bagels with plastic wrap. If you do not cover the bagels and expose them to air, a hard crust on the dough will form. This crust is not what we want.
Preheat Oven & Baking Stones
Arrange the oven racks, so they are on the upper and lower thirds of the oven. Place a pizza/baking stone on each of the racks. Set the oven to 450º F (230ºC). Allow the stones and the oven to preheat for at least 30 minutes.
Boiling the Bagels
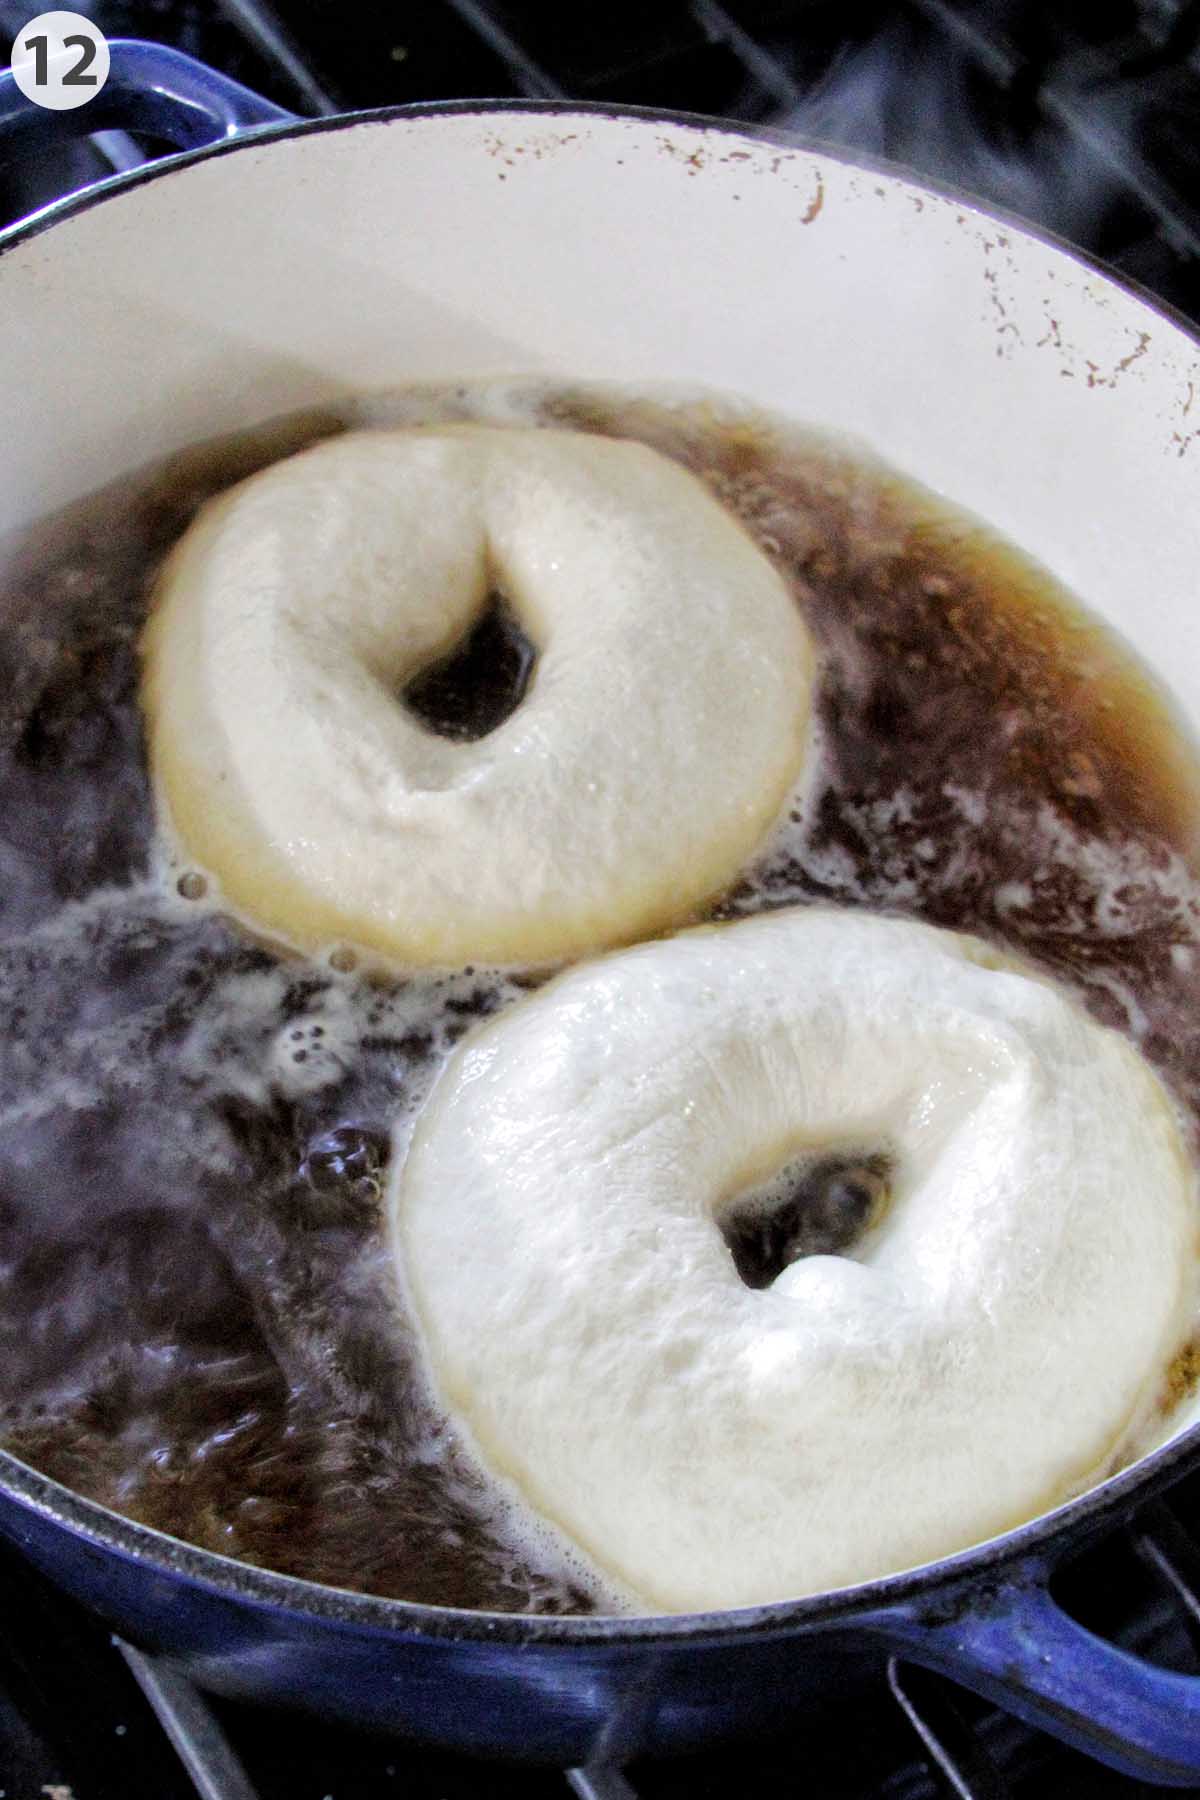
12. Another essential and unique step in the cooking process is the boiling stage. The reason bagels are boiled is because it helps give that iconic shiny and chewy exterior layer to the bagel. The longer you boil the bagel, the thicker and chewier the outside crust will be.
The boiling time also affects the interior texture of the bagel. A longer boil will result in a more dense bagel. I boil my bagels for about 30 seconds on each side to get the perfect chewy, but not too tough, texture.
To boil, bring the water from the float test up to a steady boil. Then, add in enough molasses to turn the water to a dark brown-black tea color. After the molasses is in, you can begin to boil your bagels. If the temperature of the water drops after adding molasses, allow it to come back to a steady boil before placing the bagels in the water.
Add as many bagels as you can comfortably fit into the pot. Use a slotted spoon or a spider-strainer to flip the bagels. Take the boiled bagels, and place them on a wire rack to drain.
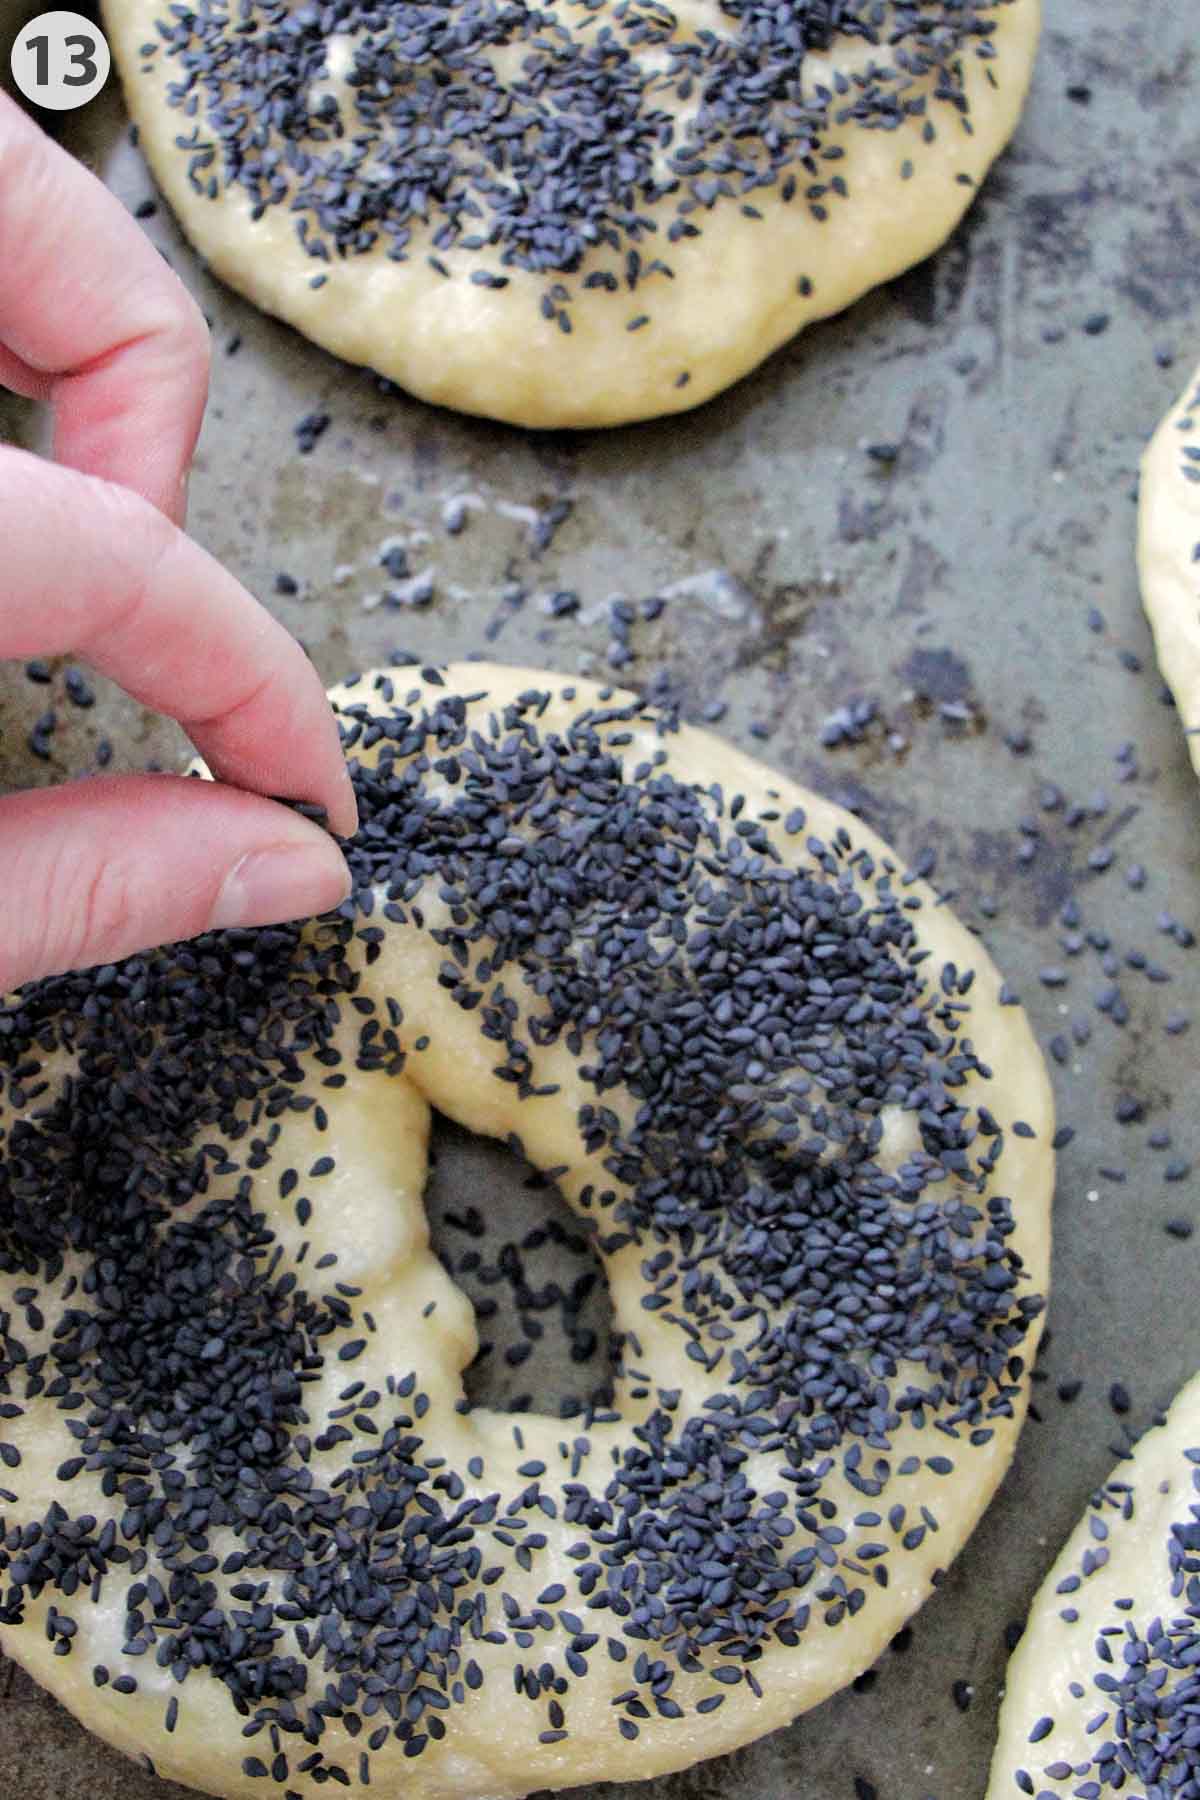
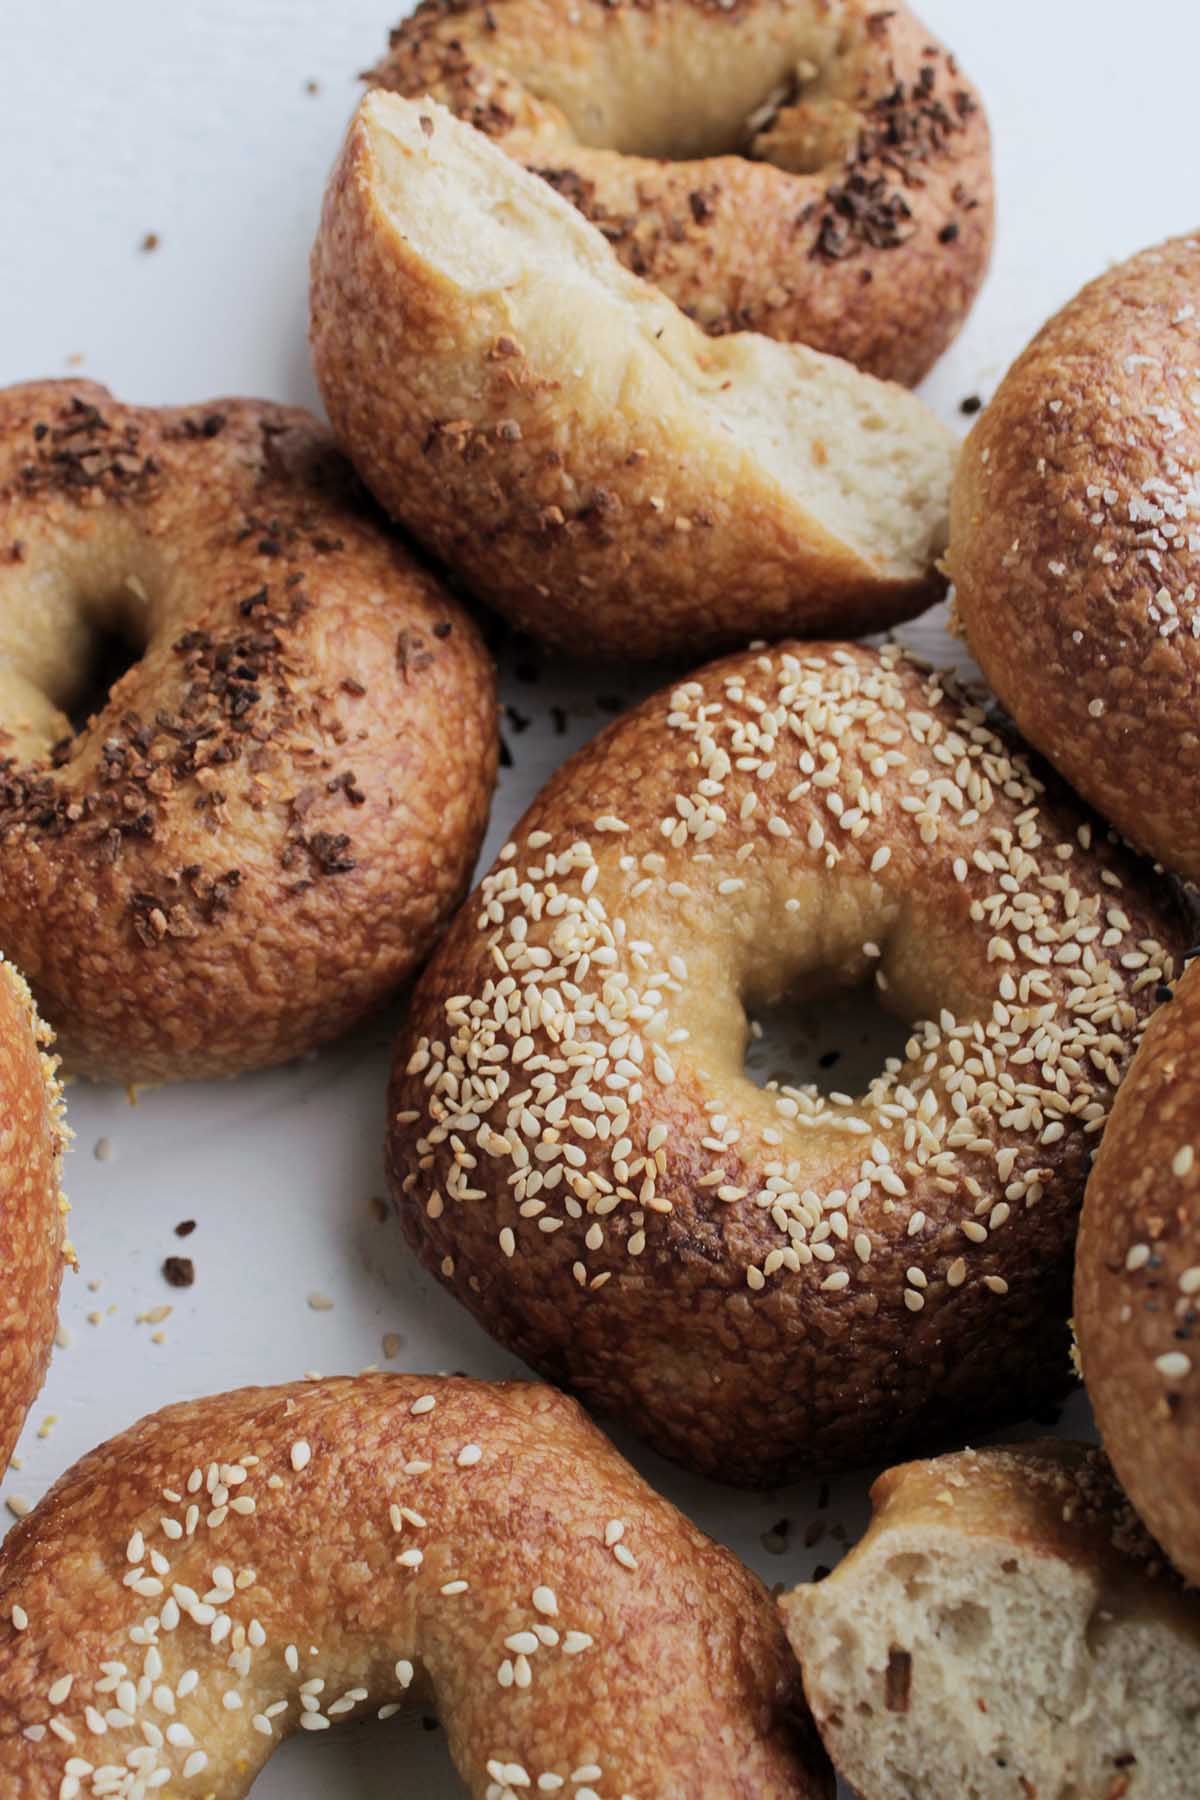
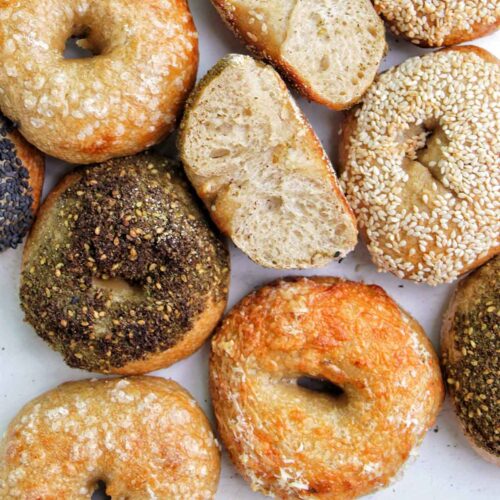
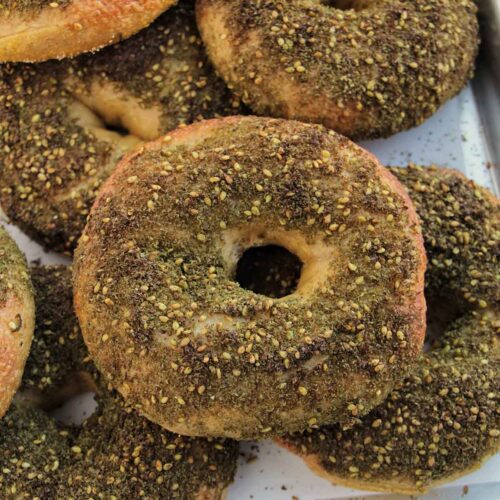
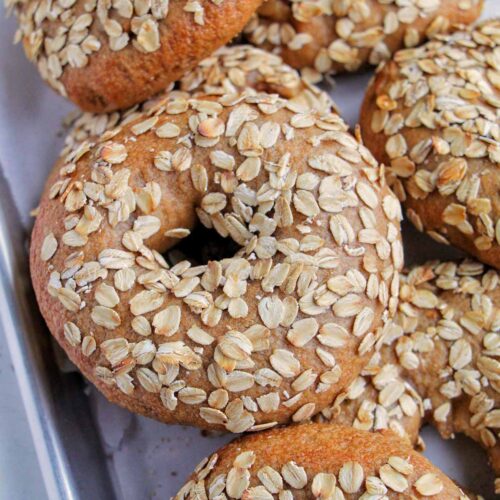
13. Once the bagels are freshly boiled, it is the best time to add your desired toppings. Some easy and tasty bagel topping ideas include:
- Everything seasoning: Use ¾ cup (126 grams) of everything seasoning blend. Immediately after the bagel has been removed from the water, gently dunk the top of the bagel into the everything seasoning.
- Sesame seeds: Use ¾ cup (96 grams) of sesame seeds. Immediately after the bagel has been removed from the water, gently dunk the top of the bagel into the sesame seeds.
- Poppy seeds: Use ¾ cup (84 grams) of poppy seeds. Immediately after the bagel has been removed from the water, gently dunk the top of the bagel into the poppy seeds.
- Sea salt flakes: Use 3 teaspoons (9 grams) of Maldon flakey sea salt. Immediately after the bagel has been removed from the water, gently dunk the top of the bagel into the Maldon flakey sea salt.
- Za'atar seasoning: Use ¾ cup (78 grams) za'atar seasoning. Immediately after the bagel has been removed from the water, gently dunk the top of the bagel into the za'atar seasoning.
- Cheddar cheese: Use 1 ½ cups (384 grams) finely shredded cheddar cheese. Immediately after the bagel has been removed from the water, top the bagel with 2 tablespoons (16 grams) of shredded cheddar cheese.
- Asiago cheese: Use 1 ½ cups (312 grams) finely shredded Asiago cheese. Immediately after the bagel has been removed from the water, top the bagel with 2 tablespoons (13 grams) of shredded Asiago cheese.
- Oatmeal: Use ¾ cup (108 grams) old fashioned oats. Immediately after the bagel has been removed from the water, gently dunk the top of the bagel into the oats.
- Cinnamon and sugar: Mix ½ cup (107 grams) firmly packed dark brown sugar, 6 tablespoons (45 grams) bread flour, 3 tablespoons (37 grams) granulated sugar, 3 tablespoons (42 grams) melted unsalted butter, and 3 teaspoons (8 grams) ground cinnamon in a small mixing bowl until combined. In a separate bowl, whisk 1 large (50 grams) egg and 1 tablespoon (14 grams) of water to make an egg wash. Immediately after the bagel has been removed from the water, brush the bagel with egg wash and top with cinnamon sugar mixture (about 1 tablespoon or 15 ml).
Place the toppings on a plate, and dip the top of the bagel into the toppings. This is the trick to getting the toppings to stick. You can fill in any holes by sprinkling additional toppings on top.
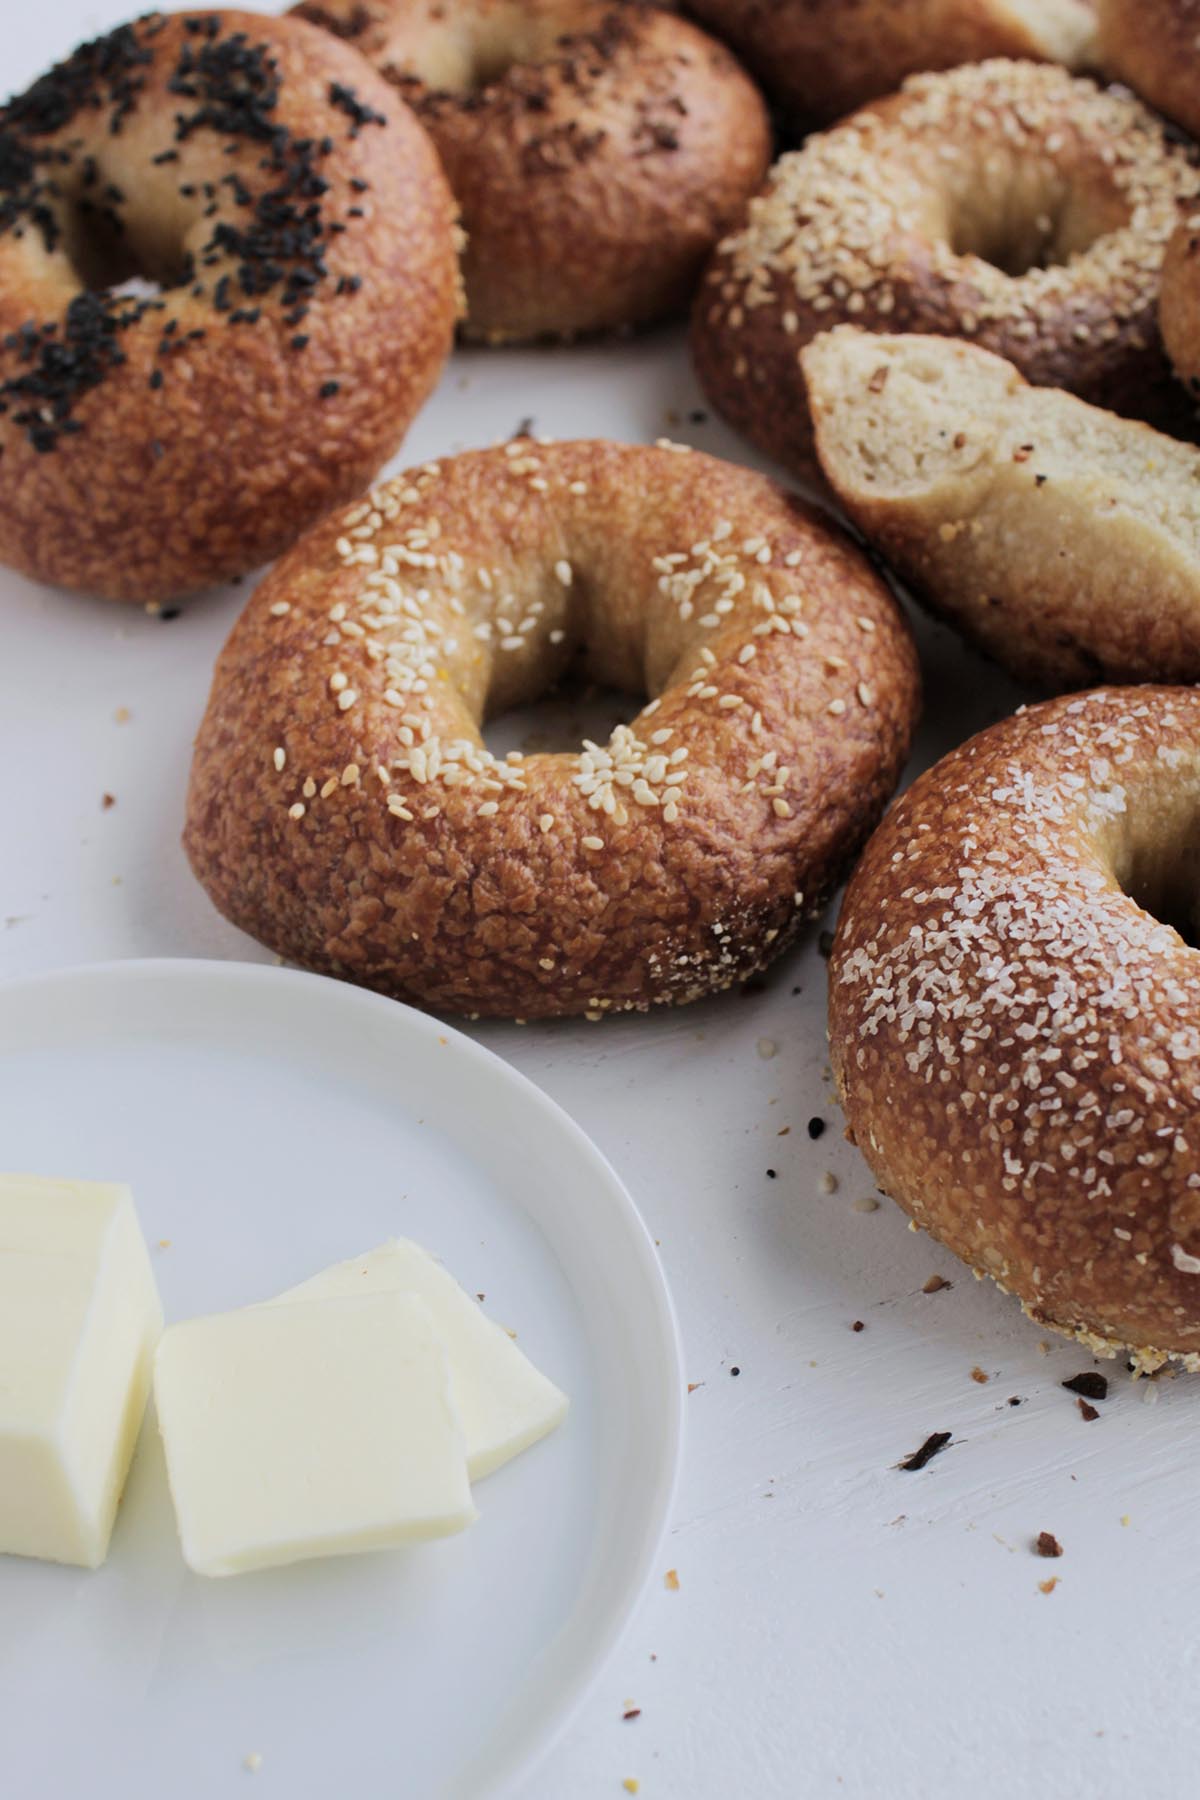
Baking the Bagels
14. Finally, it's time to bake the bagels. To achieve that beautiful browned and glossy top on the bagels, you'll need to have a very hot oven. Through testing, I have found that using a baking stone helps to get the crusty outer texture. If you choose to use baking stones, be sure they are preheated.
Many home ovens have hot spots, to achieve an even brown crust on all your bagels, be sure to move the baking stones (or baking sheet) around to guarantee that there is an even cook.
After baking is complete, the final step is to properly cool the bagels. As tempting as it is to slice into a hot, fresh bagel straight out of the oven, giving the bagel time to completely cool ensures the internal structure can fully settle, and any excess moisture can evaporate. A cooling rack is the best place to put the bagels to cool.
Now you have the freedom to eat these bagels or freeze them for later. Check out this guide for bagel storage for full instructions.
Expert Tips
- Bagels can be stored for up to 4-6 days in an airtight container at room temperature. I suggest toasting to reheat. Bagels can also be frozen for up to 6 months. Slice them in half before you freeze them. Then, you can pop the frozen bagel straight into the toaster. You can find even more tips for storing bagels.
- If you notice your mixer is overheating during the kneading process, switch over to hand kneading. Once a shaggy dough forms, begin kneading the dough by hand for a full 15 minutes (don’t cut this time short). If needed, switch out kneading the dough with a friend!
- Want to make bagels with a sourdough starter? Try out this overnight sourdough bagel recipe.
Recipe FAQs
You can absolutely proof bagel dough overnight. Good quality bagels are given the time to ferment slowly in a cold environment. The slow fermentation allows the flavor to develop and provide that iconic and delicious taste to the bagels.
No. Many people think bagels will last longer in the fridge, but that's just not true. The fridge actually promotes staling, so it is best to eat the bagels fresh or freeze them.
The boiling process helps give us that classic shiny, chewy texture on the outside of the bagel. The longer you boil the bagel, the thicker and chewier the outside crust will be.
Allow your bagel dough to proof overnight in the refrigerator for 12 - 18 hours. Make sure the dough is properly wrapped or the dough will harden. This cold proofing process adds lots of delicious flavor to the bagels.
After the bagels have been proofed, they will be full of air. Be careful when handling the bagels, otherwise you will push the air out, and the bagels can become flat.
More Bagel Recipes
Love this recipe? Please leave a 5-star ⭐⭐⭐⭐⭐ rating in the recipe card below. Have questions as you're cooking? Leave a comment below, and I'll help!
Overnight Bagel Recipe
Equipment
- scale
- bench scraper
- pizza stone
- Dutch oven or large pot
- wire rack
Ingredients
- 2 cups, plus 2 tablespoons lukewarm water (110°F or 43°C)
- 2 teaspoons active dry yeast
- 1 tablespoon, plus several tablespoons for boiling molasses
- 7 cups bread flour
- 2 teaspoons Morton kosher salt
- coarse cornmeal for dusting
- flakey sea salt, sesame seeds, or poppy seeds for topping (optional)
Instructions
- Add warm water, 1 tablespoon (17 grams) molasses, and yeast to a small bowl, and whisk together until dissolved. Allow the mixture to sit until it’s foamy on top, about 5 minutes.
- Whisk together flour and salt in a stand mixer bowl. Fit stand mixer with the dough hook attachment (see notes below for hand kneading instructions). Combine the water and yeast mixture with the flour on low speed, just until a shaggy dough forms. Scrape down the sides and increase speed to medium as needed, until the majority of the loose flour is incorporated into the dough. Once a shaggy dough is formed, increase the speed to medium high, and set a timer for 10 minutes to allow the dough to knead. During this time, keep an eye on your stand mixer to ensure it doesn’t wiggle off the counter or overheat. If at any point your mixer becomes too hot, take a break or begin hand kneading (see notes). The dough is done kneading when it is flexible and bouncy to the touch. To check that the dough is ready, grab a piece of dough between your fingers, stretch it, and see if web fibers have developed. You should be able to pull the dough thin enough that light shines through. If your dough rips as soon as you start pulling, you need to continue kneading the dough. You want the dough to be able to stretch rather than tear.
- Roll the dough into a tight ball, then place it in a clean bowl, and cover with plastic wrap. Allow the dough to rise in a warm, draft-free place until doubled in size, about 60–90 minutes. Rise time will vary depending on the temperature of your environment.
- While the dough is rising, prepare two baking sheets generously sprinkled with cornmeal. Set aside.
- Punch down the risen dough a few times to release some of the gas that formed. On a clean, un-floured surface, remove the dough from the bowl. Using a bench scraper or knife, divide the dough into pieces weighing 4 ounces (113 grams).
- Working with one piece of dough at a time, and keeping the others covered with a tea towel, roll the dough into a ball. Push through the center of the ball using both thumbs to make a hole. Then, continue to stretch the bagel out until it reaches about 4 inches (10 cm) across. Be sure not to flatten the bagel too much throughout this process. Place completed bagels about 2 inches (5 cm) apart on the previously prepared baking sheets, and cover with plastic wrap. Repeat until all pieces of the dough have been shaped.
- Securely cover the bagels with plastic wrap, so no air can get into the baking sheet. Allow dough to proof overnight in the refrigerator for 12–18 hours.
- Arrange the oven racks to the upper and lower thirds of the oven. Place a pizza stone on each of the racks, then heat oven to 450°F (230°C). Allow the oven and pizza stones to preheat for at least 30 minutes.
- Fill a large pot or dutch oven about halfway full with water. Place over high heat to boil. Once the water is at a rolling boil, add in molasses, a tablespoon at a time, until the water is dark brown.
- Remove the bagels from the refrigerator. They will have puffed up slightly overnight. Gently, place as many bagels into the boiling water as will comfortably fit without over crowding the pot or dutch oven. Allow the bagels to boil for 30 seconds on the first side, then flip, and boil for an additional 30 seconds on the second side. Using a slotted spoon, remove the bagel from the boiling water and place on a wire rack to cool. Repeat until all of the bagels have been boiled.
- Carefully, remove the hot pizza stones from the oven. Transfer the cornmeal from the original baking sheets to the hot pizza stone to prevent sticking. Place bagels on the stone about 2 inches (5 cm) apart. Bake for 15–19 minutes, rotating the pans halfway through baking, until bagels are golden brown and shiny on top. Keep an eye on your bagels (without opening the oven door) to ensure they're not getting too dark. Remove from the oven, and let cool completely on a wire rack.
Notes
-
- Everything seasoning: Use ¾ cup (126 grams) of everything seasoning blend. Immediately after the bagel has been removed from the water, gently dunk the top of the bagel into the everything seasoning.
-
- Sesame seeds: Use ¾ cup (96 grams) of sesame seeds. Immediately after the bagel has been removed from the water, gently dunk the top of the bagel into the sesame seeds.
-
- Poppy seeds: Use ¾ cup (84 grams) of poppy seeds. Immediately after the bagel has been removed from the water, gently dunk the top of the bagel into the poppy seeds.
-
- Sea salt flakes: Use 3 teaspoons (9 grams) of Maldon flakey sea salt. Immediately after the bagel has been removed from the water, gently dunk the top of the bagel into the Maldon flakey sea salt.
-
- Za'atar seasoning: Use ¾ cup (78 grams) za'atar seasoning. Immediately after the bagel has been removed from the water, gently dunk the top of the bagel into the za'atar seasoning.
-
- Cheddar cheese: Use 1 ½ cups (384 grams) finely shredded cheddar cheese. Immediately after the bagel has been removed from the water, top the bagel with 2 tablespoons (16 grams) of shredded cheddar cheese.
-
- Asiago cheese: Use 1 ½ cups (312 grams) finely shredded Asiago cheese. Immediately after the bagel has been removed from the water, top the bagel with 2 tablespoons (13 grams) of shredded Asiago cheese.
-
- Oatmeal: Use ¾ cup (108 grams) old fashioned oats. Immediately after the bagel has been removed from the water, gently dunk the top of the bagel into the oats.
-
- Cinnamon and sugar: Mix ½ cup (107 grams) firmly packed dark brown sugar, 6 tablespoons (45 grams) bread flour, 3 tablespoons (37 grams) granulated sugar, 3 tablespoons (42 grams) melted unsalted butter, and 3 teaspoons (8 grams) ground cinnamon in a small mixing bowl until combined. In a separate bowl, whisk 1 large (50 grams) egg and 1 tablespoon (14 grams) of water to make an egg wash. Immediately after the bagel has been removed from the water, brush the bagel with egg wash and top with cinnamon sugar mixture (about 1 tablespoon or 15 ml).
Nutrition
Additional Bagel Resources
Want to master this overnight bagel recipe or even create your very own recipe? These resources will be just what you need:
- I really enjoyed reading this article from the Institute of Culinary Education on '10 Tips for Making Schmear-Worthy Homemade Bagels.'
- An interview with Daniela Moreira on how to make better bagels at home. Super interesting and an easy read!
- Another good article on the secrets of bagel making.


Karyn
This recipe worked great! I love these bagels and will be making them again!
Jessica Mode
Karyn - so glad you loved the recipe!! It's one of my favorites too! Thanks for taking the time to leave a review 🙂
Steve Berger
Love the recipe, I just ordered some malt powder, do you happen to know how much I should use?
Jessica Mode
Hey Steve! I have not experimented with the barley malt powder, so I'm not sure! Good luck!
albert
hello i was wondering if you can edit this recipe to use sour dough starter?
thanks for any help
Jessica Mode
Hi Albert! I've actually thought about doing this recently, so I'm glad there is interest! I'll keep you updated! For now, you might find this article helpful: https://breadtopia.com/faq/how-to-convert-recipes-between-sourdough-and-yeast/
Jessica Mode
Hey Albert! Just wanted to update you that I have a bagel recipe using sourdough starter: https://homebodyeats.com/overnight-sourdough-bagels/
Can't wait for you to let me know what you think of the recipe!
Lisa
I'm confused and in the middle of this recipe currently. You say to put the bagels onto the corn meal while proofing. Doesn't that create a problem when you boil them prior to baking? I would think it would not only change the texture but get in the water as well.
Jessica Mode
Hi Lisa - If you don't place the bottom of the bagels in the cornmeal, they will stick while proofing overnight. Some of the cornmeal does come off when boiling, but it doesn't affect the final product's texture.
Taschia
Hi!
Can I use instant dry yeast instead of active? If so, would I change the amount in this recipe?
Jessica Mode
Hey Taschia! It shouldn't be a problem to use instant yeast. The rise times will vary (most likely a faster rise depending on the temperature in your room). You can use a 1:1 ratio. Hope this helps ☺️