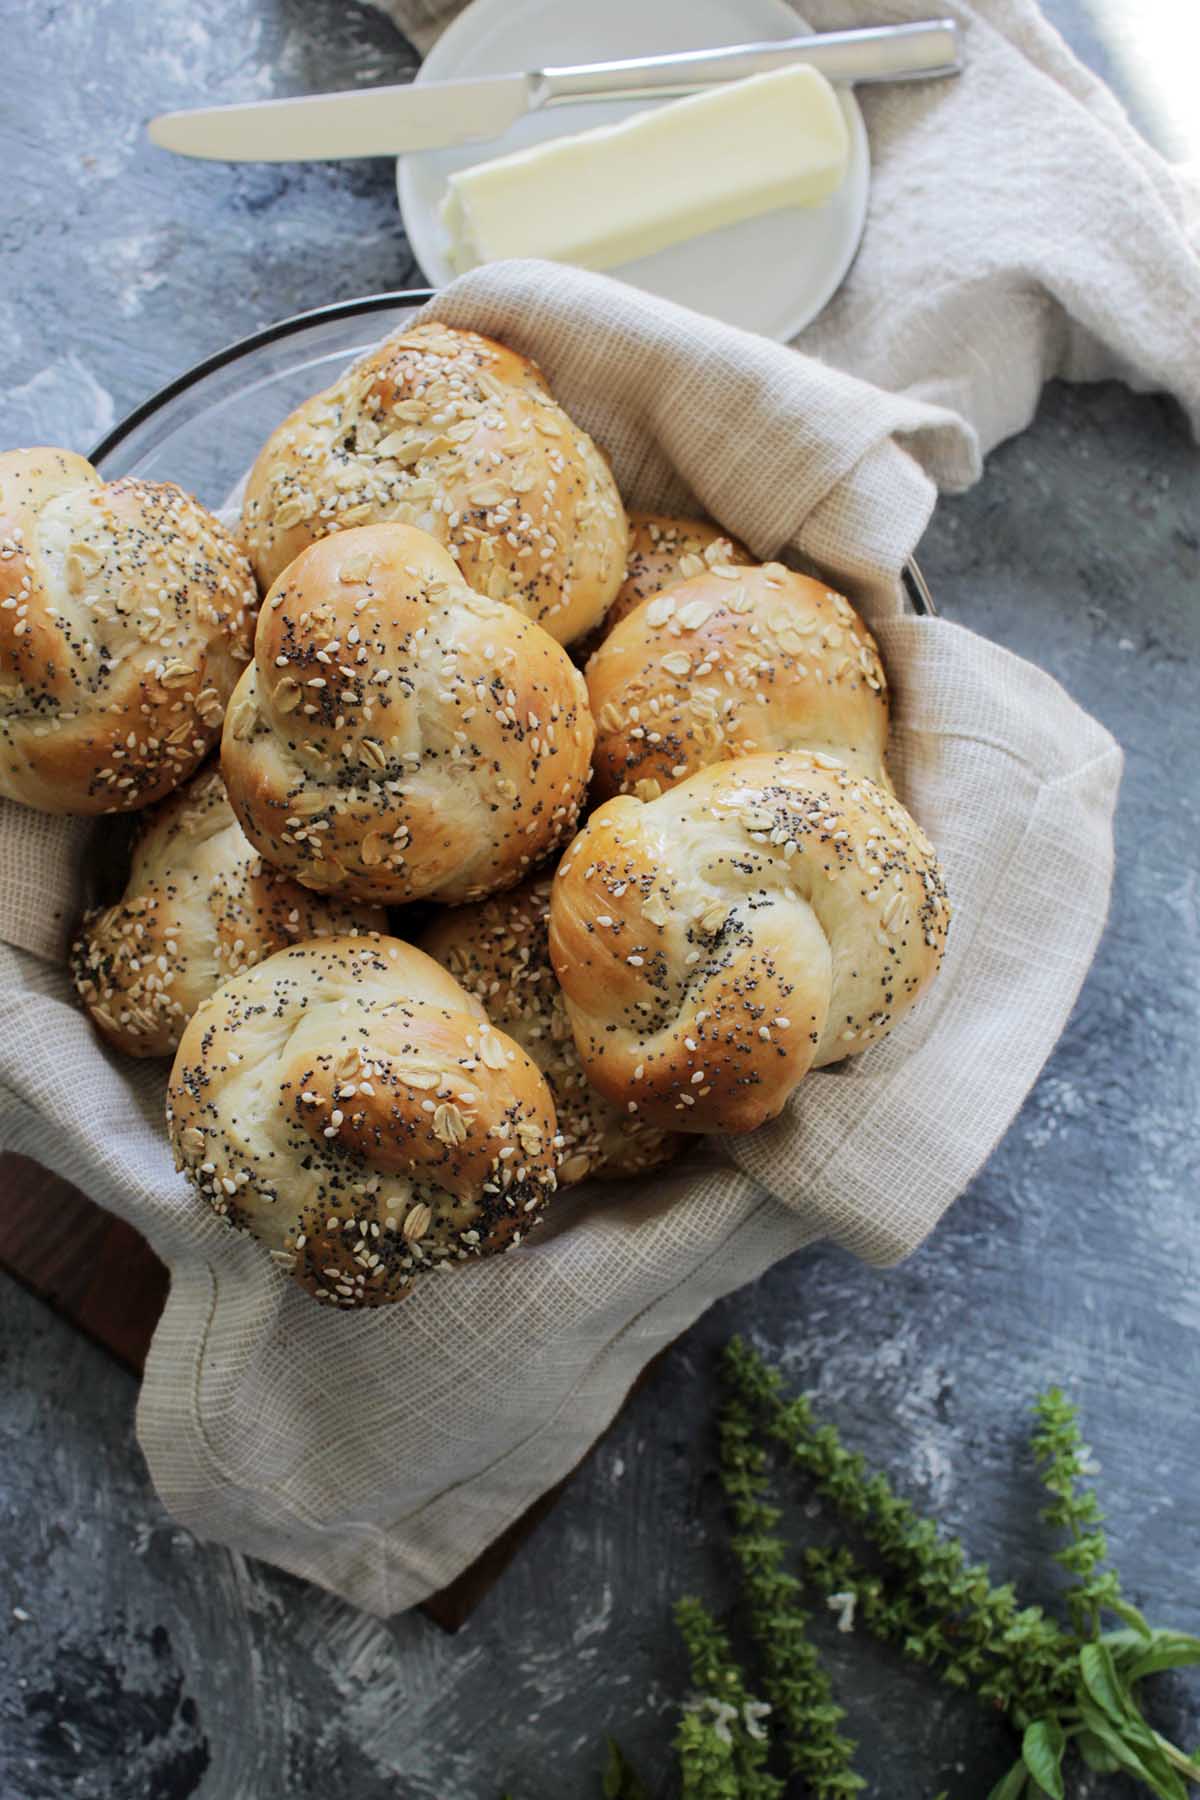
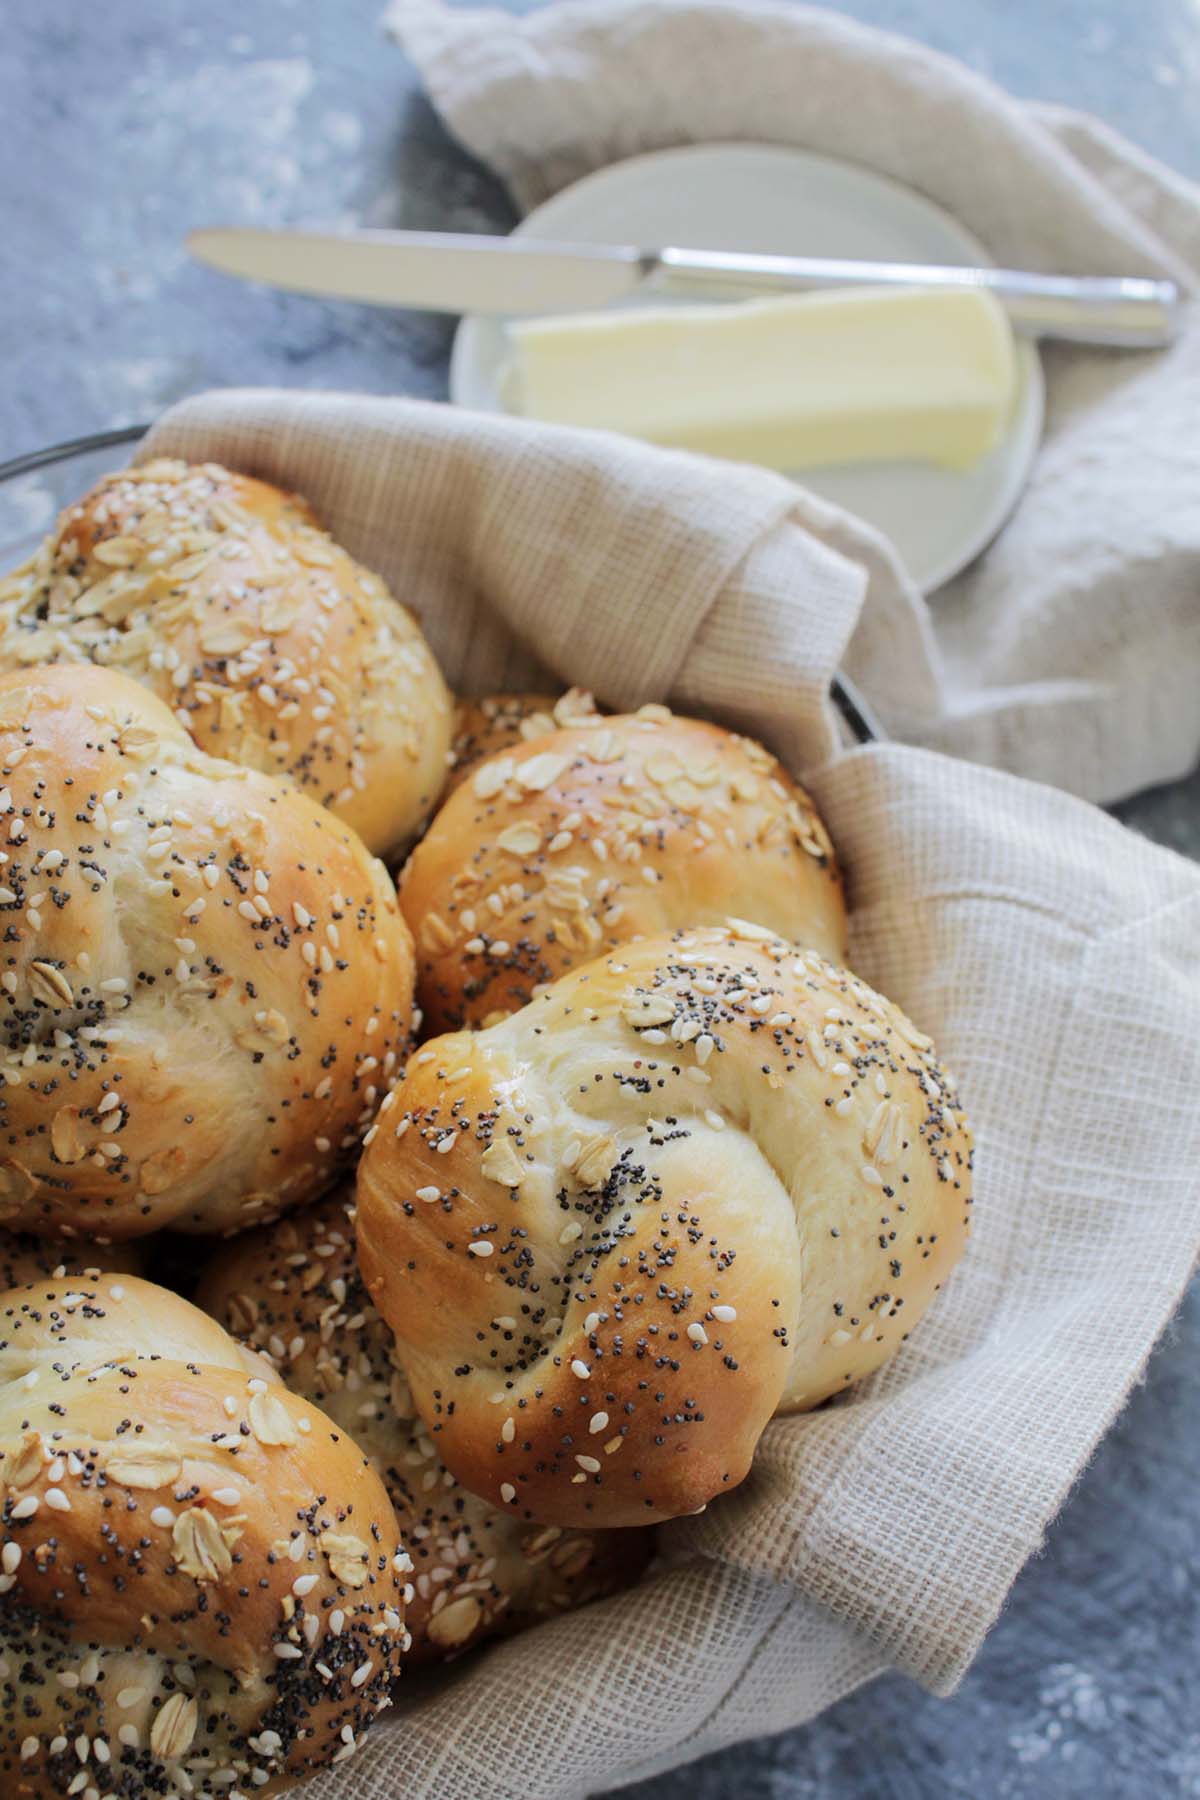
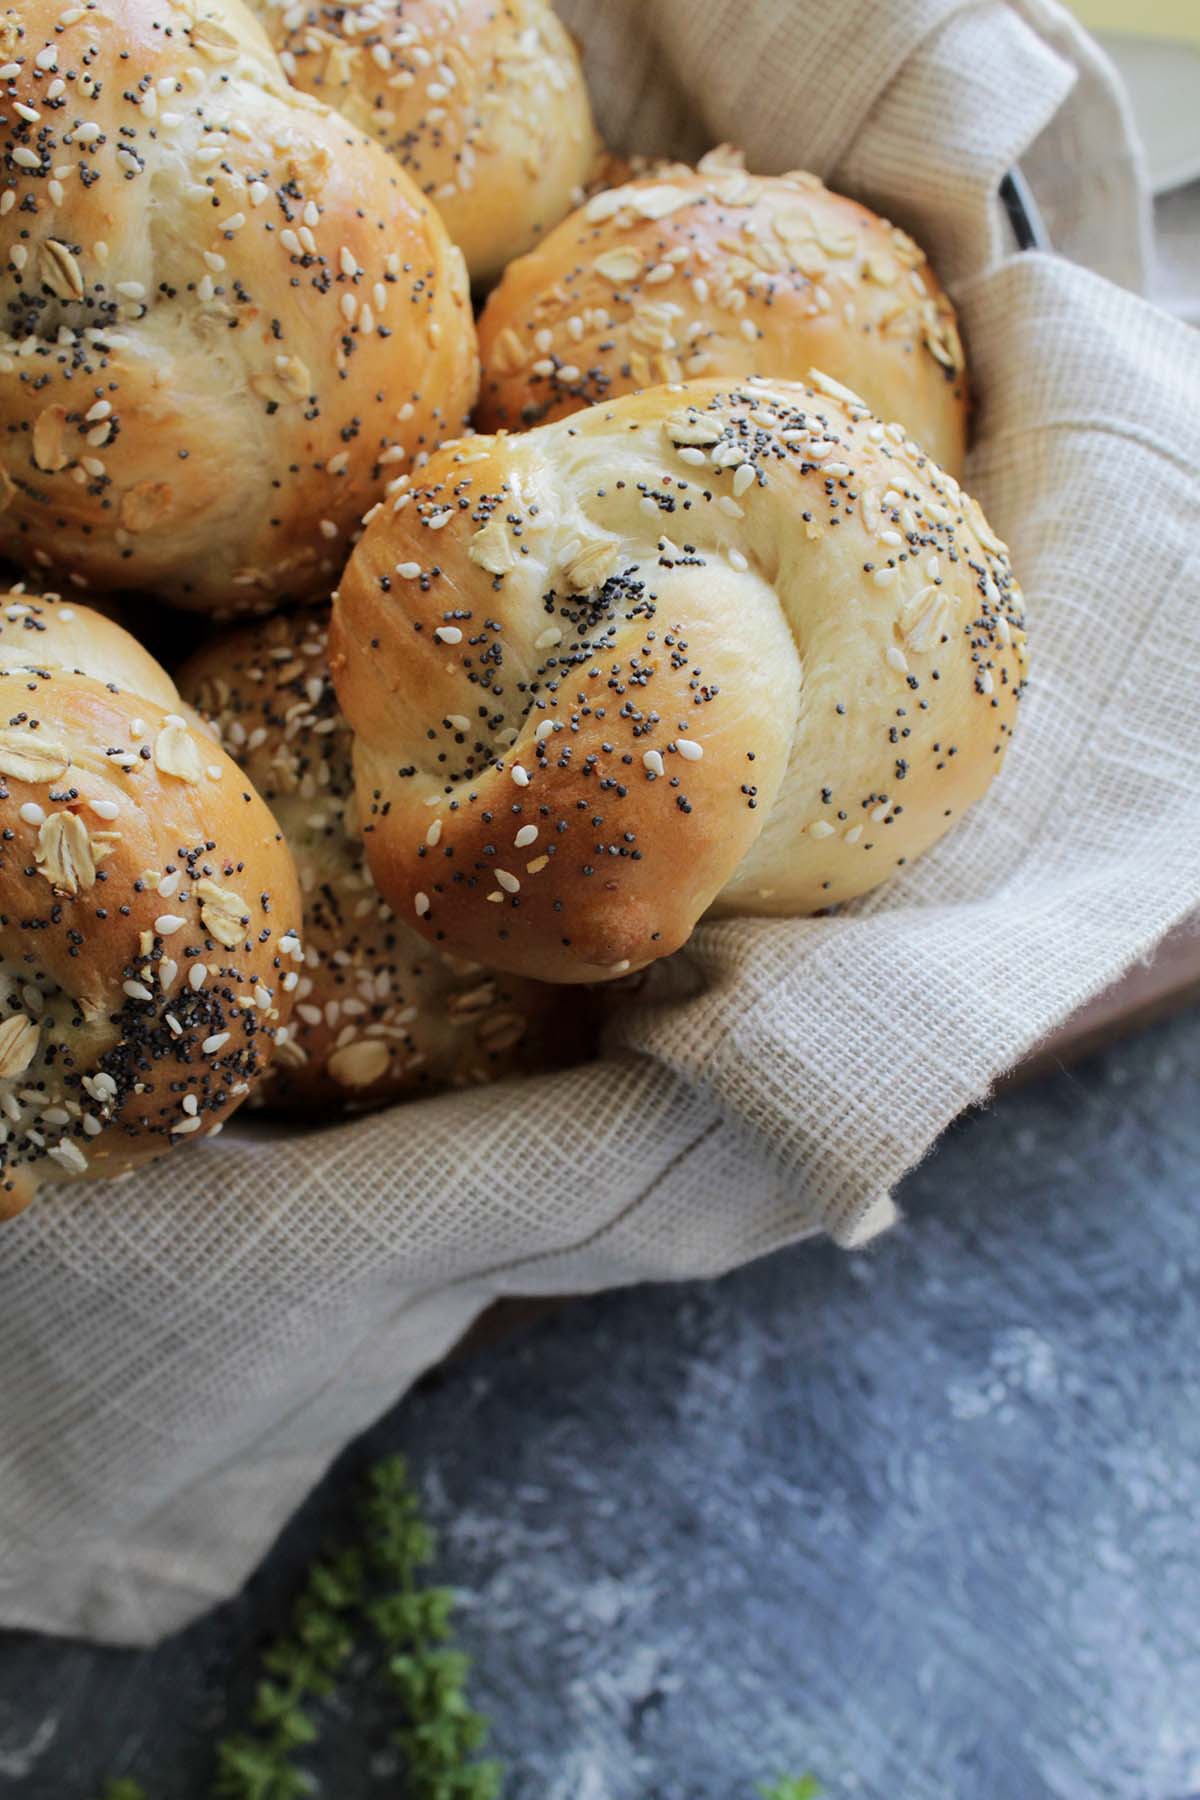
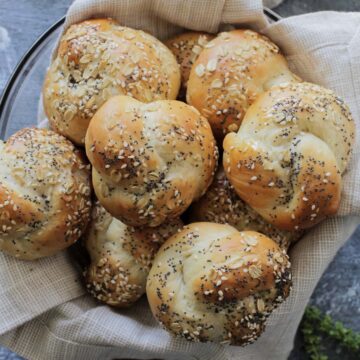
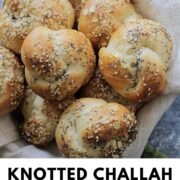
Learn how to bake a batch of easy challah dinner rolls or buns. These rolls are light, fluffy, and topped with a seed mixture for some texture.
Want To Save This Article?
Enter your email below and we'll send it straight to your inbox. Plus, you'll receive new weekly recipe inspiration.
If you're looking for a baking project, you won't be disappointed with these challah buns. They're a great recipe that the whole family will love.
This recipe is a spin on the challah bread we all know and love. Rather than baking up a whole loaf of bread, this recipe can be made into dinner rolls or buns.
Challah has a rich history! Because of this, you can find many different varieties of challah, different shapes, colors, stuffings, and braiding techniques. This is yet another take on the beloved and classic challah bread.
Jump to:
What You'll Learn In This Recipe
From making this recipe, you'll learn:
- A bit of history about challah, and how the recipe has transformed throughout the decades.
- Why challah classifies as an enriched dough (and what that even means).
- How to properly rise and proof yeasted dough.
For more of my favorite baking tips and tricks, download my free Better Baker Guide. This 13 page guide will be delivered straight to your inbox with all of my favorite baking secrets and tricks.
What are Challah Rolls?
Challah is a very special type of bread that is eaten during Jewish Sabbath and holidays.
There is a lot of symbolism within how you choose to shape your challah. For example, according to My Jewish Learning, braided challah with intertwined arms symbolizes love, while larger loaves with 12 bumps reminisce of the 12 tribes of Israel.
The fluffy and flaky challah that we think of today has evolved over the years. The New York Times shares how the dough has evolved from flatbread to bread full of spices and almost everything in between. It's no wonder challah is such a beloved dish.
From a culinary perspective, challah is known as an enriched dough. Enriched doughs are made with fat and sugar. What's unique about challah is the noticeably higher amount of eggs in the recipe. This contributes to the yellowish crumb.
Depending on the recipe, challah can contain milk and sometimes butter.
Ingredients You Need
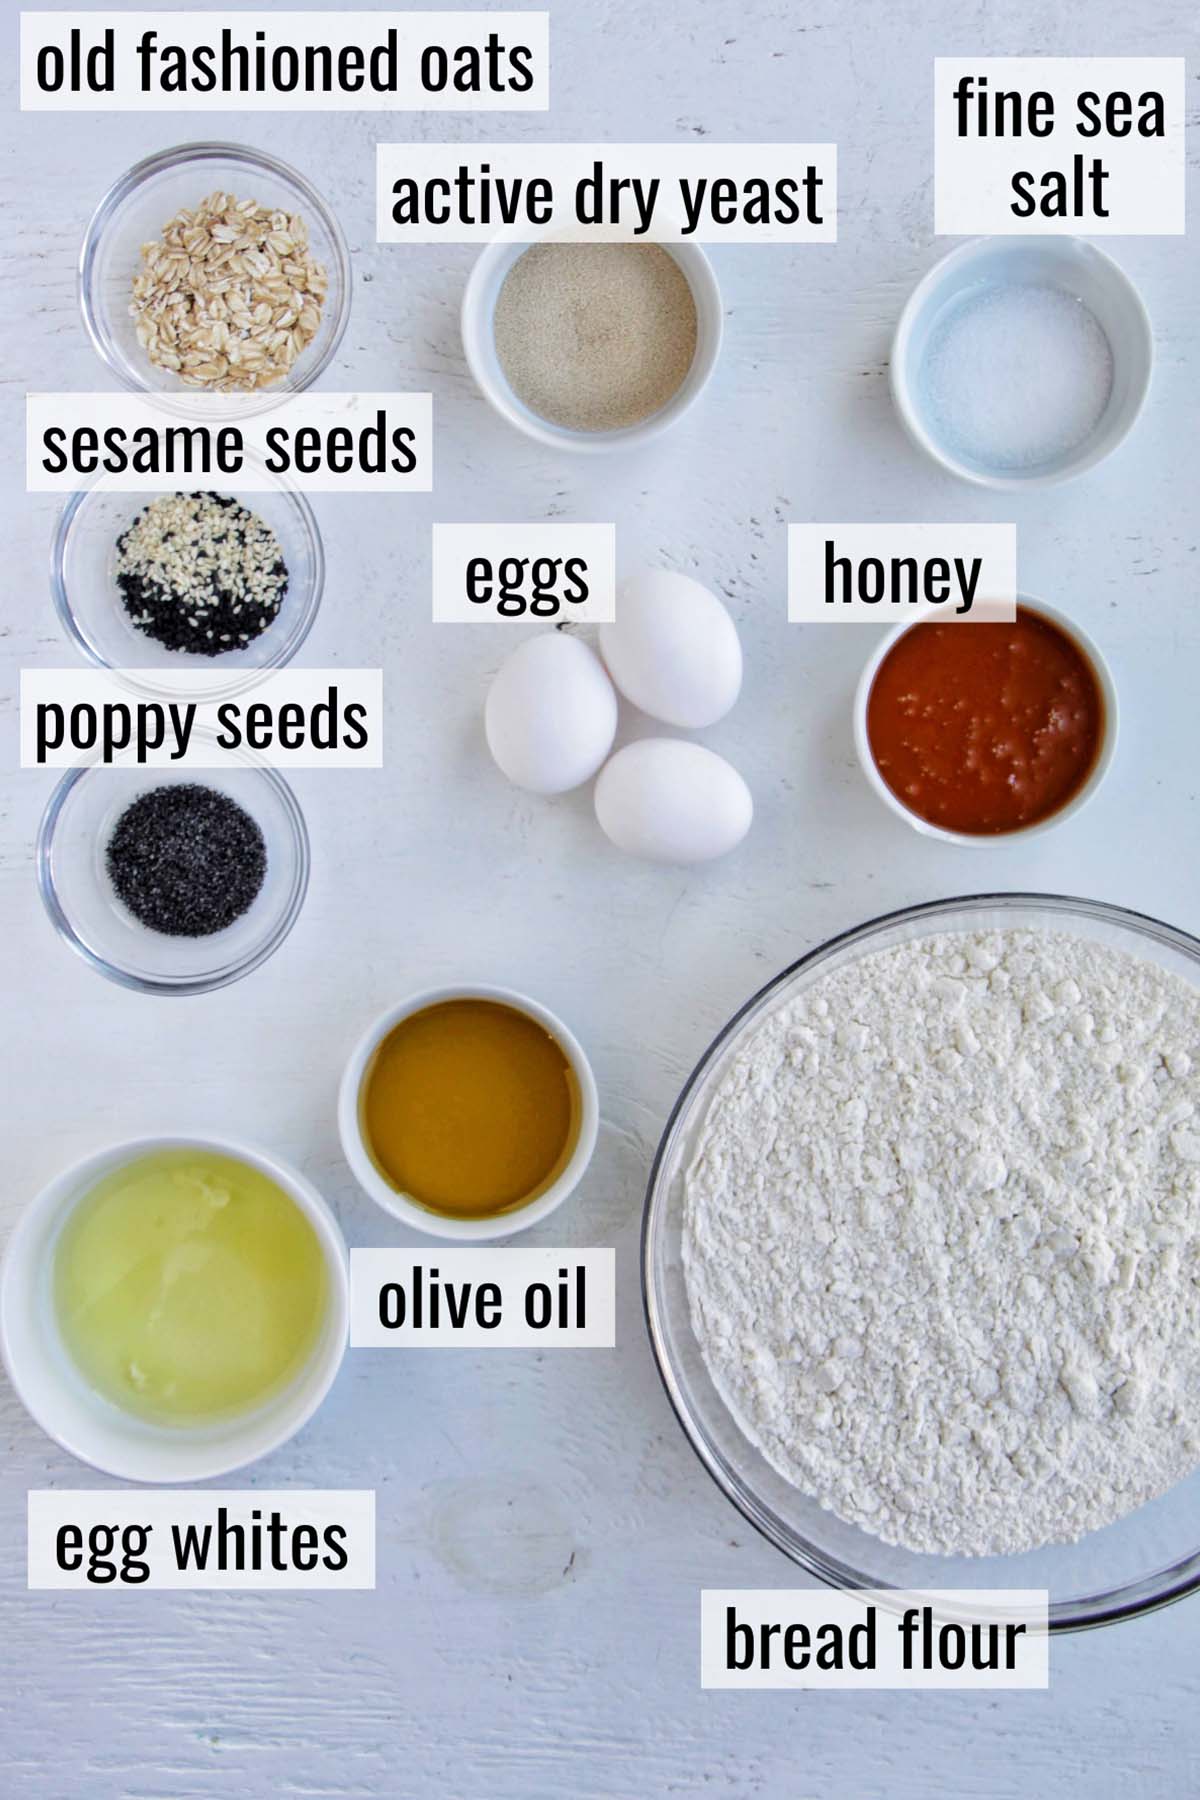
Challah buns require a few ingredients, many of which are common in all enriched dough recipes:
Active dry yeast: Yeast, of course, is the reason our dough is able to rise and turn into a beautiful roll. If you only have instant yeast on hand, you can substitute it for the same amount of active dry yeast.
Honey: Honey not only contributes to the texture of the crumb but also the flavor of these rolls. If you have any leftover honey after making this recipe, you could also make some delicious honey butter to eat on the challah rolls.
Olive oil: You may see some challah recipes that use butter instead of oil. However, oil is more common, according to my research. Be sure to use a high-quality oil with a good taste.
Fine sea salt: I prefer fine sea salt for baking. It distributes very easily and tastes great. Remember, even baking recipes need salt to enhance their flavor!
Bread flour: The protein content in bread flour is slightly higher than all-purpose flour. This is going to give our challah rolls a bit more of a chewy bite.
Eggs: Challah is known for its high level of eggs. Eggs are an important part of the recipe. We'll use whole eggs in the dough and an egg white wash to make the tops of the buns nice and golden.
How To Make This Recipe
Let me show you just how to make these challah rolls, with step-by-step photos. You'll also learn a little science behind the baking process.
Make the Topping
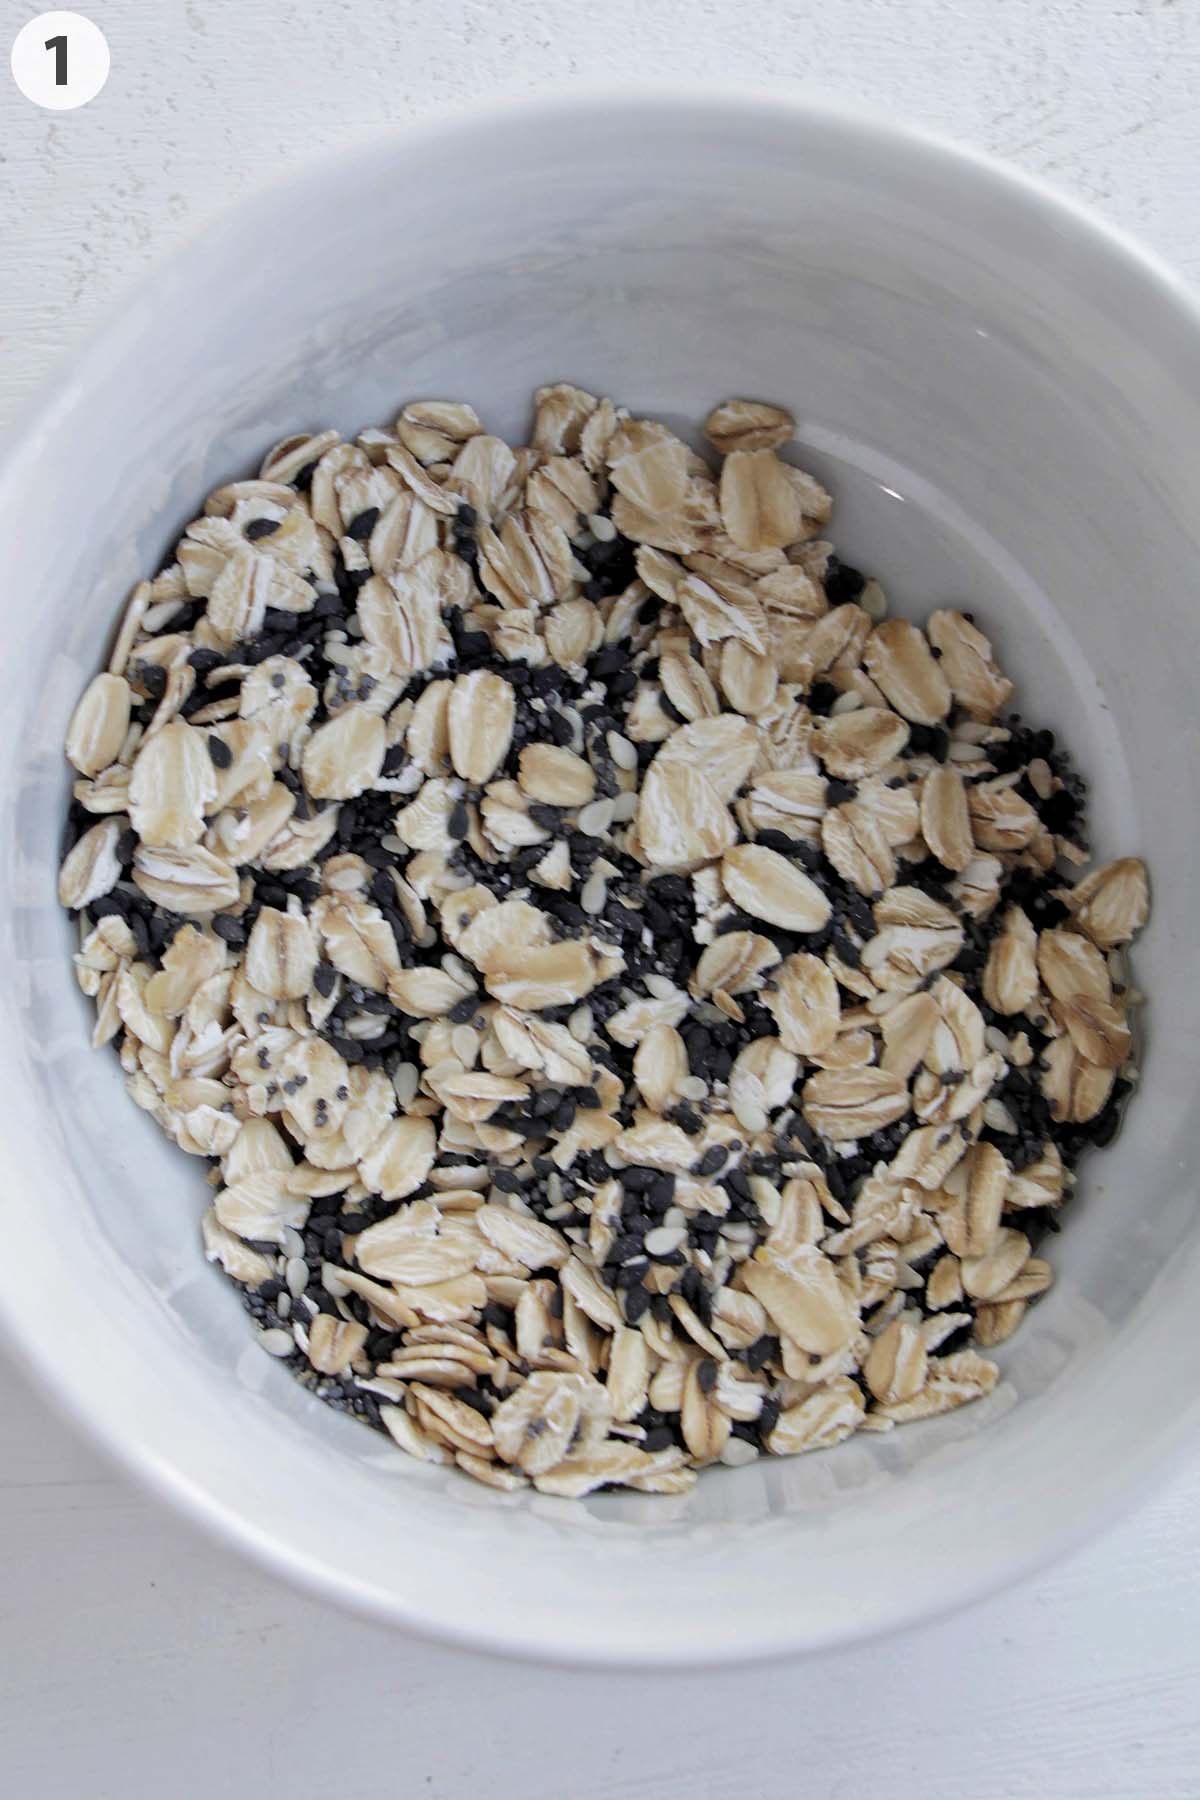
One thing that makes this challah roll recipe unique is the topping! It combines a perfect blend of poppy seeds, rolled oats, and sesame seeds.
Proof the Yeast
Next, we are going to proof (rehydrate) the yeast. Technically, most modern-day yeast doesn't need to be rehydrated. It can just be added straight to the dough. However, I like to proof my yeast to ensure it's alive as well as kickstart it.
You'll know your yeast is alive if it becomes foamy on top after rehydrating in the water at around 110°F (43°C). Just make sure the water isn't too hot. Your yeast will die in temperatures around 138°F (58°C).
Mix the Dough
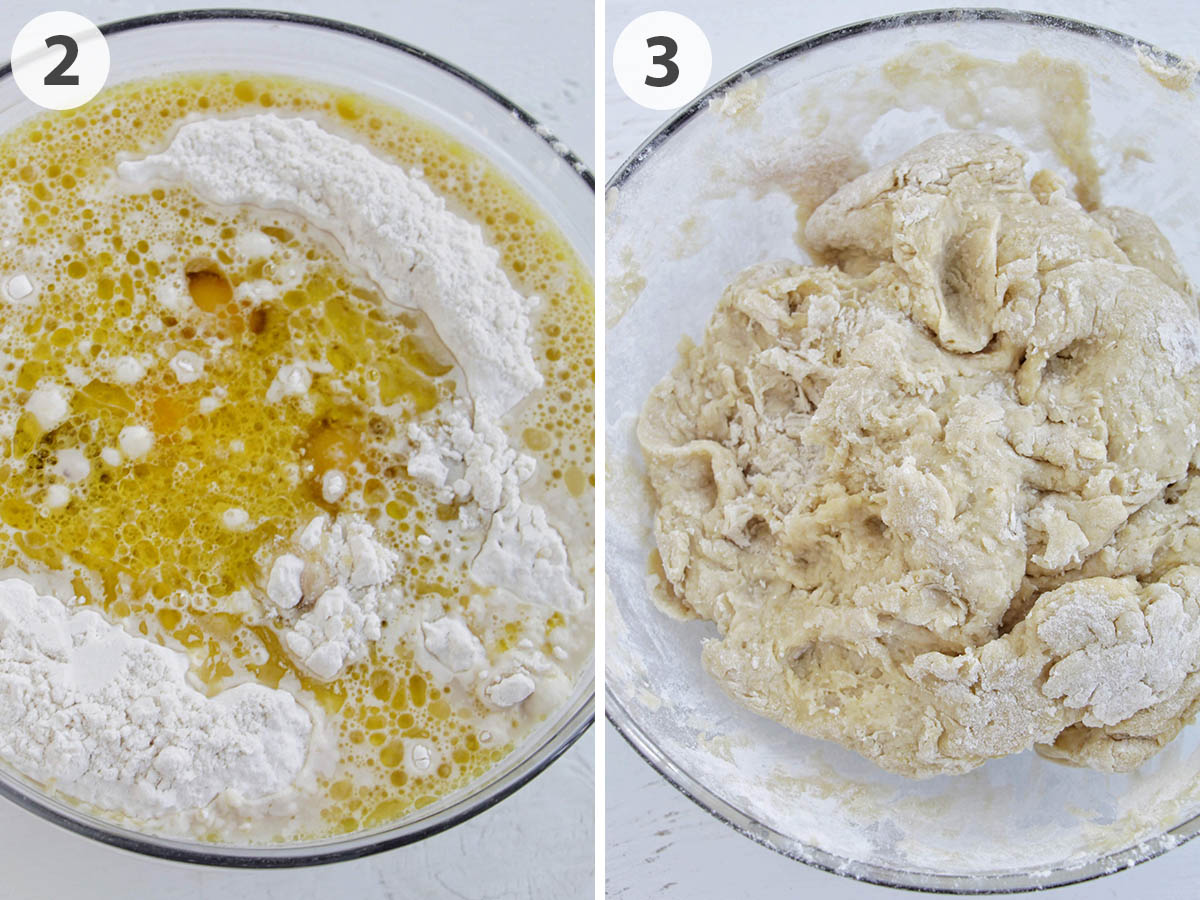
Next, it's time to mix all the ingredients together to form the challah dough. We're using a mixing method called the straight dough method with a little moderation since we need to add fat and sugar to the enriched dough.
Basically, the straight dough method is a system for mixing the ingredients together to help form a well-developed bread recipe. It takes less time than other mixing methods since you combine and mix all the ingredients together without any resting time in between.
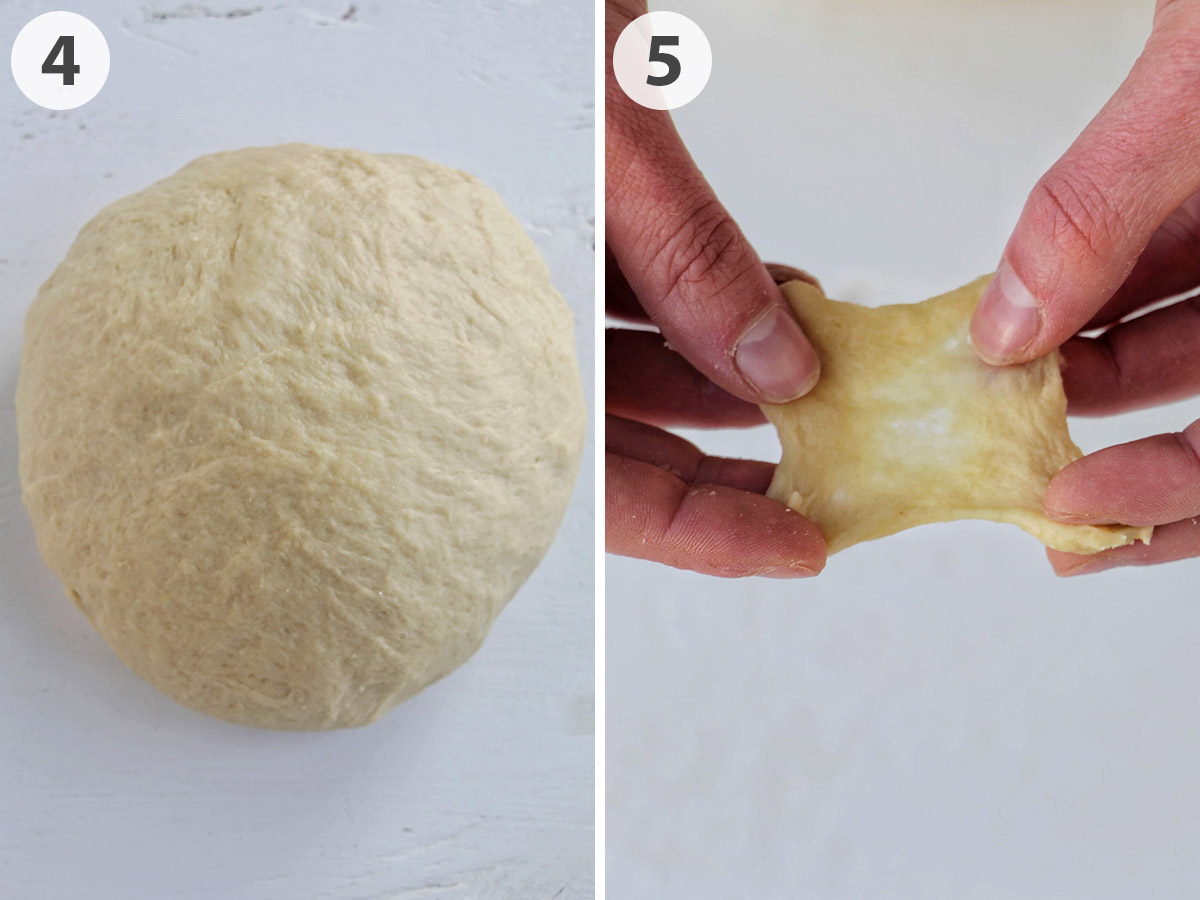
Be sure that you have mixed the dough long enough to form the proper gluten structure. Enriched doughs can take longer to develop because of the added sugar and fat.
To test that the dough is ready, perform the windowpane test. To test the dough, pinch off a little piece and stretch it. If it breaks right away, you need to continue kneading the dough. If you can pull the dough apart and it can thinly stretch without tearing apart, it’s sufficiently kneaded.
Allow Dough To Rise
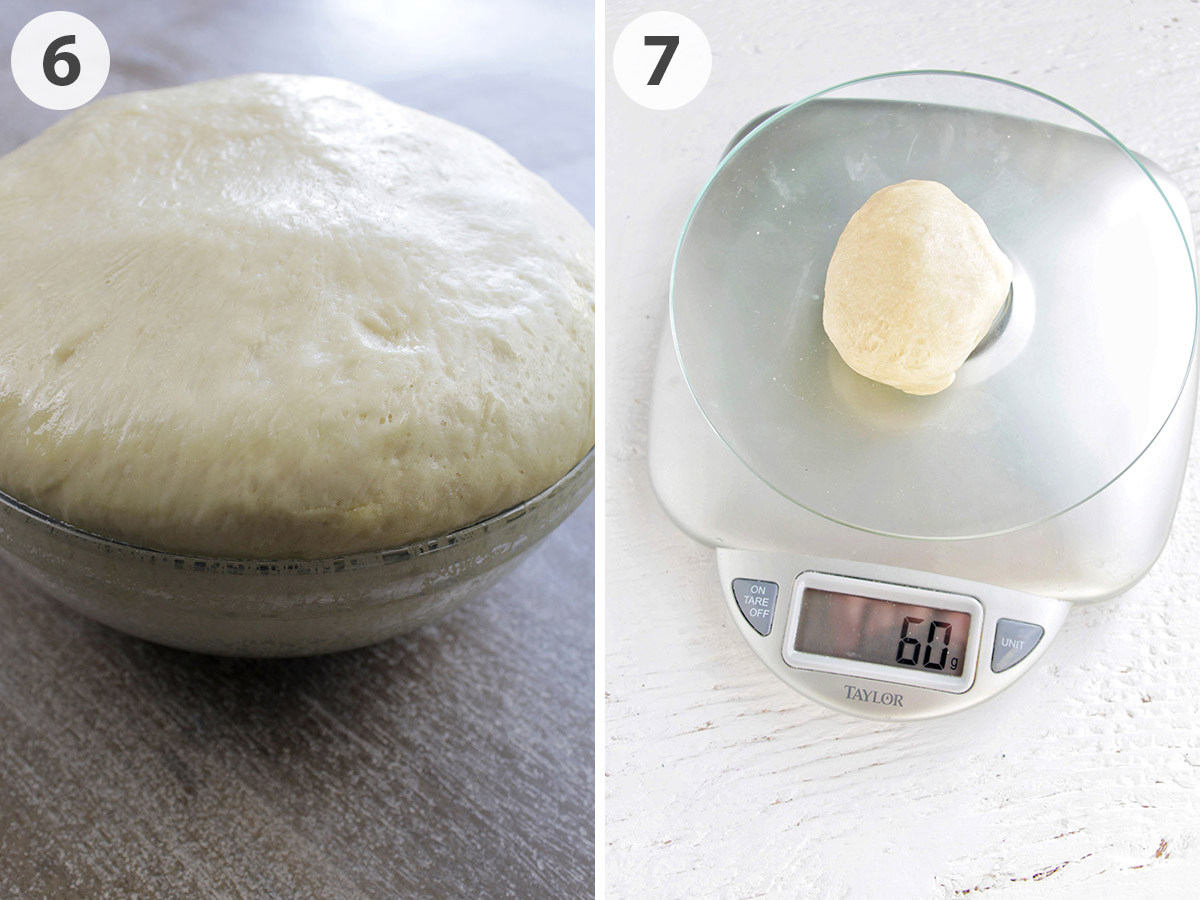
Once the dough is kneaded correctly, it's time to let it rise until doubled in size. Usually, this process will take about 90-120 minutes. However, this time can vary depending on how cold or hot your environment is.
The warmer your house, the less time it will likely take to rise. It's important to check that the dough has doubled in size, rather than just setting a timer and hoping 90-120 minutes was the correct amount of time. Always go by the physical indicator (doubled in size) rather than a time limit.
After the dough has risen, punch it to release some of the gas. Then, divide the dough into 20 equal portions weighing about 60 grams each.
Shape The Rolls
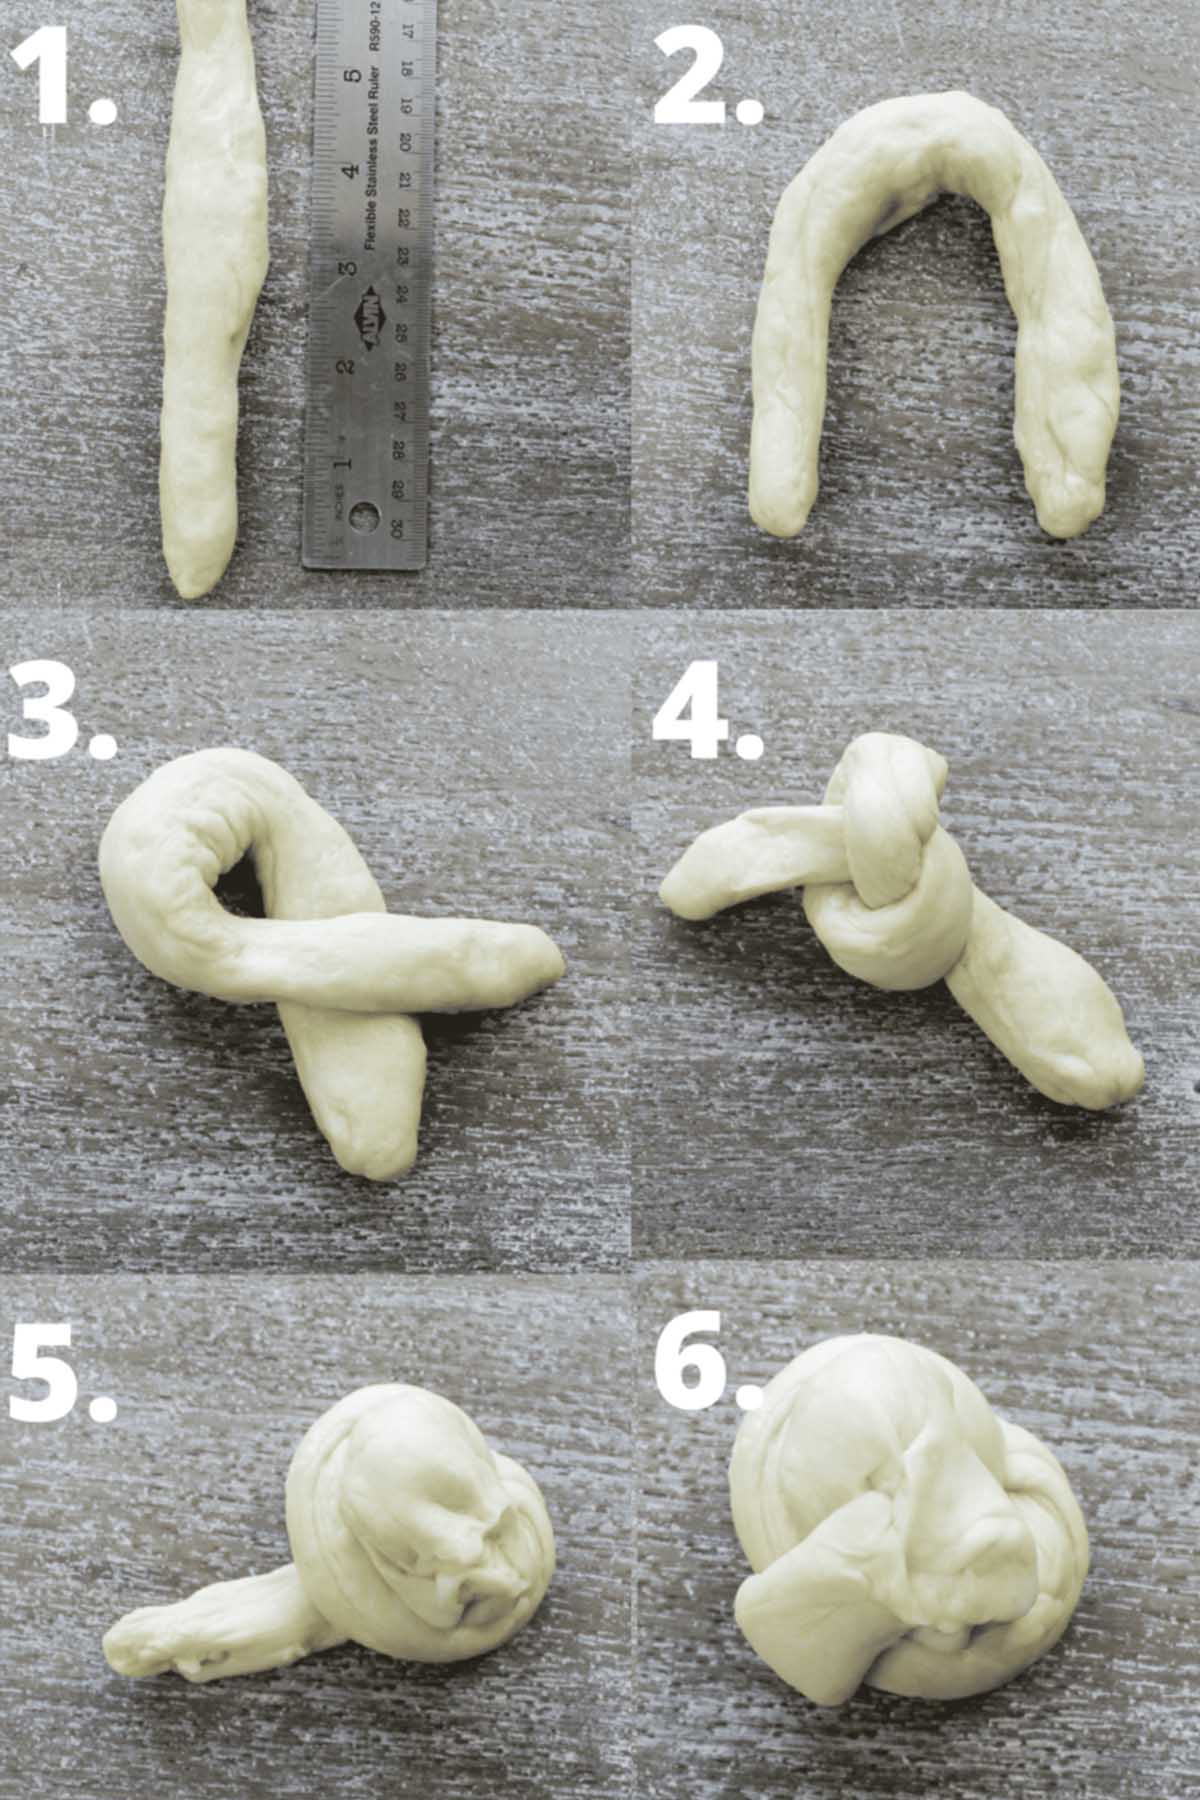
The unique part about this challah recipe is the fact that we're shaping the dough into mini rolls. Here are a few photos to help you with the shaping process:
- Gently roll each piece of dough against the counter into an elongated log shape, about 8 inches in length.
- Shape the log into an upside-down letter U shape.
- Then, cross one arm over the other.
- Grab the right bottom arm and thread it through the hole.
- Allow the left arm to fall down to the side.
- Pinch the ends of each arm together to secure them on the underside.
Proof Dough & Bake
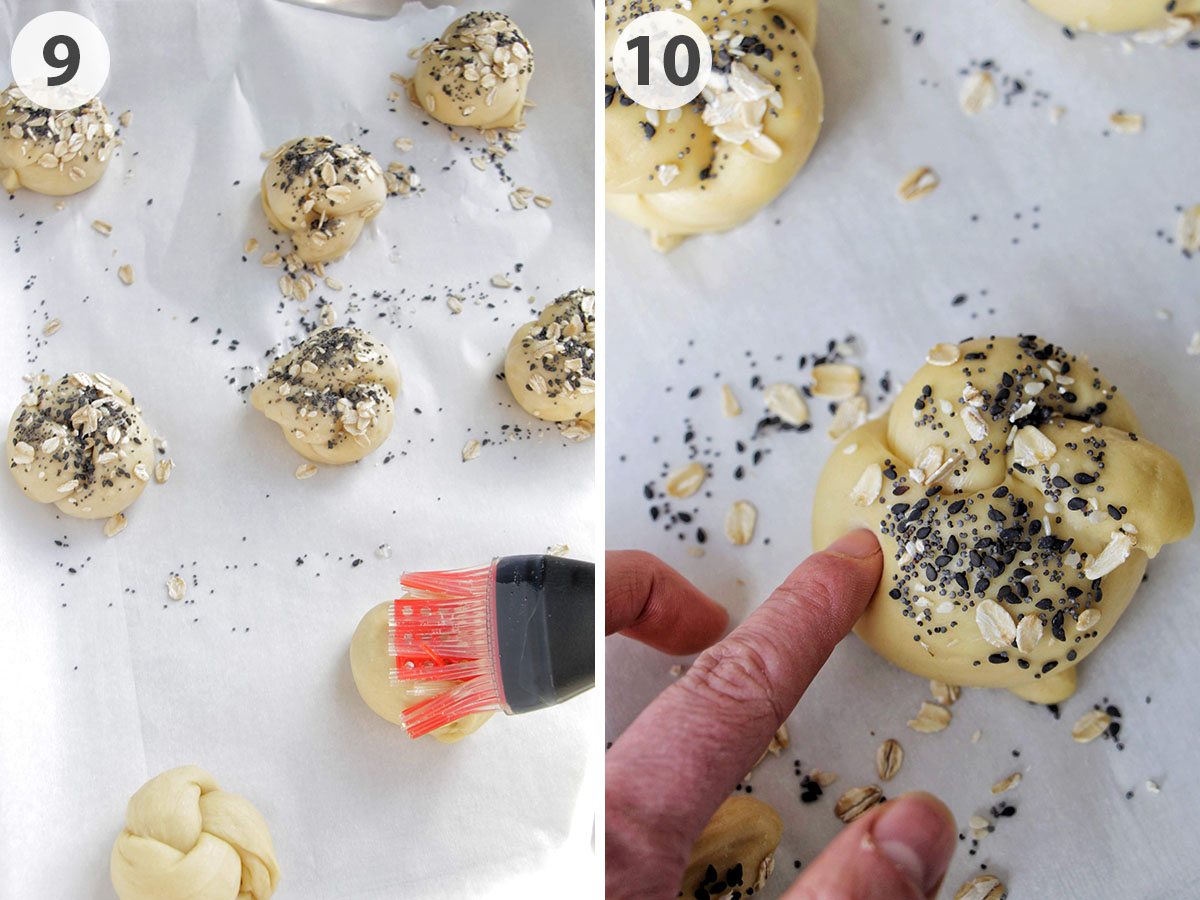
Next, brush the rolls with egg wash, which is a combination of egg whites and water. Generously sprinkle the seed mixture on top.
Then, it's time to proof the challah rolls.
Proofing is the final rise given to the dough prior to baking. You'll want to check that your buns have properly proofed. To do this, gently touch the dough. If it slowly springs back, it's ready to bake!
Check the dough after 30-60 minutes to see if the rolls are done proofing. Enriched dough can collapse if it has been over-proofed.
Check the dough periodically to ensure it never reaches this point. Over-proofed dough never springs back when it's poked.
Finally, we'll bake the rolls until golden brown. They will sound hollow when you tap the bottom.
Expert Tips
- If you wish to make challah buns, divide the dough into 12 even pieces, about 100 grams each. This will result in larger buns, big enough for sandwiches or burgers. Gently roll each piece of dough against the counter into an elongated log shape, about 12 inches in length. Then follow the braiding instructions in the recipe card below.
- These challah rolls will last for up to 5 days when stored in an airtight plastic bag or storage container. For more helpful tips, check out my guide for storing, freezing, and reheating, challah bread.
- If you're having trouble braiding the challah rolls, watch this helpful video guide on how to bread challah rolls.
Recipe FAQs
Enriched dough can take a while to rise with the addition of fat. Also, depending on the temperature of your house, the amount of time it takes the dough to rise can vary. In general, the colder your environment, the longer it takes for the dough to rise.
Even if it's taking a while, it's better to wait until the dough has doubled in size, rather than moving along in the baking process before it has properly risen. The crumb of the finished challah rolls will be dense if the dough has not properly risen.
Proofing is the final rise after shaping the dough and before baking.
It is possible to overproof your challah dough, and it can result in collapsed rolls and poor flavor. Don't worry, it's easy to check if your dough is correctly proofed. Simply use your index finger and gently poke the dough. If it slowly springs back when touched, it's perfectly proofed.
Over-proofed dough never springs back when it's poked.
If your challah rolls turned out dense, it's likely you didn't allow the dough to rise as long as it needed. Typically, the dough needs to rest for around 90-120 minutes during the bulk fermentation stage (first rise). However, the rise time can vary depending on your environment. Make sure to go by how the dough looks visually (until doubled in size), rather than by the time limit.
Pro tip - Allow the dough to rise in a bowl that is roughly the same size as the dough will be when it doubles in size. This helps you visually see once the dough has properly risen.
Many people love the stringy texture of challah. Trust me, it's a thing! In order to achieve this texture, you first need a good recipe, which you can find below.
What really gives the stringy texture is the shaping process. I've found that tighter braided/shaped challah tends to be more stringy. Make sure to use your hands to shape the dough (not a rolling pin) to keep the air present in the dough.
I like to allow my dough to rise during the bulk fermentation and proofing stage on top of my oven. Turn your oven on to a low temperature (250°F - 300°F). This will allow the top of the oven to heat up just enough - to around 75°F - 80°F - and create the perfect environment!
These challah rolls will last for up to 5 days when stored in an airtight plastic bag or storage container. For more helpful tips, check out my guide for storing, freezing, and reheating, challah bread.
More Bread Recipes


Love this recipe? Please leave a 5-star ⭐⭐⭐⭐⭐ rating in the recipe card below. Have questions as you're cooking? Leave a comment below, and I'll help!
Challah Rolls
Equipment
- bench scraper
Ingredients
- 2 tablespoons old fashioned rolled oats
- 1 tablespoon sesame seeds
- 2 teaspoons poppy seeds
- 4 teaspoons (12 grams) active dry yeast
- 3 large (150 grams) whole eggs
- 7 tablespoons (147 grams) honey
- 5 tablespoons (58 grams) extra virgin olive oil
- 6 cups (720 grams) bread flour
- 2 teaspoons (12 grams) fine sea salt
- 2 large (70 grams) egg whites
Instructions
- Combine rolled oats, sesame seeds, and poppy seeds in a small bowl. Mix and set aside.
- In a small saucepan, warm 1 cup (227 grams) of water over medium-low heat until it reaches 110°F (45°C) on an instant-read thermometer. Pour water into a medium bowl and whisk in yeast. Once thoroughly combined, stir in eggs, honey, olive oil.
- In a separate large bowl, whisk flour and salt just until combined.
- Make a well in the center of the flour and pour in the wet ingredients. Slowly incorporate the flour into the wet ingredients using your hands or a wooden spoon. Continue mixing until a shaggy dough has formed.
- On a clean, lightly floured surface, remove the dough from the bowl. Knead the dough by hand for 10 minutes until smooth and elastic. If you find the dough is sticking to your hands, you can add a bit more flour while kneading (no more than ¼ cup (30 grams)). To check that the dough is properly kneaded, grab a small, penny-sized ball of dough between your fingers and slowly stretch it out. If the dough can stretch thin enough to allow light to pass through without tearing, the dough has been properly kneaded. If the dough rips as soon as you start pulling, continue kneading until you can perform the dough stretch test without any tears.
- Place dough in a lightly greased glass bowl. Cover with plastic wrap and allow to rise in a warm (around 75°F - 80°F (24°C - 27°C)), draft-free place until doubled in size, about 90-120 minutes. Rise time will vary depending on the temperature of your environment. Make sure to go by how the dough looks visually (until doubled in size) rather than by the time limit.
- Punch down the dough to release some of the gas. Divide dough into 20 equal portions (about 60 grams each) using a bench scraper. Cover divided dough with a tea towel so it doesn’t dry out while you shape the rolls. Gently roll each piece of dough against the counter into an elongated log shape 8 inches in length. Shape the log into an upside down letter U, then cross one arm over the other. Grab the right bottom arm and thread it through the hole. Allow the left arm to fall down to the side, and pinch the ends of each arm together to secure on the underside. See photos above for assistance. Place the finished rolls 2-3 inches apart on a parchment lined baking sheet. Repeat the shaping process with the remaining dough.
- Whisk together egg whites and 2 tablespoons (28 grams) of water. Generously brush rolls with egg wash using a pastry brush, then sprinkle with seed mixture. Cover the leftover egg wash and place it in the refrigerator to use later. Cover baking sheet with a tea towel, and allow rolls to proof in a warm, draft-free place until doubled in size, about 30- 60 minutes. You can test if the dough is properly proofed by gently touching it with your index finger. If the dough slowly springs back and leaves a small indent, it’s ready.
- Place oven rack in an upper middle slot. Heat oven to 350°F (175°C). Gently brush rolls with a second layer of egg wash.
- Bake for 18-22 minutes until the rolls are golden brown and sound hollow when thumped. Allow rolls to cool to room temperature on a cooling rack.
Ryan
Jessica graciously allowed us to try some of these amazing Challah rolls! They were perfectly done. The rolls had the precise amount of density with excellent seasoning to enhance the flavor. The kids loved the Challah rolls just as much as my wife and I did. We are very lucky to be her neighbor! She is such a great chef that we are always awaiting her call to try anything she whips up! Thank you, Jessica!
Jeremy Olson
Needed something new for Thanksgiving. Made a batch of these rolls and they were a hit with the family at Thanksgiving.
Sandra
Such a delicious side dish idea! The bread flour added a bit of extra chewiness. I will definitely be making these again - I'm going to try challah buns next time!