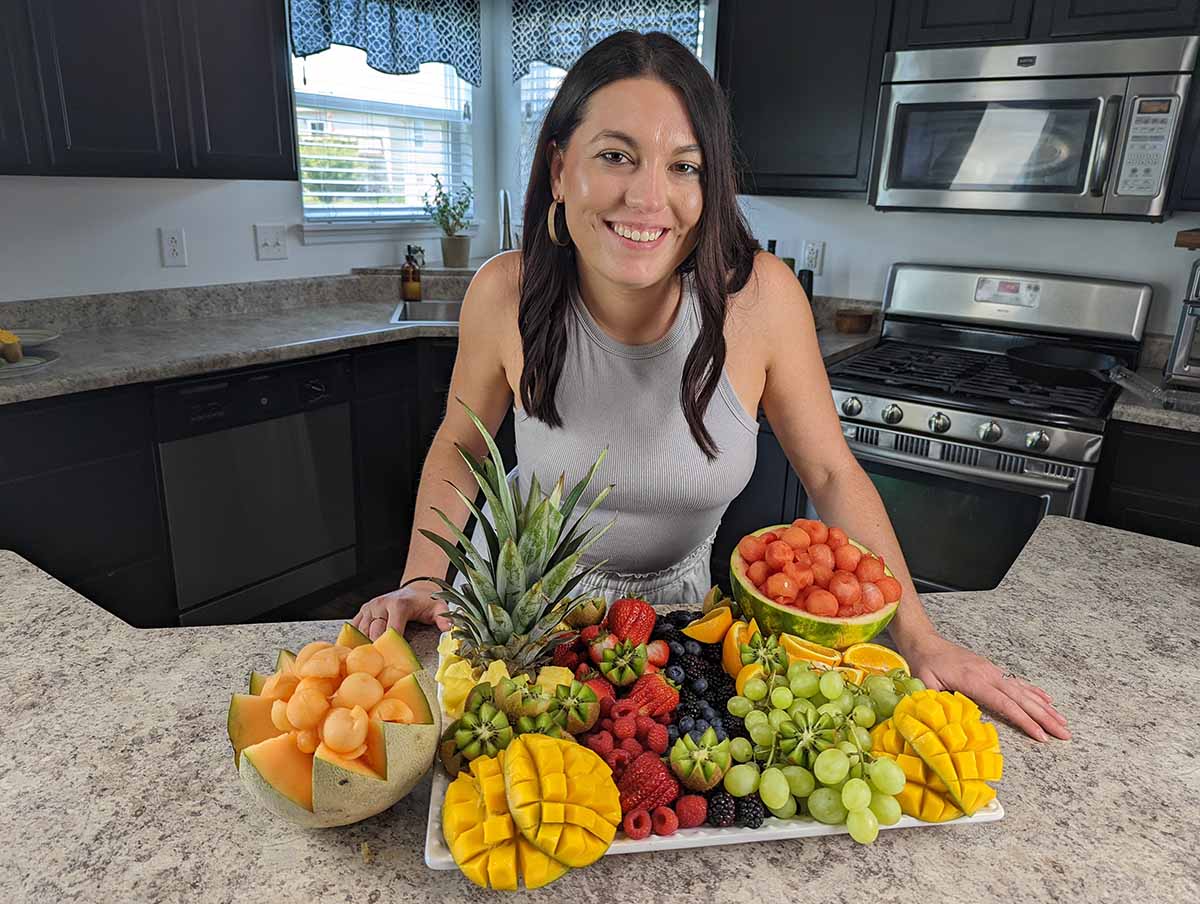
Learn step by step how to build a DIY fruit display for a party, wedding, baby shower, or bridal shower. This decorative fruit platter will be a show-stopping centerpiece that your guests will love.
Want To Save This Article?
Enter your email below and we'll send it straight to your inbox. Plus, you'll receive new weekly recipe inspiration.
When it comes to entertaining and parties, food is always the center of attention! If you're looking to build a small fruit display that will wow your guests, you've come to the right place.
I'll teach you step by step how to shop for the ingredients you'll need to build a decorative fruit tray, as well as how to cut all the fruit into pretty shapes and assemble the display.
Whether you need a fruit display for a wedding, birthday party, anniversary celebration, or even a baby or bridal shower, this guide will teach you everything to successfully assemble a fruit display on your own. You will be able to DIY this fruit platter presentation idea for a fraction of the price it would cost you to have this catered.
Jump to:
What You'll Learn In This Recipe
I'll teach you many things along the way to ensure you have a beautiful fruit board. You'll learn:
- How to buy the best in-season fruit.
- Creative ways to cut the fruit into decorative patterns and shapes.
- My step-by-step process to assembling an aesthetically pleasing display.
If you enjoy learning how to improve your skills in the kitchen, be sure to sign up for my weekly newsletter for more tips and tricks like these.
Ingredients You Need
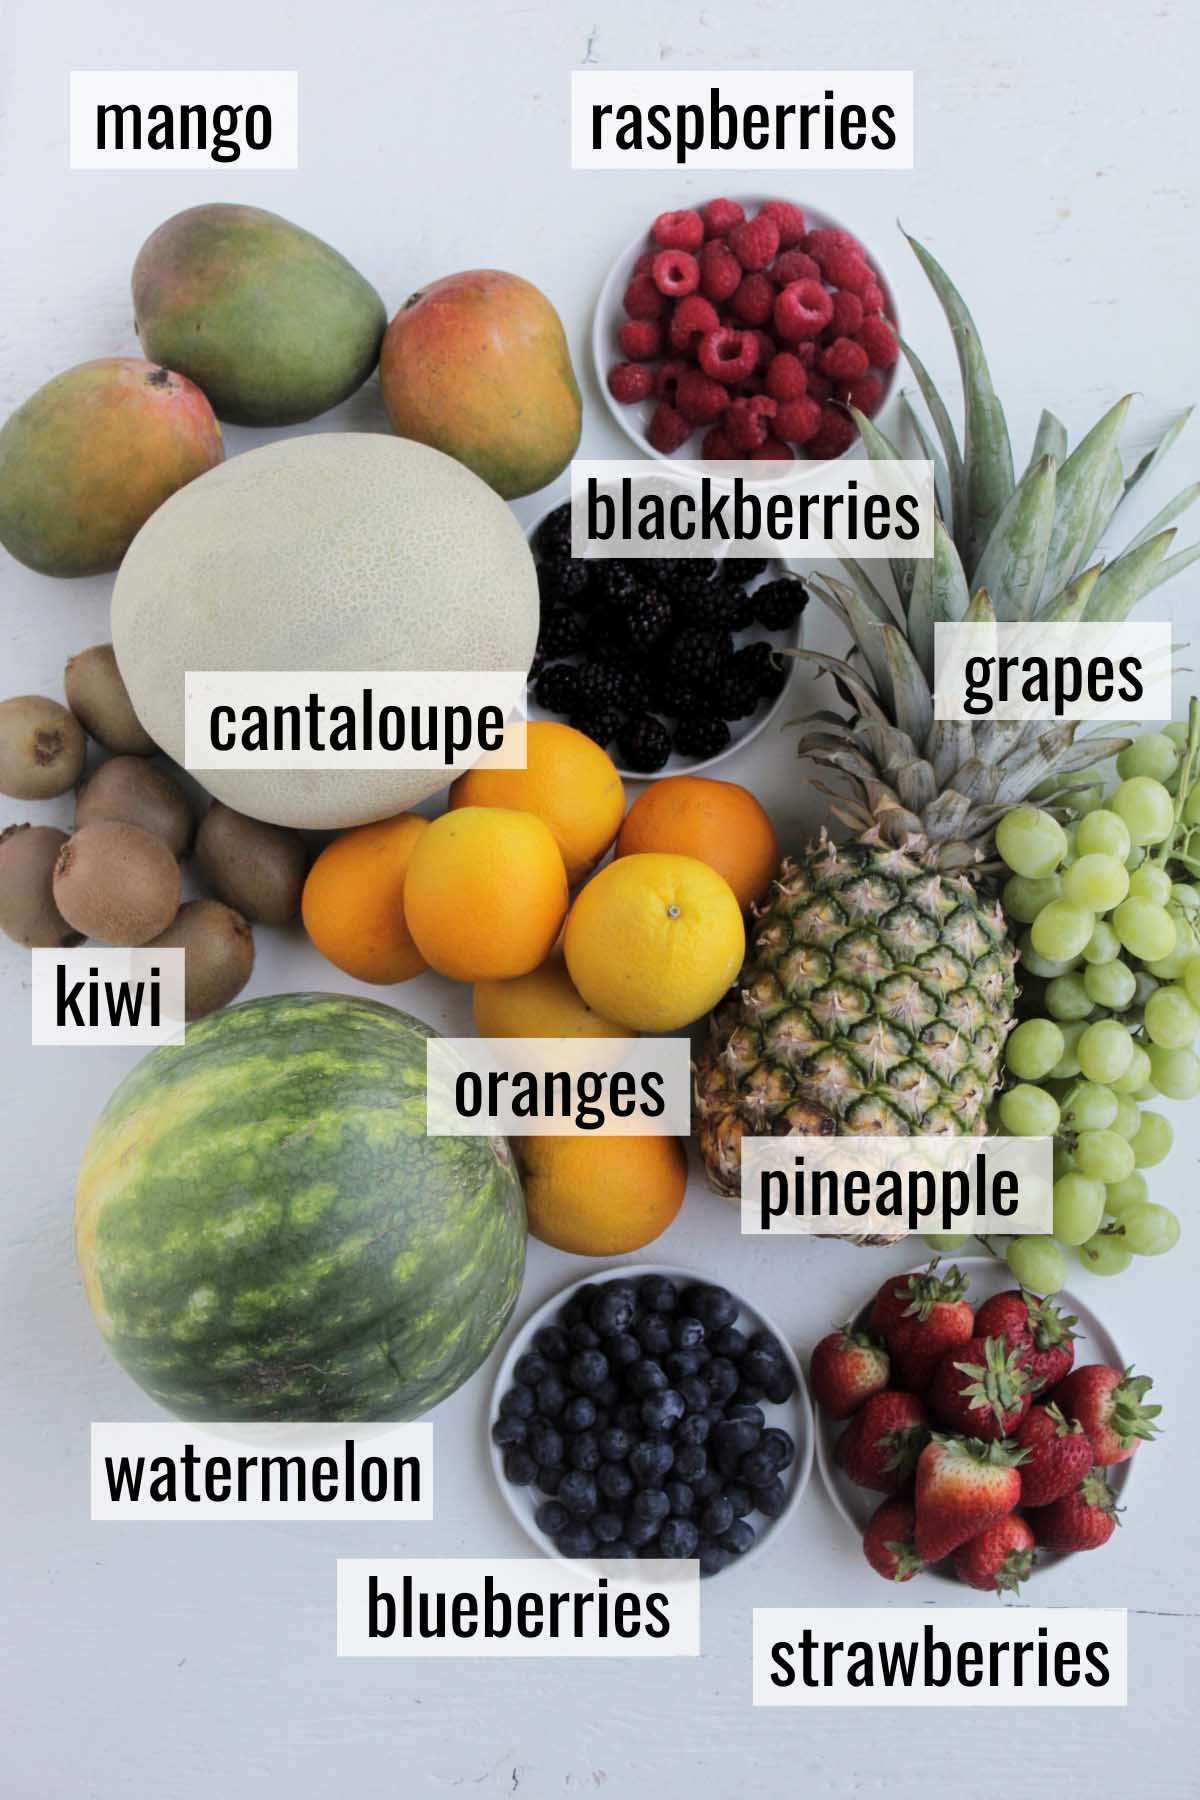
Let's first go over what ingredients you'll need to build a fruit display. Depending on the size of the party, you may need to increase or decrease the quantities to feed the number of guests you have.
When you're purchasing these ingredients, pay attention to the quality of the fruit. Good-quality fruit that is in season will taste better and ensure your presentation is beautiful.
- Blackberries: Blackberries add a rich purple color to the platter. Blackberries are in season from mid-June through August. When purchasing at the grocery store, look for deeply colored, glossy berries. Ensure there is no mold present and none of the berries are smashed or bruised.
- Blueberries: This is a small and firm berry that has a short peak season ranging from mid-June to mid-August. To select high-quality blueberries, inspect the carton to ensure there is no mold present. You'll also want to look for berries that are a deep purple color (un-ripe red berries will be bitter). Make sure the skin is unbroken and unbruised.
- Cantaloupe: This sweet melon has a moist orange flesh with seeds in the middle. You'll generally find cantaloupes at peak season during the summer months. Look for melons that have a good smell coming from the hole where the stem was present. There shouldn't be any large areas of discoloration, soft spots, or bruising.
- Grapes: Green grapes, also known as Thompson seedless grapes, have a crisp texture and sweet taste. They are in peak season from June through August. When selecting grapes at the store, they should be firm and attached to the stems. Avoid grapes that are mushy, shriveled, or molded.
- Kiwi: Kiwis are known for their bright green interior and fuzzy-skinned exterior. This fruit can be found throughout the year since it is imported from various regions and countries. You'll know kiwis are ripe and ready to use when you gently press on the skin and feel a slight give from the fruit.
- Mango: Mangos are a sweet and acidic fruit that have a large pit running through the middle. Mangos have yellow or orange-red skin. When purchased, the mangos should have a good smell, and be free of bruises, blemishes, or shriveled skin. You can allow the mangos to fully ripen (meaning they give when you gently press on the skin) at room temperature. Once ripe, they can last about a week in the refrigerator.
- Oranges: I'd recommend purchasing navel oranges since they are seedless. Navel oranges are in peak season from November through January, although they usually can be purchased year round. Look for oranges that feel heavy for their size. The outer peel should be fairly firm when squeezed and smooth. Remember that the skin color is not an indicator of flavor.
- Pineapple: Picking a pineapple with sweet flesh is simple to do. Grab a fruit that feels heavy and has a sweet aroma. Avoid pineapples with bruises, soft spots, or dried-up leaves. The peak season for pineapples is March through June.
- Raspberries: Raspberries add a beautiful pop of red and a tart flavor to the fruit platter. These berries have a peak season that runs from April to June. When purchasing at the store, inspect the carton thoroughly to ensure the berries are not smashed or moldy.
- Strawberries: This fruit has a short growing season, usually mid-May through early July. Similar to other berries, before buying be sure to inspect the carton. If there are moldy, mushy, or blemished strawberries, avoid purchasing that carton. Strawberries will not last too long, so be sure to purchase these right before you're ready to assemble the fruit display.
- Watermelon: A sweet, juicy watermelon can be found most often in July and August. To select a good watermelon, pick it up and test how heavy it is. It should feel heavy for its size. The yellow spot on the watermelon is where the watermelon rested on the ground, and it usually indicates a ripe melon. If you tap the watermelon and hear a hollow sound, you'll know it's full of juice.
Fruit Alternatives For Different Seasons
Keep in mind that you can change out the fruits to match what is in season during the time you are making this display.
Alternatively, if your guests are allergic or have certain food preferences, you can make substitutions as needed. Here are some other colorful fruit ideas you can try:
Red Fruits: Try switching out the raspberries and strawberries for candied cranberries, pomegranates, or cherries.
Orange Fruits: Instead of navel oranges or cantaloupe, opt for blood oranges, tangerines, red papayas, or persimmons.
Yellow Fruits: Substitute pineapple or mangos for other yellow fruits such as star fruits or gold watermelon.
Green Fruits: Other than kiwi and grapes, you can use green honeydew.
Blue/Purple Fruits: Switch out blueberries and blackberries for other varieties of grapes like red flame grapes.
How To Make This Recipe
The first step to building this display is preparing all of the fruit. Begin by washing and cutting all of the fruit. Since much of the fruit is cut in a decorative manner, I'll walk you through how to get all of these eye-catching designs.
As a note, remember to always wash your hands and wear latex-free, food-safe gloves during this stage if you're making the display for a party. This will keep everything sanitary.
Cut the Strawberries
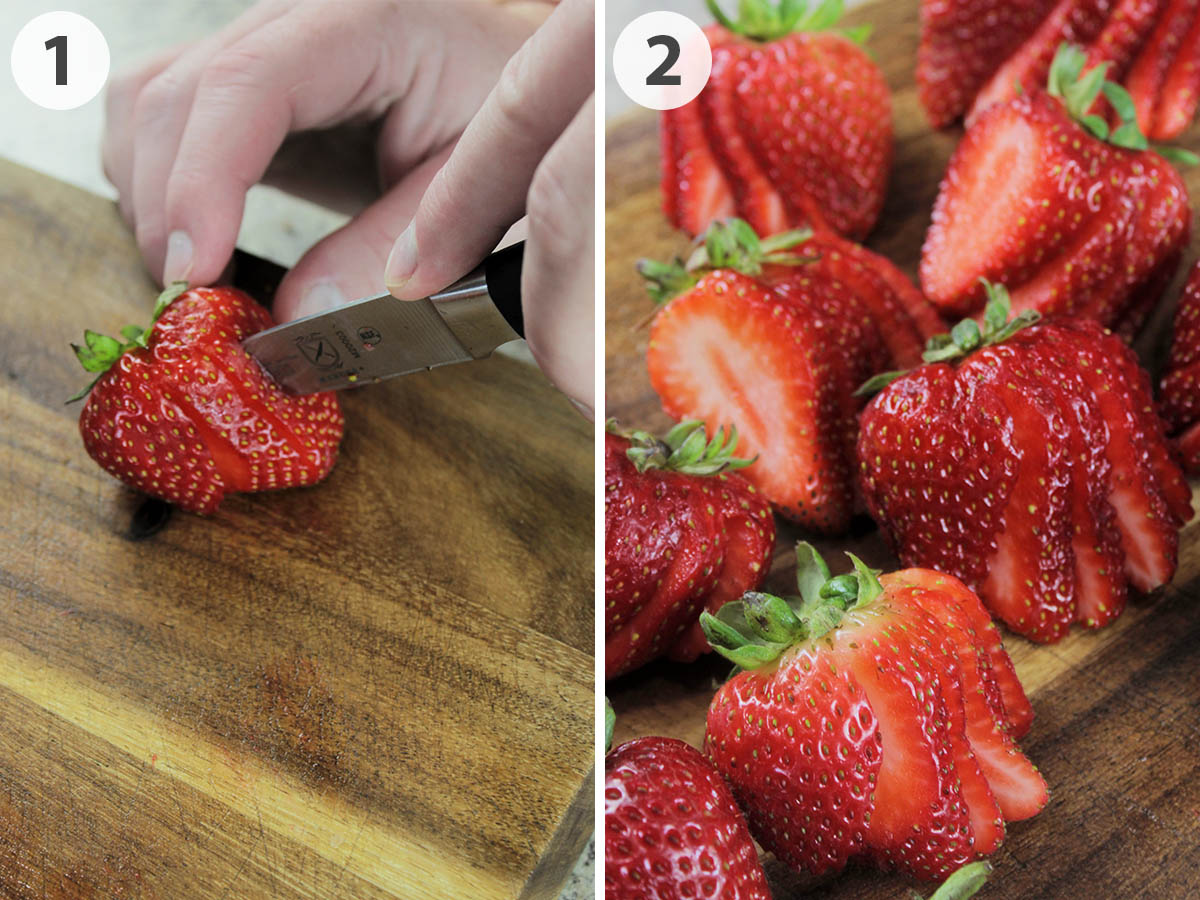
With a paring knife, cut parallel slices into the base of the strawberry without cutting through the stem. Lightly press the strawberry to fan out the slices.
Cut the Pineapple
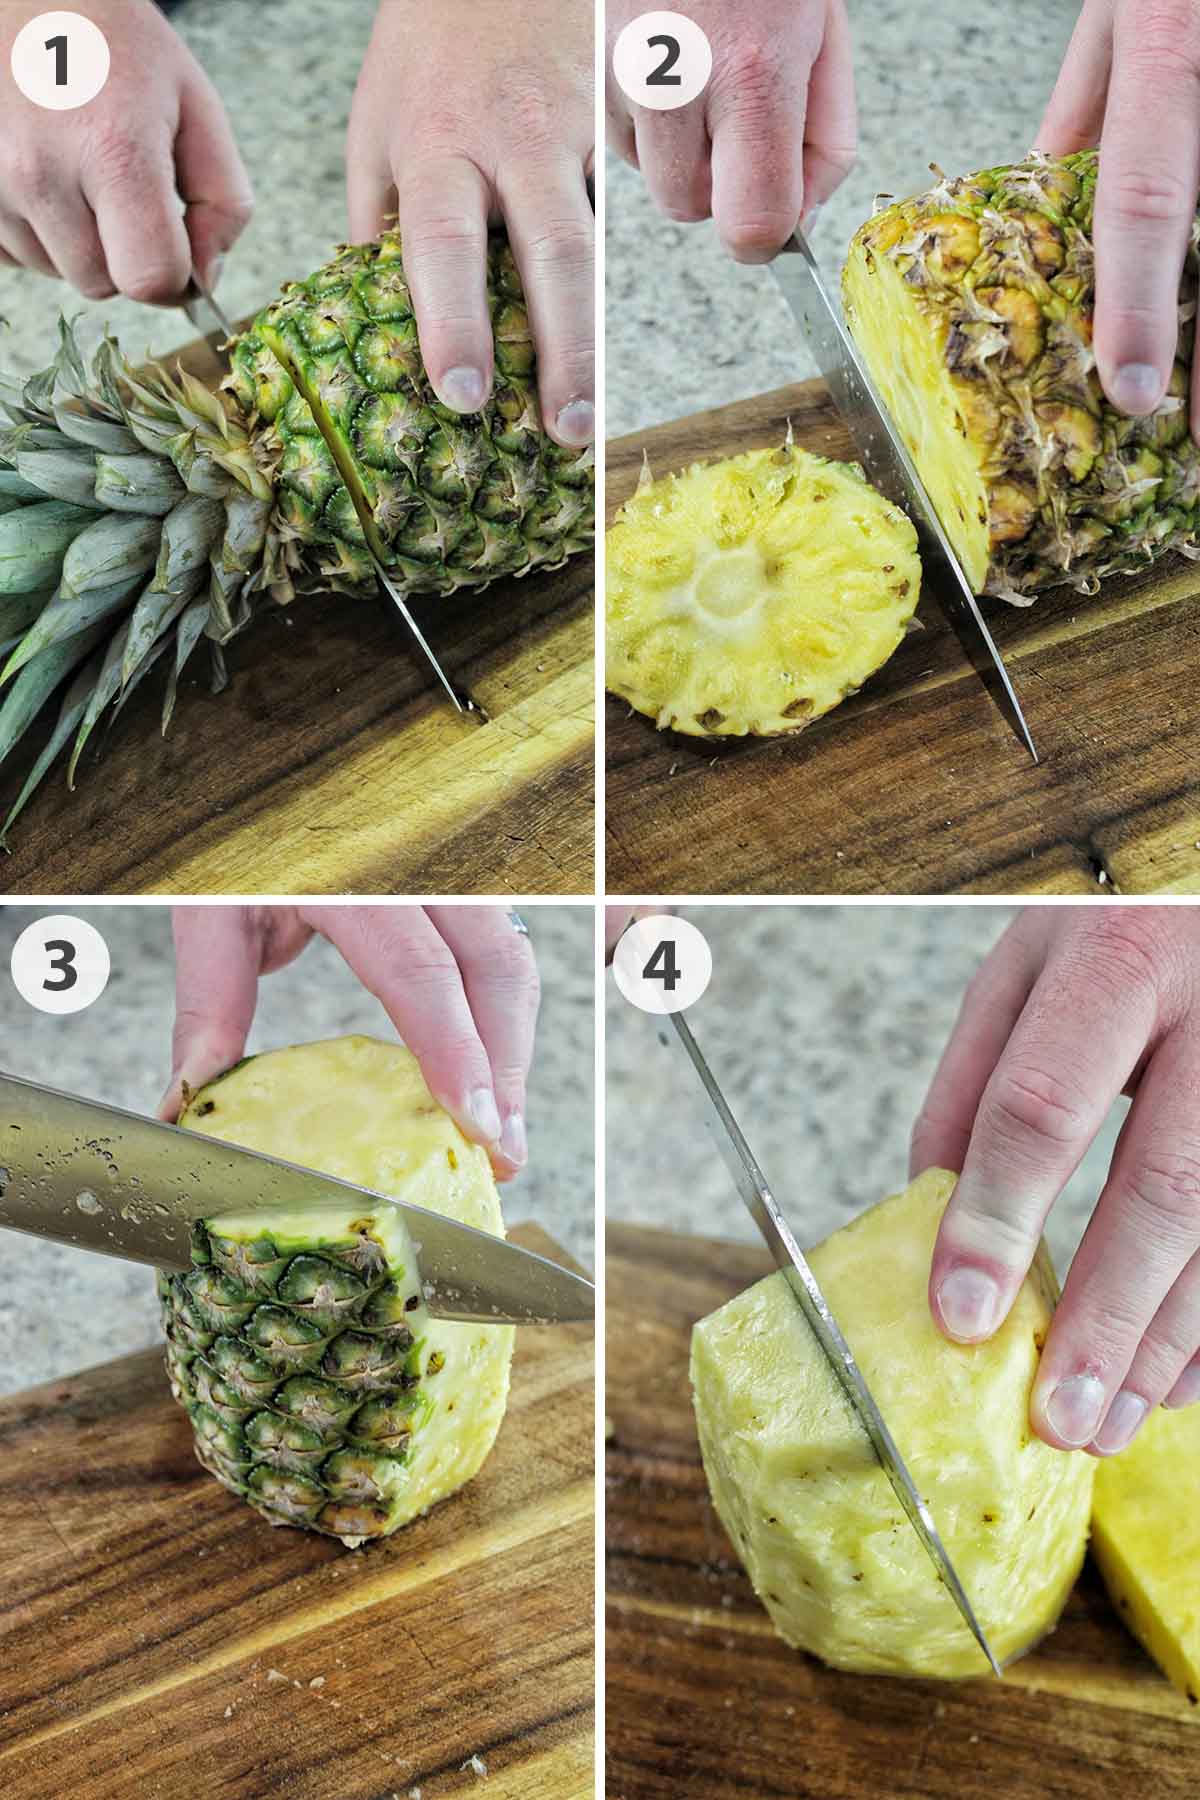
Slice off the top leaves of the pineapple and set to the side (but don't throw them away). We will use the leaves in the fruit display. Next, cut off the bottom of the pineapple.
Stand the fruit upright and cut the peel off in vertical strips. Then, cut the flesh of the pineapple off the tough core. Discard the core (it's too hard to eat).
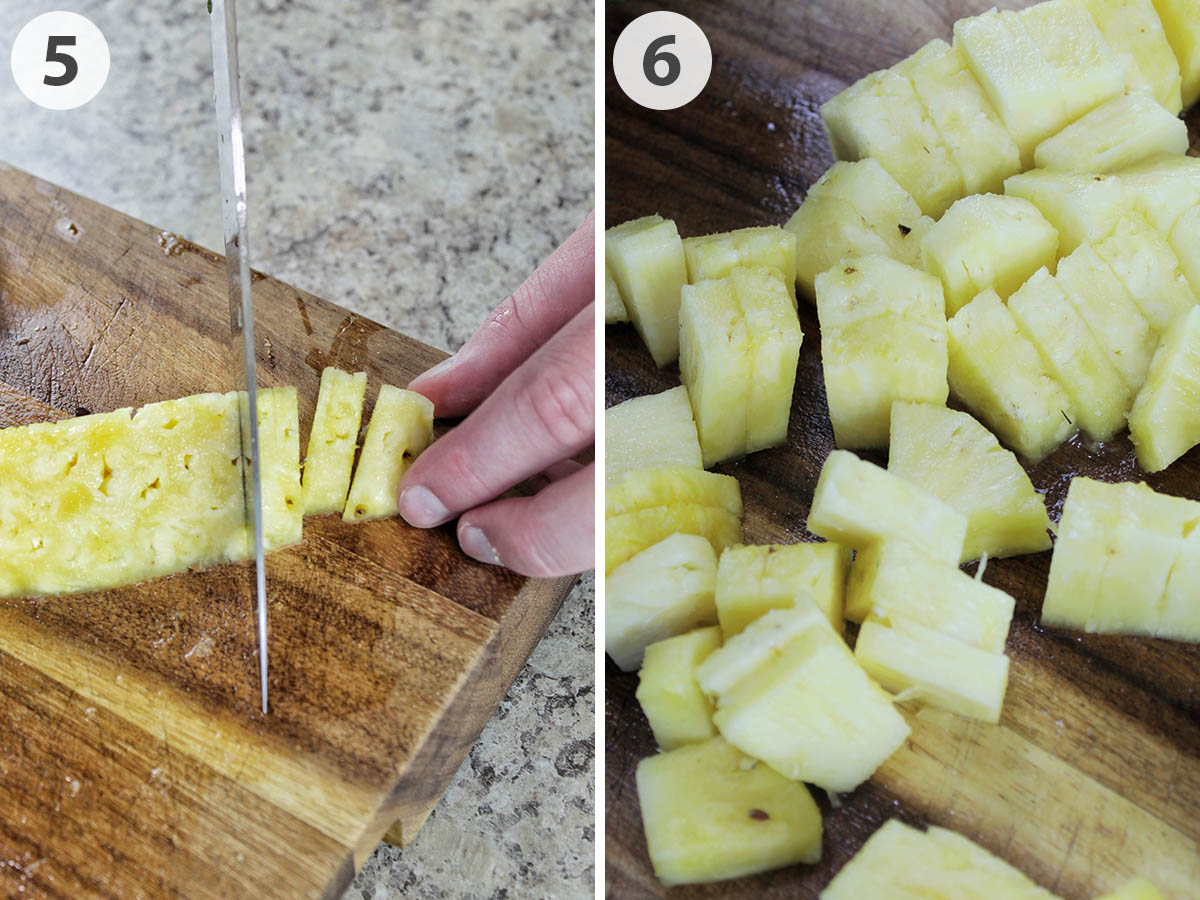
Finally, cut the flesh into even slices. You can cut them as thick or as thin as you prefer.
Check out this YouTube video if you'd prefer to watch how to cut a pineapple.
Cut the Oranges
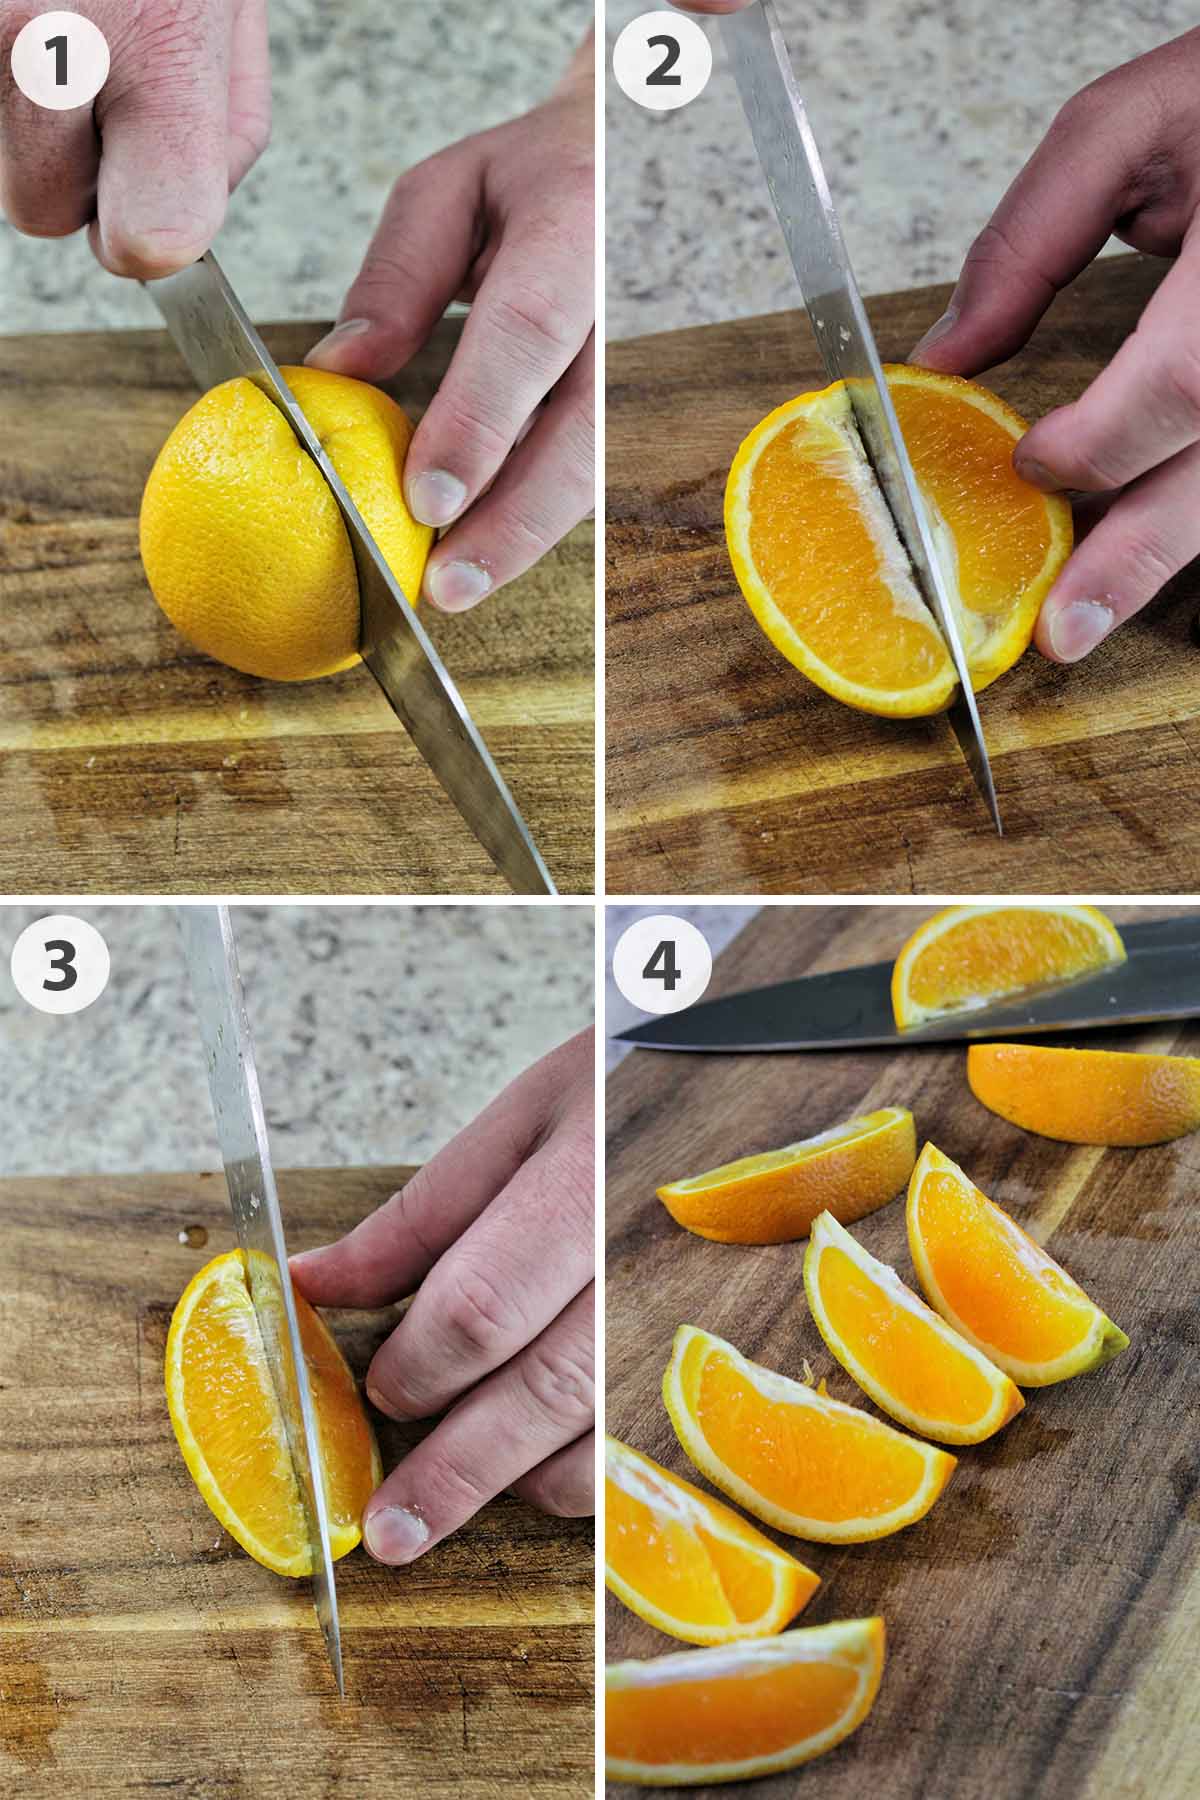
First, slice the orange in half. You'll be left with two halves of an orange. From there, divide the half into another half and then into four small slices. Now you'll have the perfect slices of orange.
Cut the Watermelon
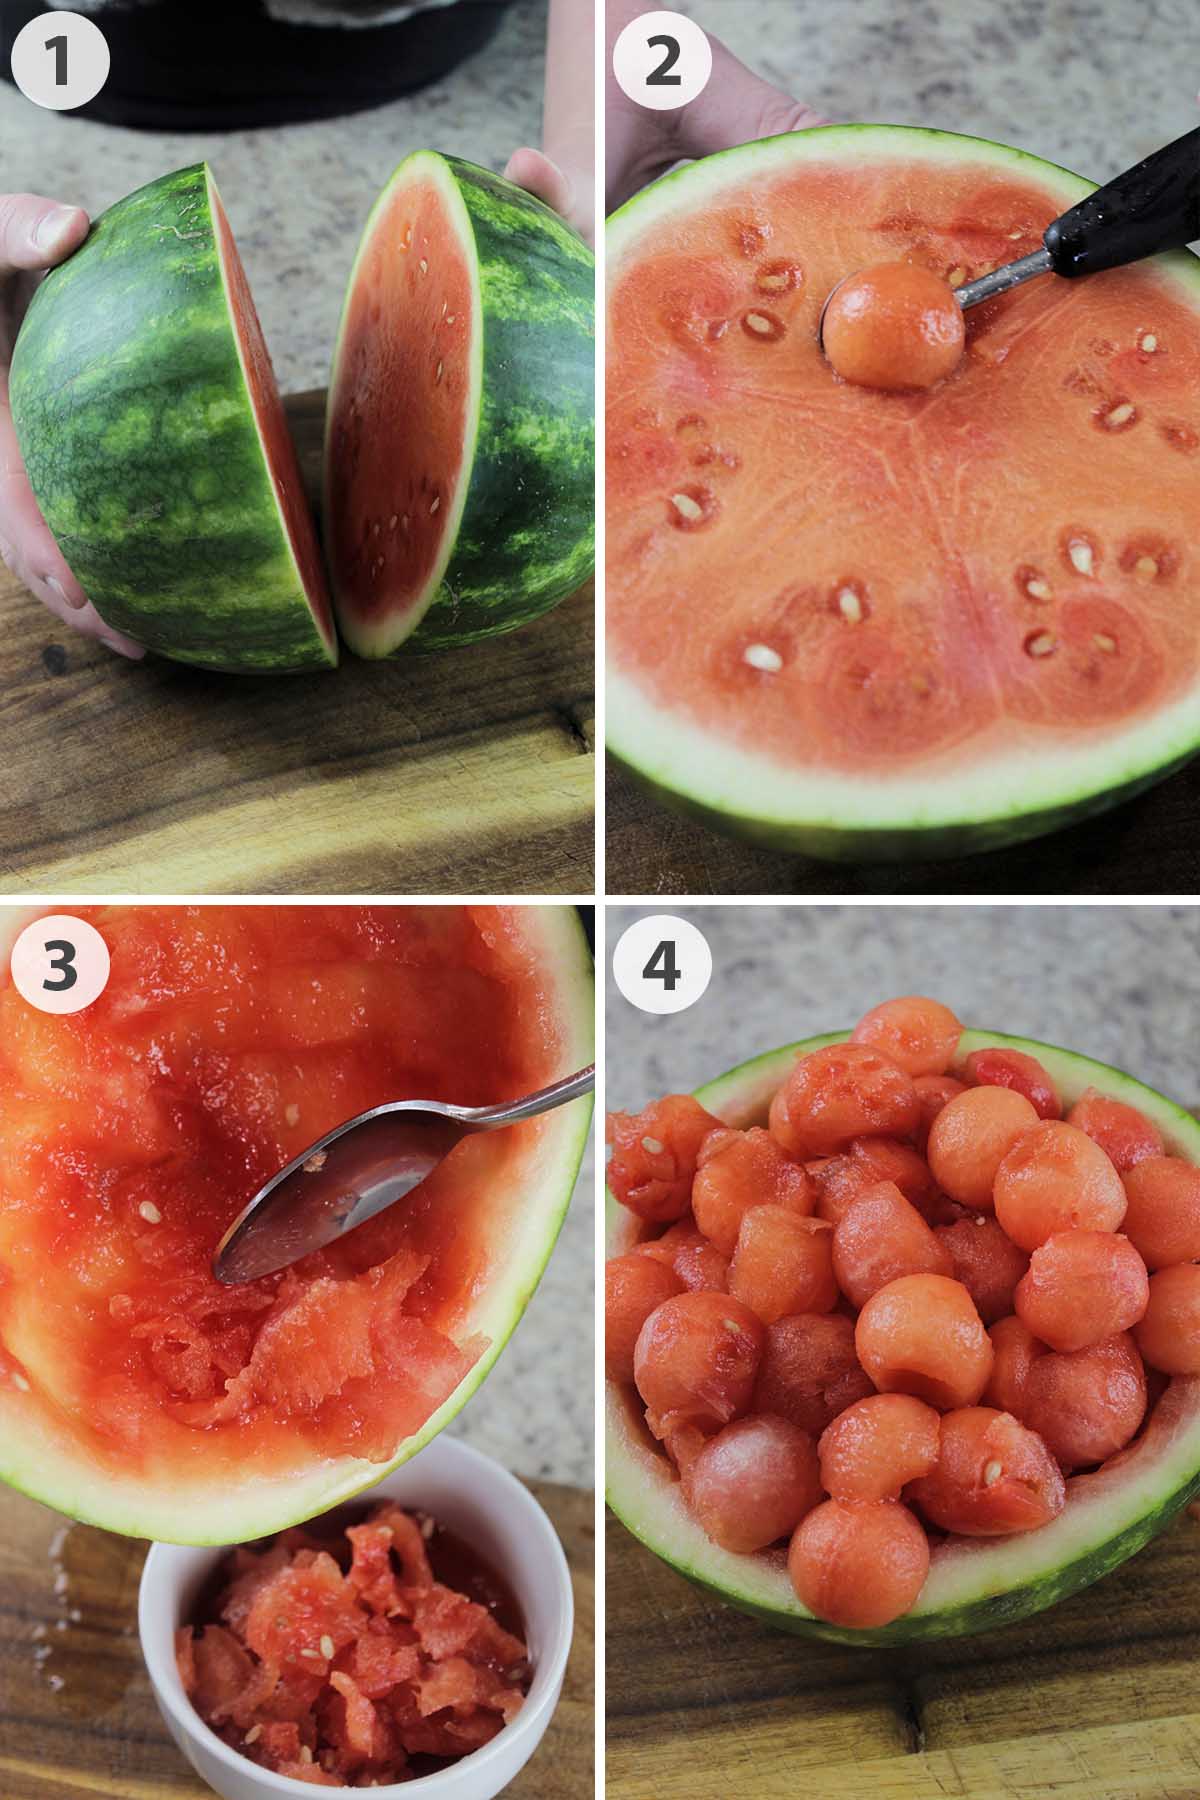
First, cut off both ends of the watermelon. Then, slice the watermelon in half down the short side. Use a melon baller and scoop out the flesh of each side.
With the remaining watermelon rinds scoop out the flesh and dump out any juice. Finally, use this as a bowl to hold the watermelon flesh balls.
Cut the Kiwi
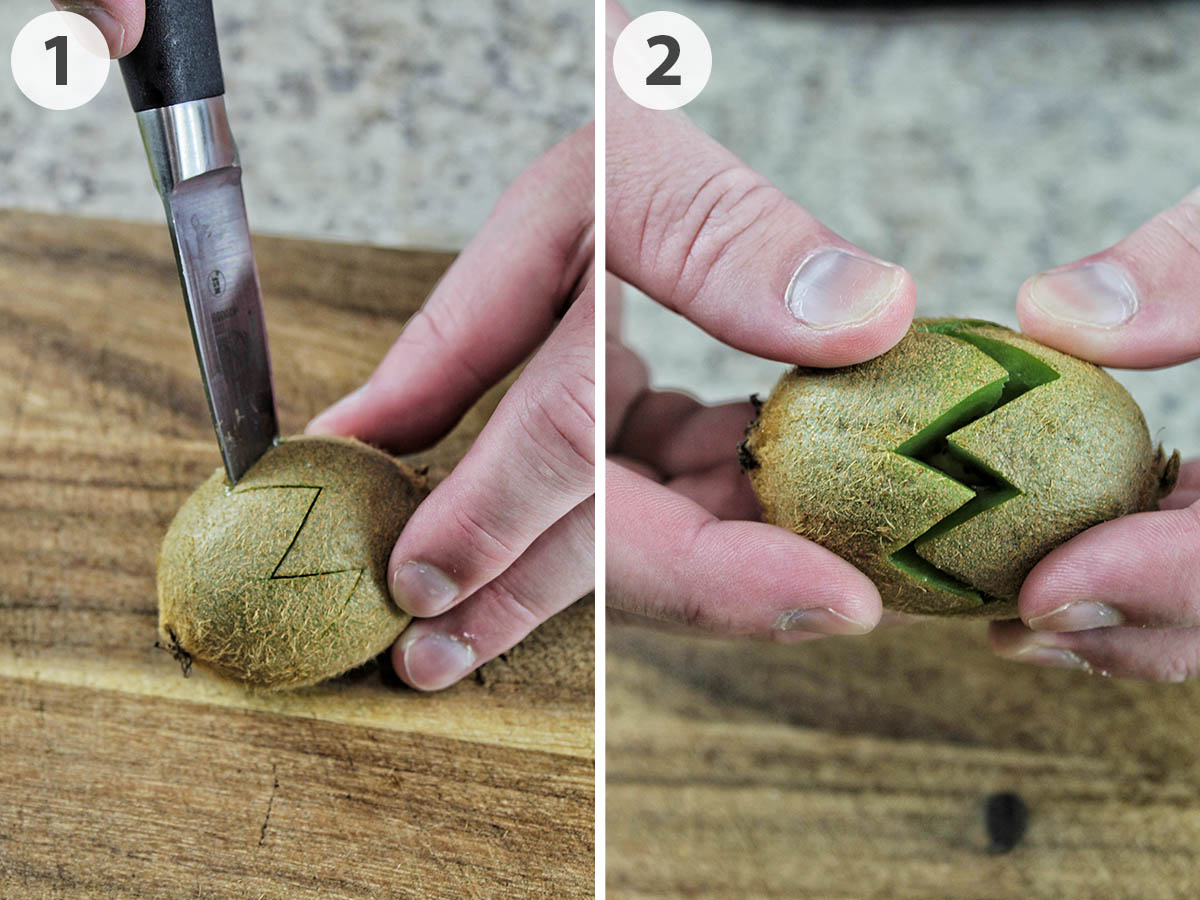
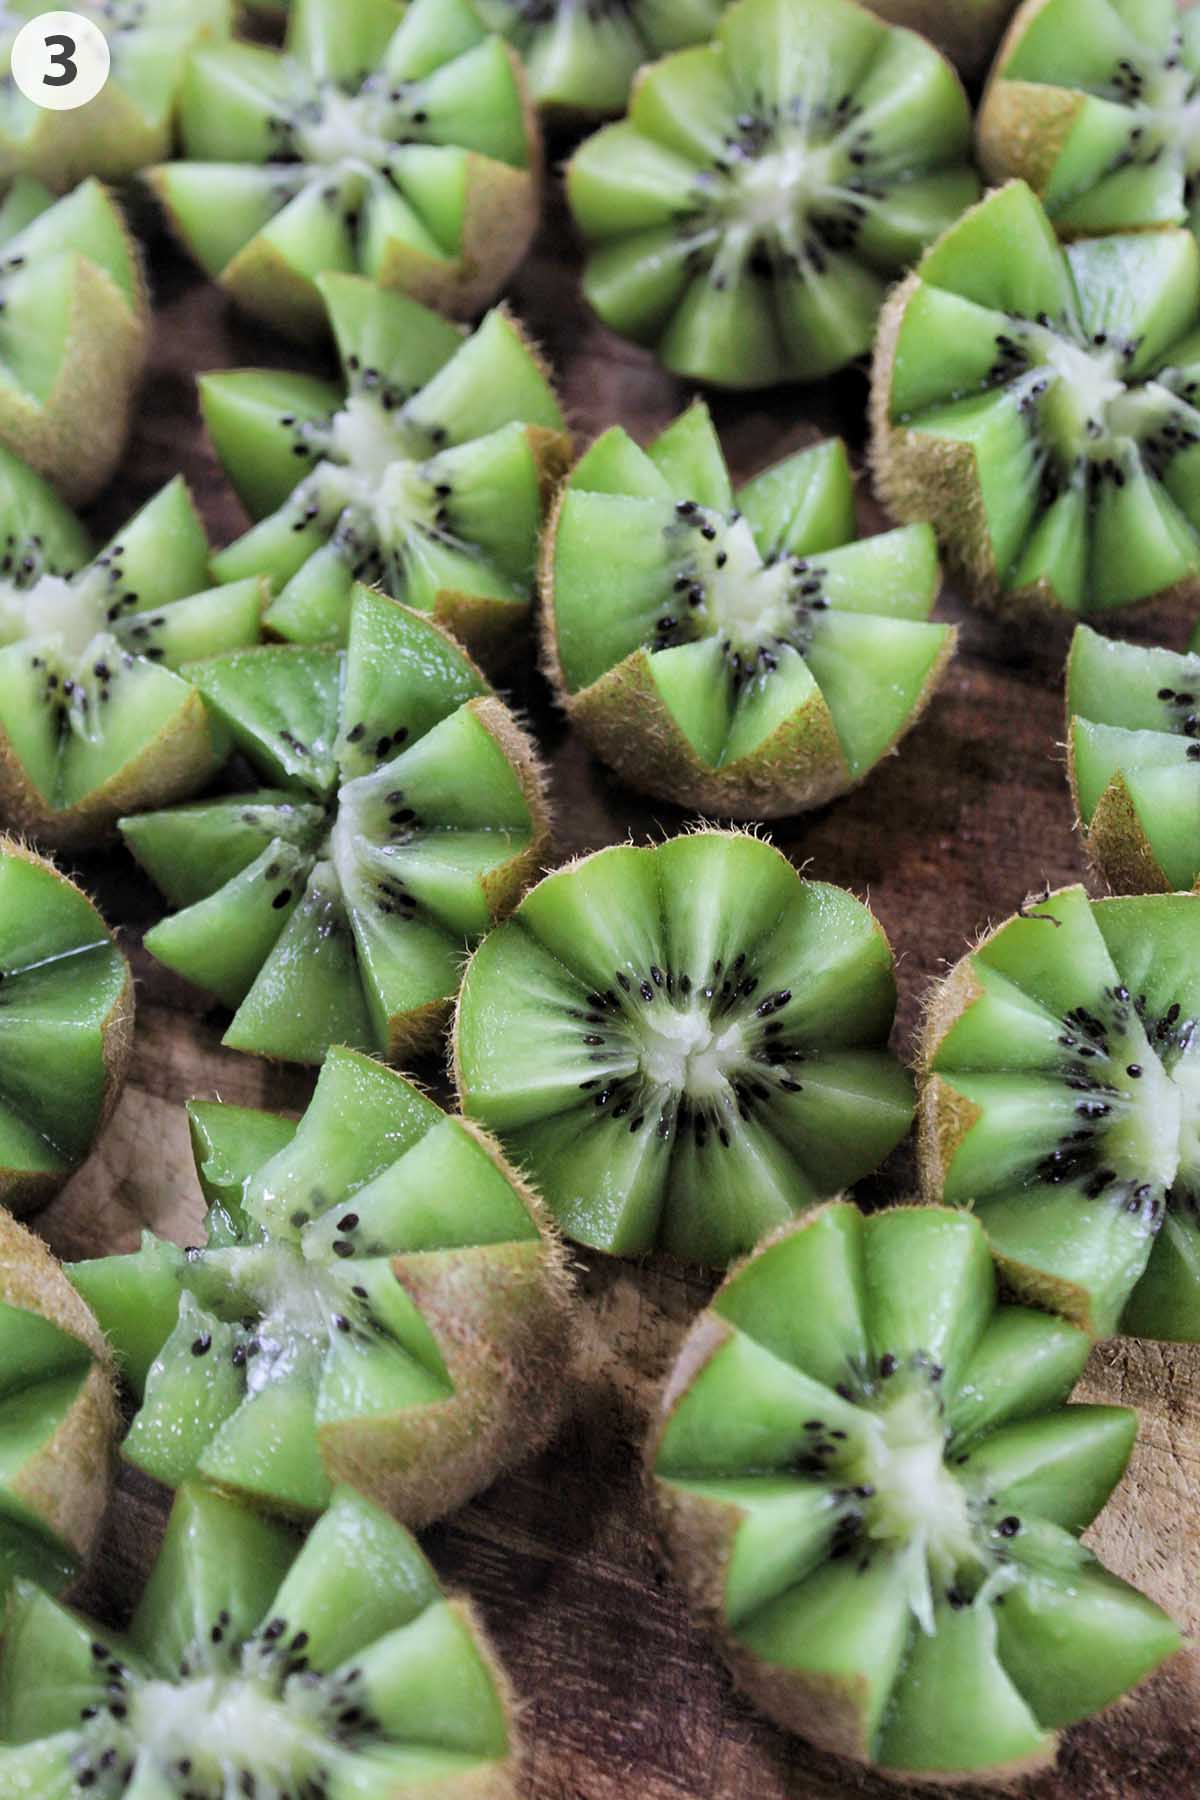
The kiwi flower cut is one of my favorite techniques. First, you'll need to grab a pairing knife. Next, make a zig-zag pattern around the middle of the kiwi. Try to keep a consistent and even pattern as much as possible.
Next, gently pull the kiwi apart to reveal the design.
Cut the Mangos
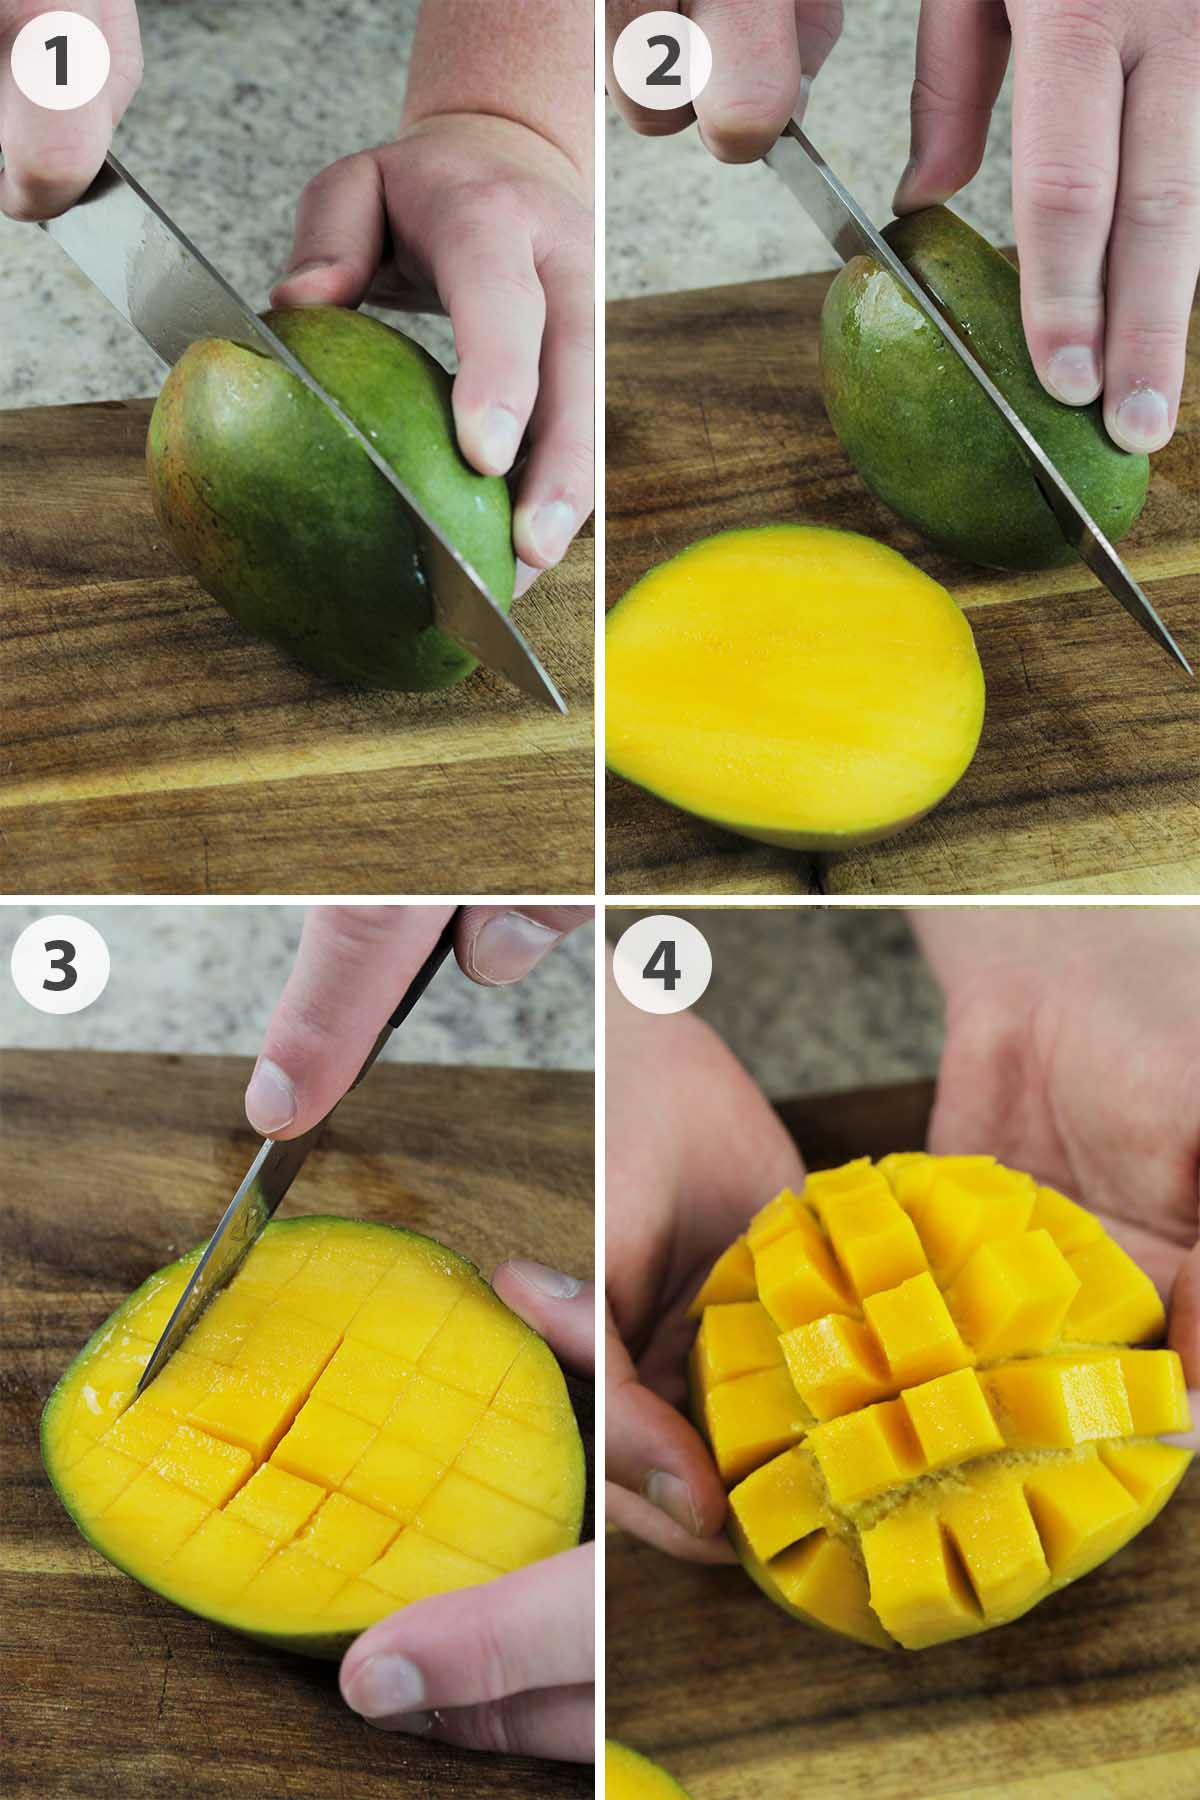
Using a chef's knife cut along each side of the pit in the middle of the mango. This should result in two slices of mango.
Switch over to a paring knife, and make a crosshatch cut through the flesh, making sure not to cut the skin of the mango.
Finally, gently press up on the bottom of the skin to expose the cubes.
Cut the Cantaloupe
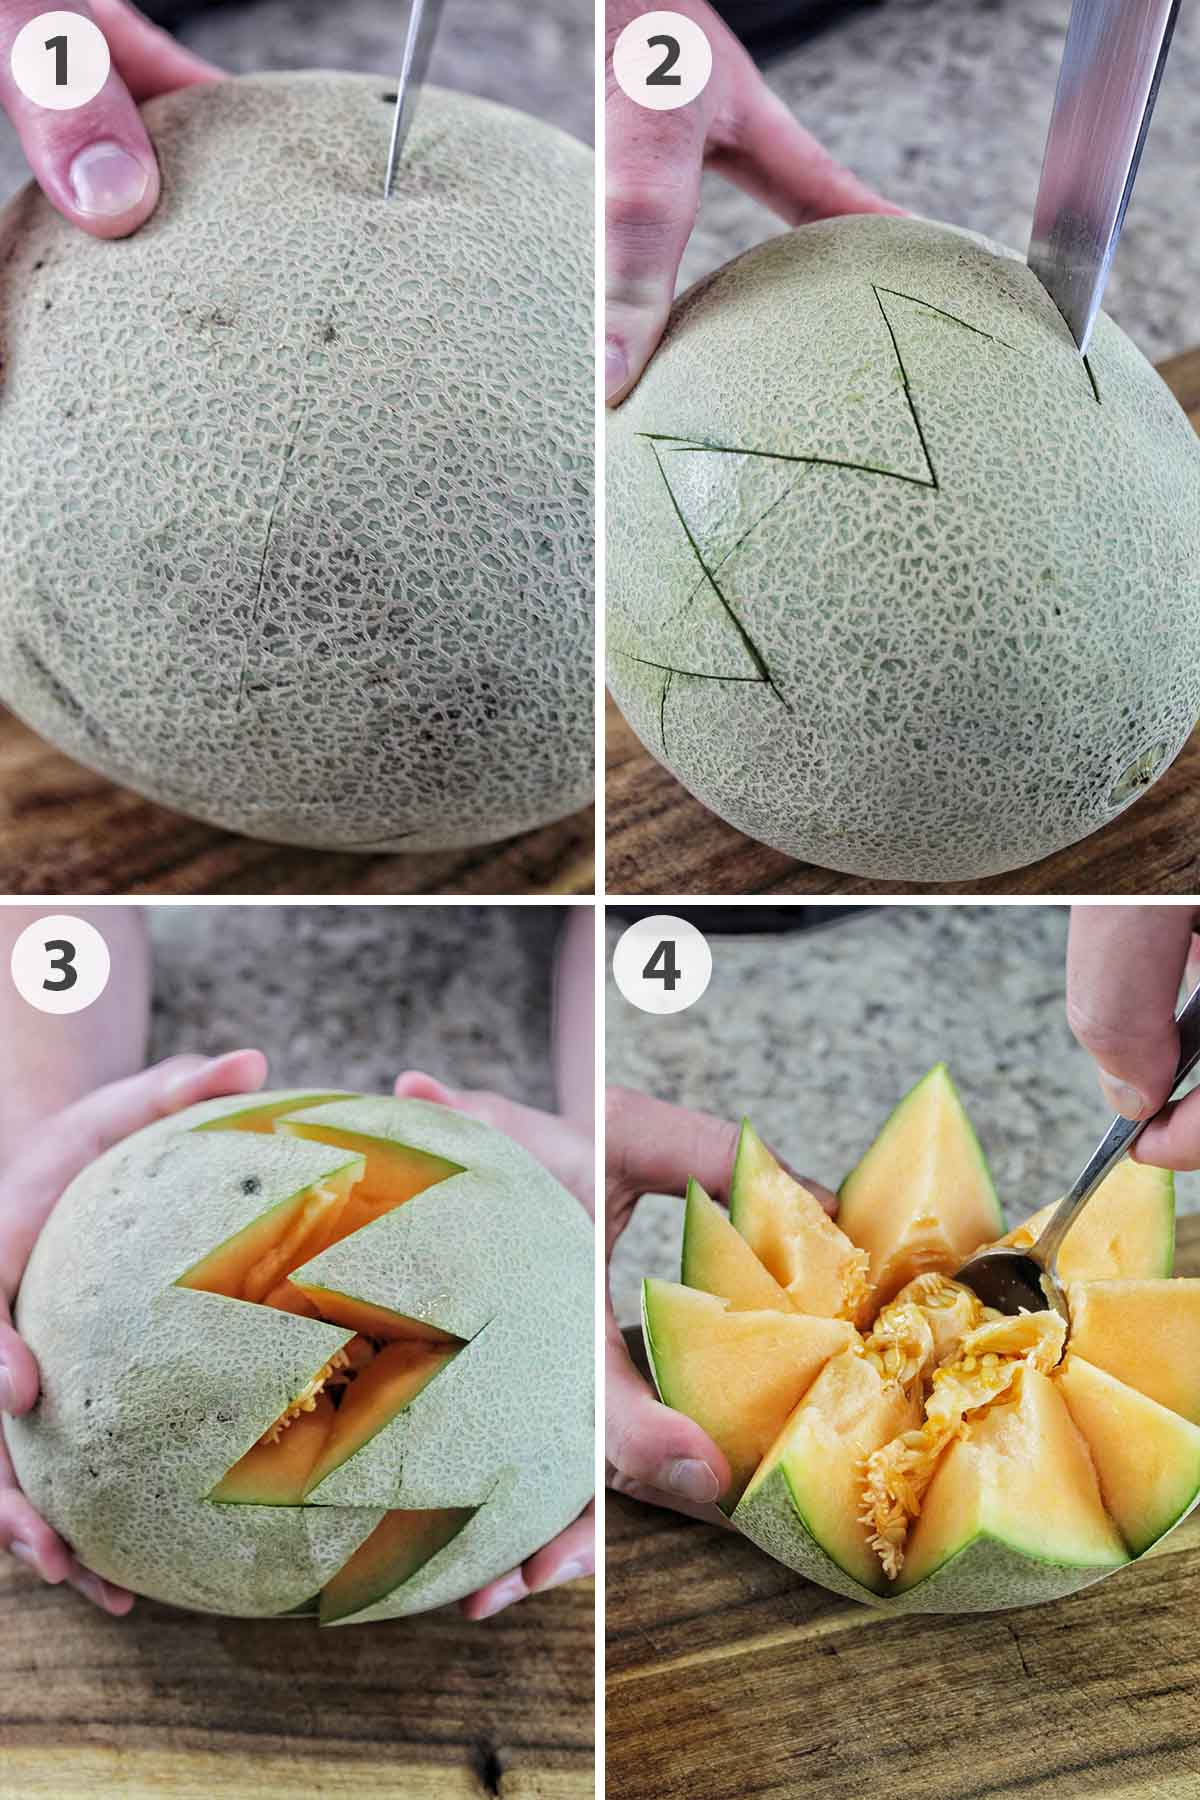
Start by drawing a faint line down the center circumference of the cantaloupe using the tip of the knife. This will help you cut straight down the middle in the next step!
Next, cut a zig-zag pattern, using the line as a guide. It's important to use a chef's knife so you can cut deep enough into the middle of the melon. Make the cuts as even as possible. However, don't stress if they're not perfect. It will still turn out great!
Once you've cut all the way around, gently tug on each side of the canteloupe until it pulls apart. Finally, scrape and scoop out the seeds in the middle of each melon.
You can leave the melon how it is and simply use it as a decoration. Or, with the second cantaloupe, use a melon baller and scoop out the flesh. Then, place the balls inside the decoratively cut cantaloupe.
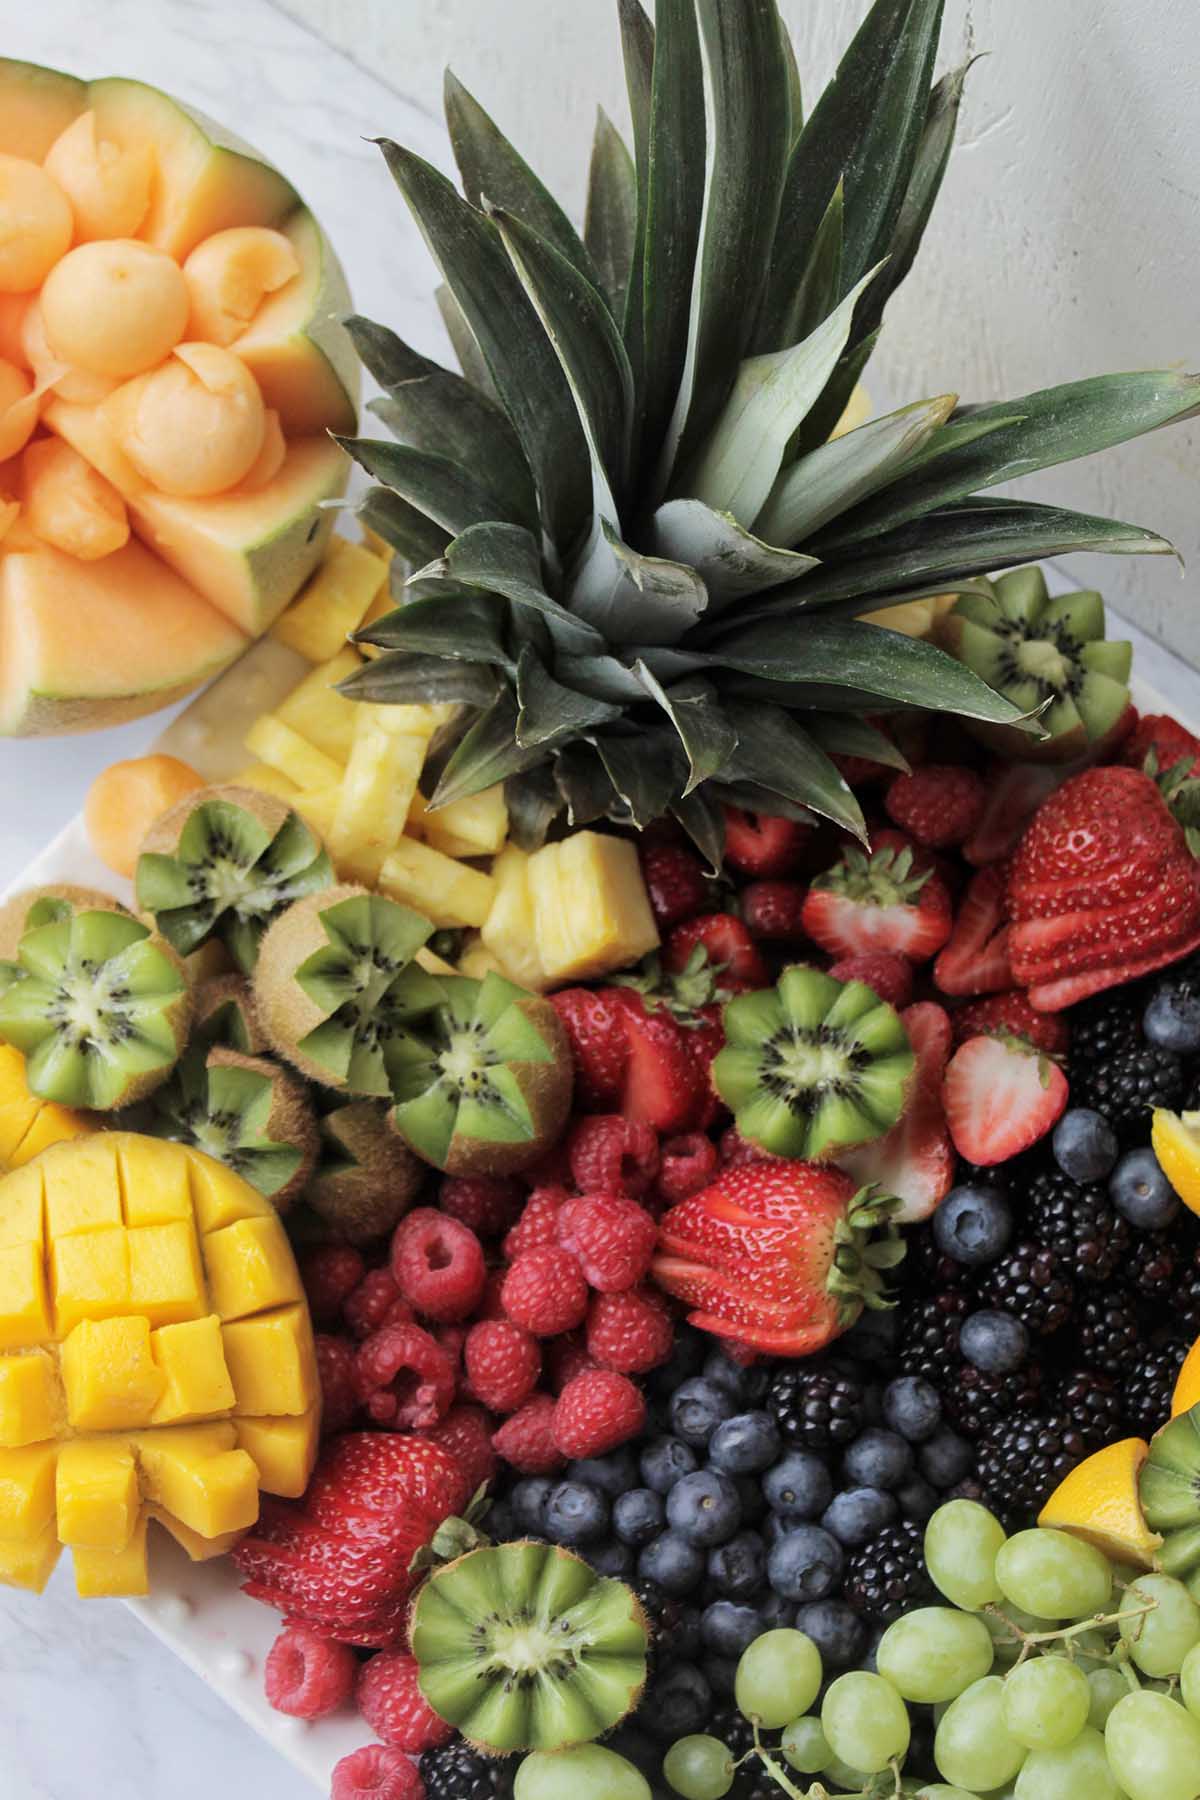
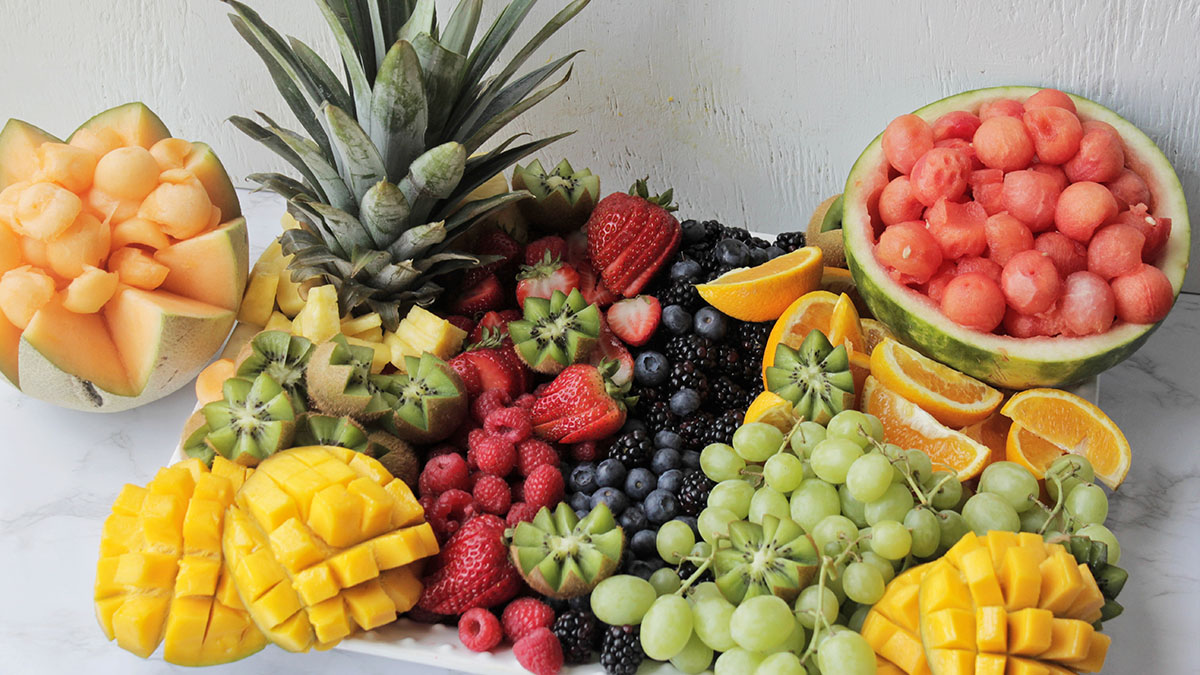
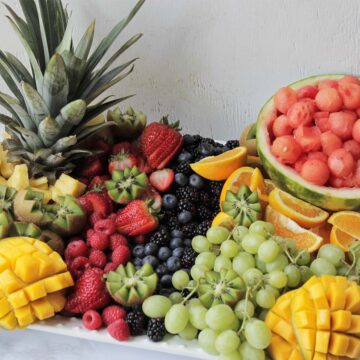
Assemble the Display
Now that all the fruit is prepped and ready, it's time to assemble the display. Feel free to have fun and build the platter using your creativity. However, if you need help, follow these steps below:
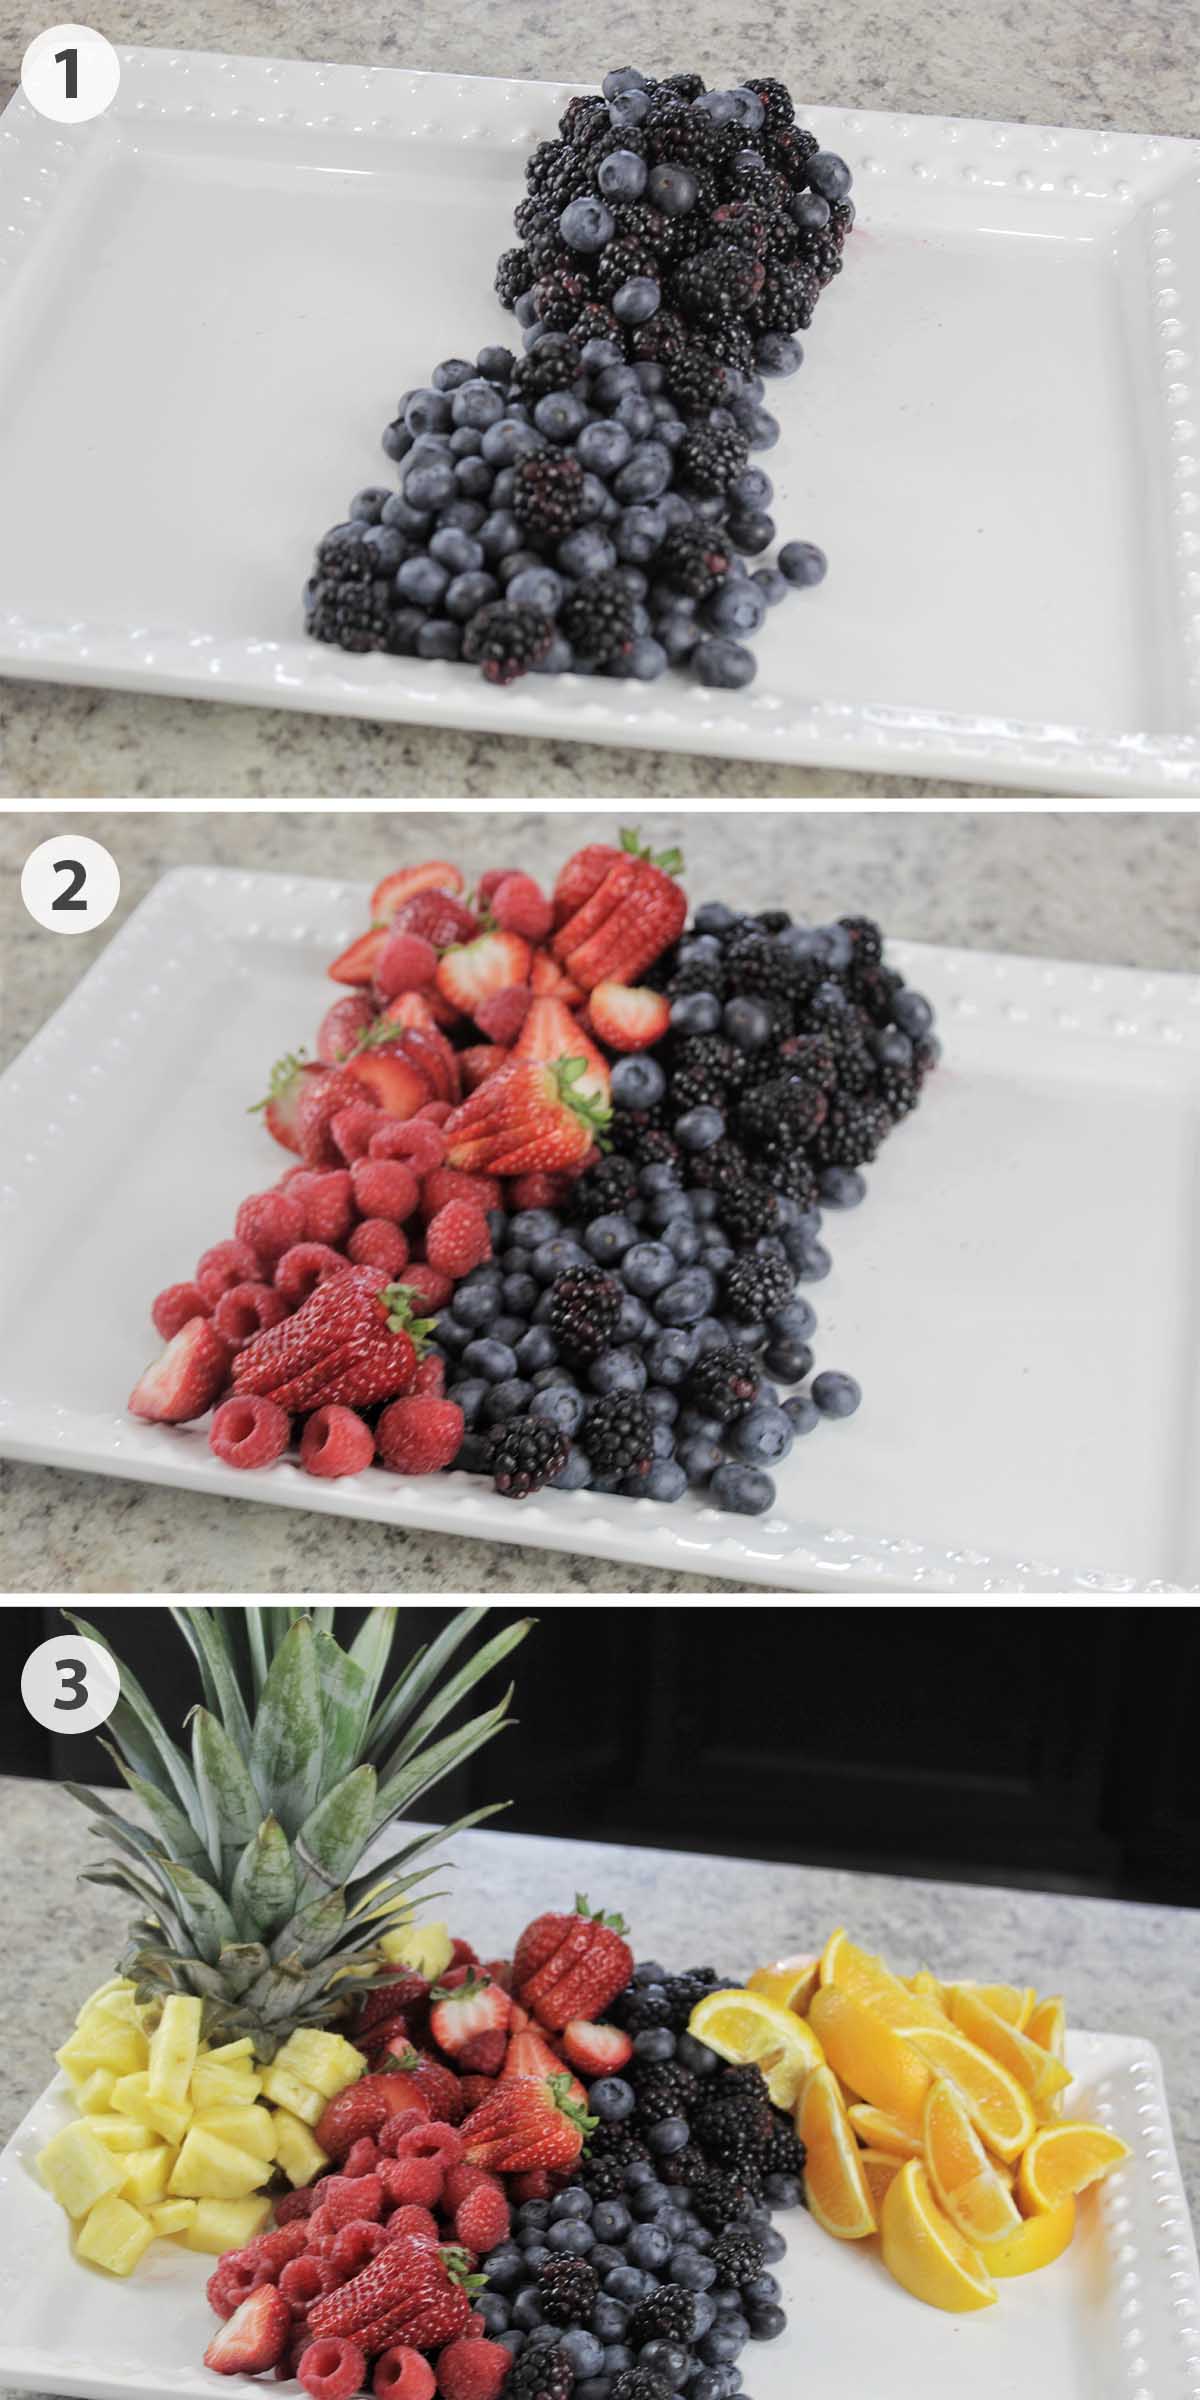
1. Add blueberries and blackberries down the middle of the tray.
2. Next, place the strawberries and raspberries in a row next to the blueberries and blackberries.
3. On one side of the tray, place the pineapple leaves on the corner. Pile up the pineapple slices around the leaves. On the other side lay the orange slices.
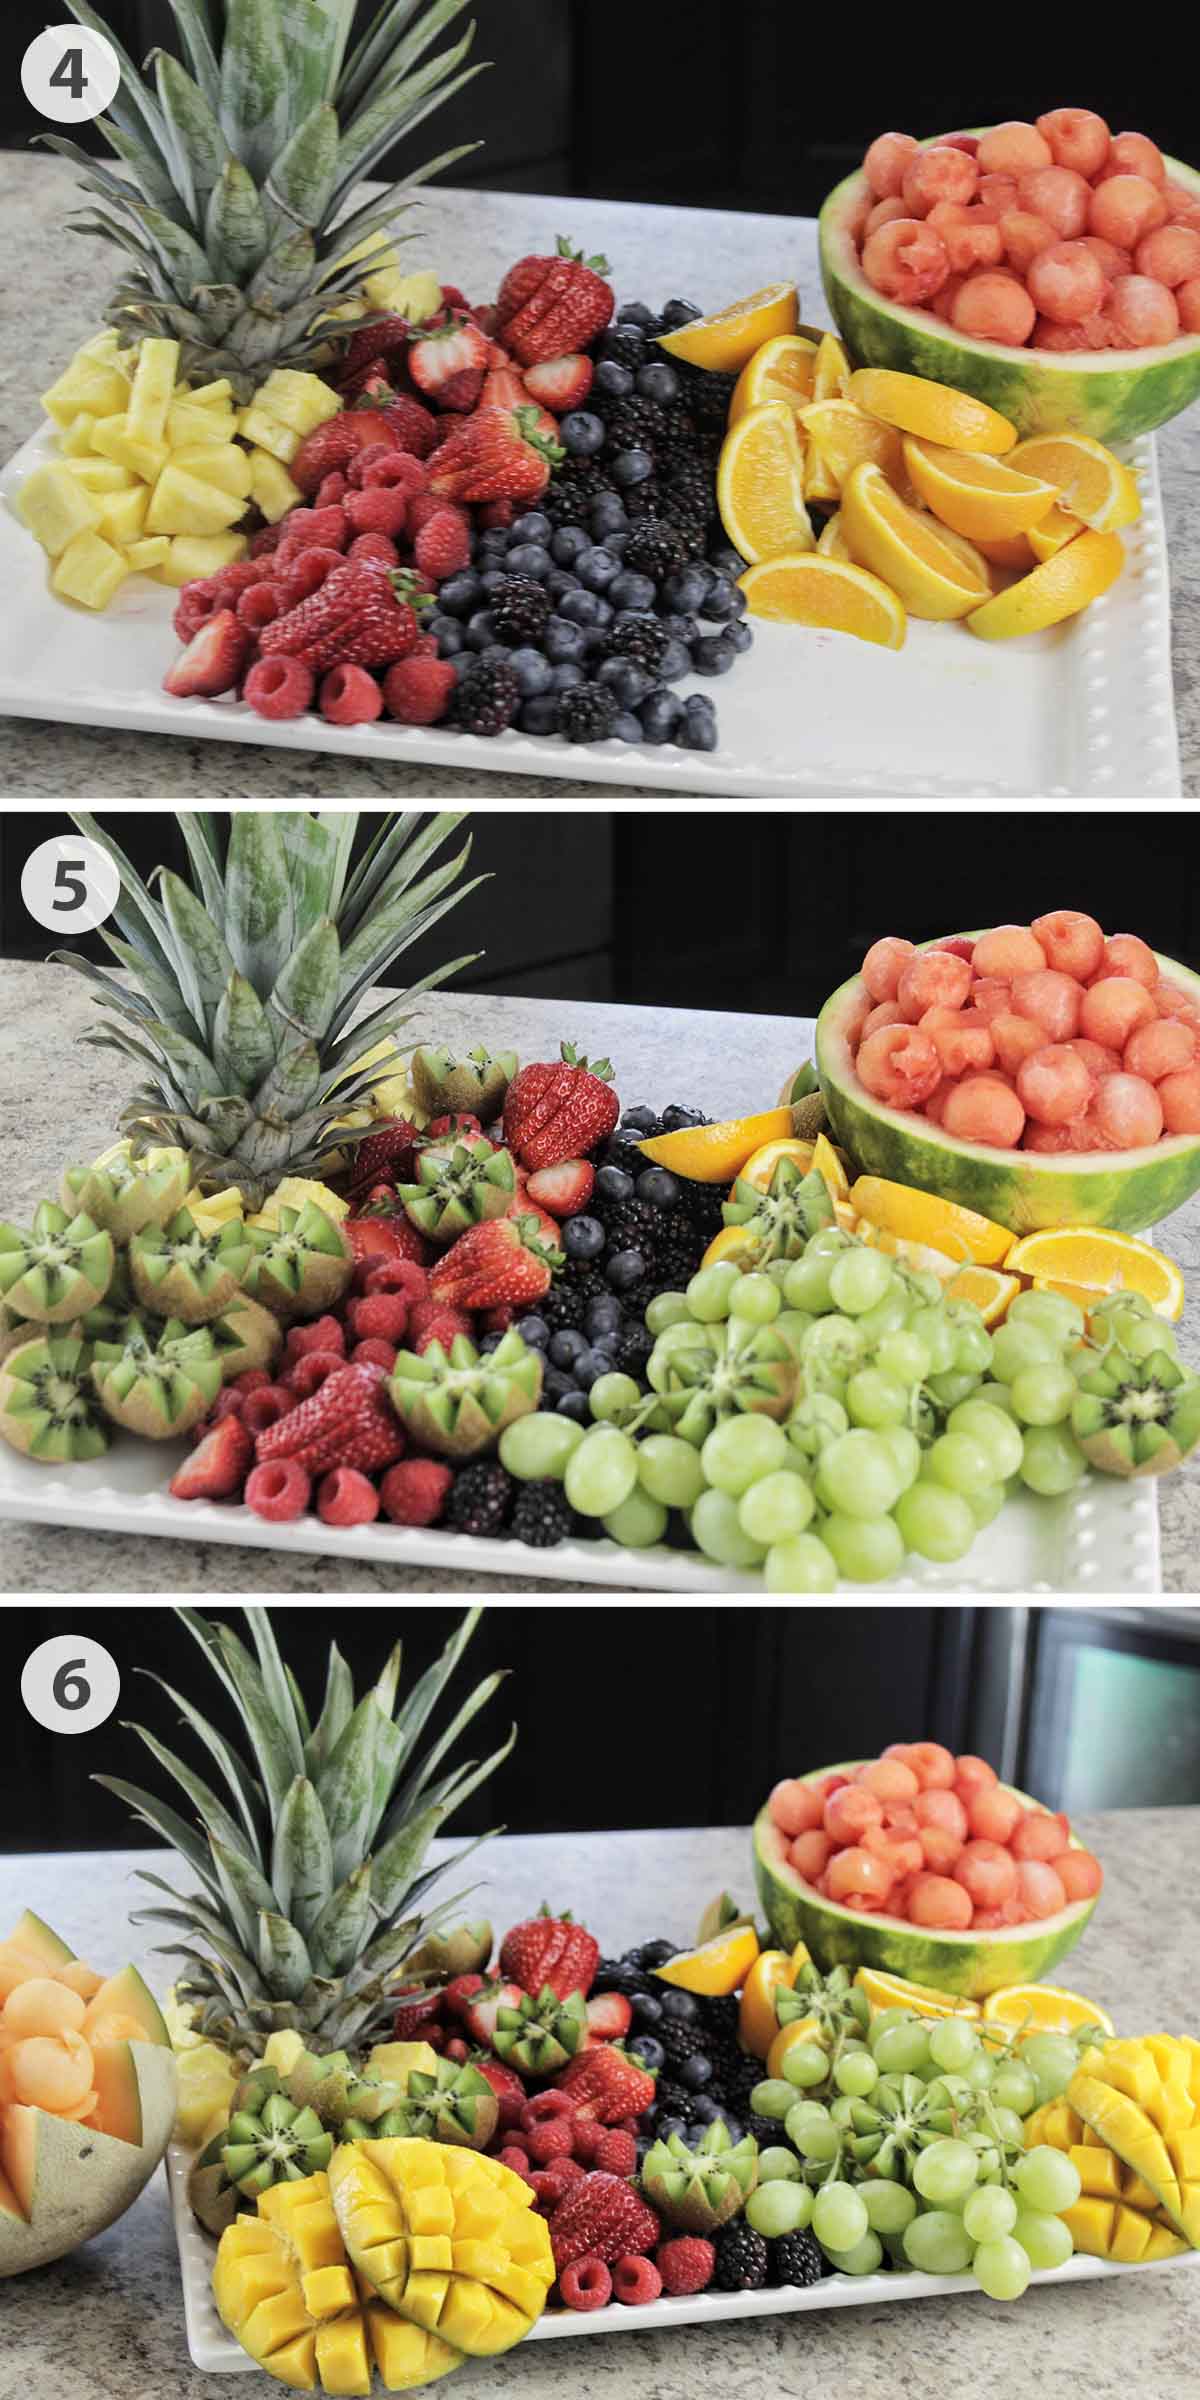
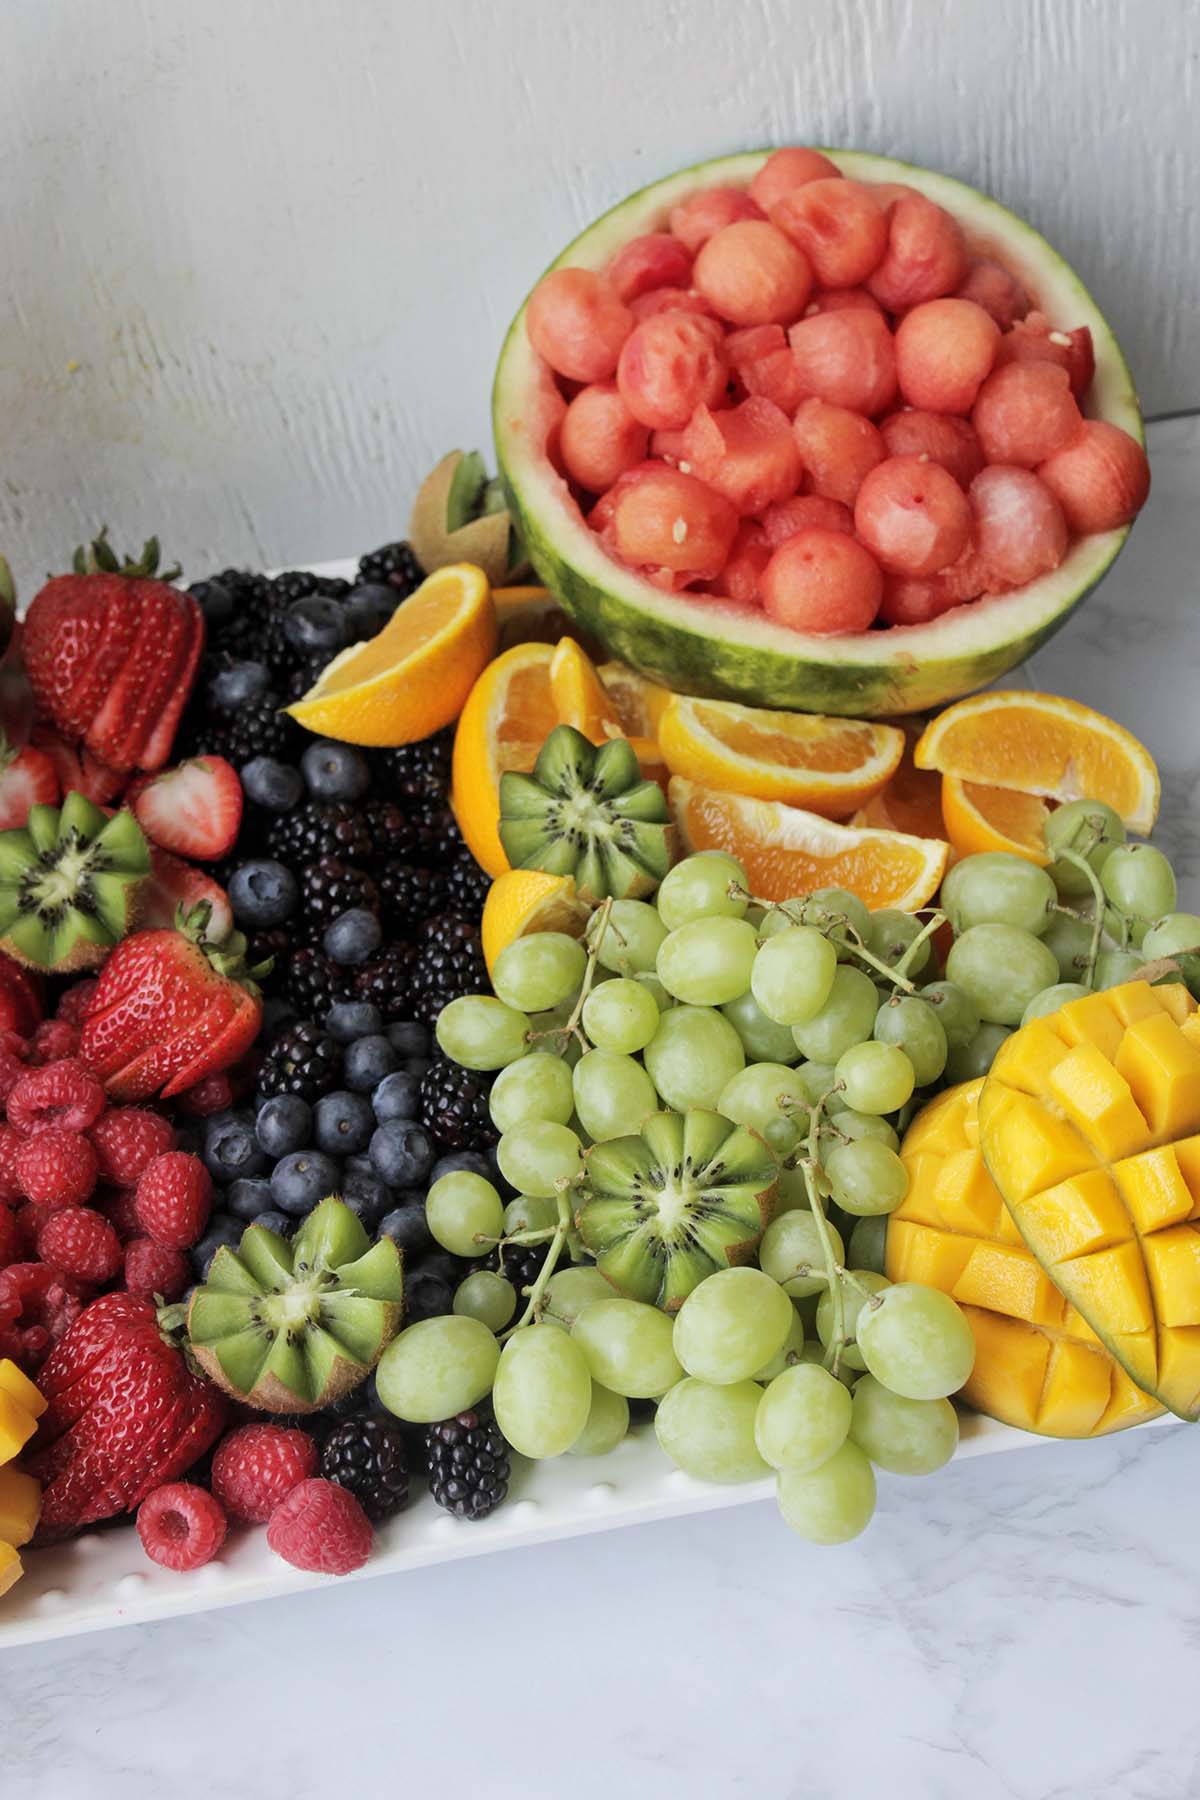
4. Place the watermelon bowl on the opposite corner of the platter as the pineapple leaves.
5. Set the grapes next to the orange slices. Then, next to the pineapple stack a pile of kiwi. With any leftover kiwi flowers, place them around the board for a pop of color.
6. Finally, add two mangos slices to each corner of the platter. Place the cantaloupe bowl on the counter (on the opposite side of the watermelon bowl).
Expert Tips
- If you're preparing this board for a party, be sure to wear latex free, food safe gloves while cutting the fruit and assembling the platter.
- It's essential to have a sharp chef's knife and a paring knife while cutting the fruit. This will help you achieve clean cut lines.
- You can vary the size of the platter depending on how small or large your fruit display is. I'd suggest a platter that's at least 12 x 17 inches (as pictured below).
- Don't be afraid to set the fruit bowls, like the watermelon and canteloupe, next to the platter instead of on the platter.
Recipe FAQs
I would suggest prepping some of the fruit the night before and then assembling the platter on the day of your event. The pineapple, oranges, and kiwi can be prepped the night before and stored in the refrigerator. All other items should be prepared on the day of assembling the platter.
To keep the fruit fresh, place the display out shortly before your guests arrive. Be sure not to wash or cut the produce too far in advance or it could spoil.
The pineapple, oranges, and kiwi can be cut up to 24 hours in advance and stored in the refrigerator until you're ready to build the display.
Yes, it is almost always cheaper to make your own fruit display than to have it catered for a party. Most catering companies will charge $200+ for a display of this size. The supplies for this fruit tray cost under $75.
More Entertaining Recipes
If you've enjoyed putting together this fruit display, try my other favorite board and platter ideas:

Love this recipe? Please leave a 5-star ⭐⭐⭐⭐⭐ rating in the recipe card below. Have questions as you're cooking? Leave a comment below, and I'll help!
Fruit Display
Ingredients
- 32 ounces strawberries
- 1 pineapple
- 3 navel oranges
- 1 small watermelon
- 1 pound green seedless grapes
- 8 kiwi
- 2 mangos
- 2 cantaloupes
- 12 ounces blackberries
- 12 ounces blueberries
- 12 ounces raspberries
Instructions
- Wash all of the fruit to remove any dirt or debris.
- Prepare the strawberries by making parallel cuts with a paring knife into the base of the strawberry without cutting through the stem. Lightly press the strawberry to fan out the slices.
- Prepare the pineapple by slicing off the top leaves. Set the leaves to the side, but don't throw them away. We will use the leaves in the fruit display. Next, cut off the bottom of the pineapple. Stand the fruit upright and cut the peel off in vertical strips. Then, cut the flesh of the pineapple off around the tough core. Discard the core. Finally, cut the flesh into even, bite-sized slices.
- Prepare the oranges by slicing the orange in half. You'll be left with two halves of an orange. From there, divide the half into another half and then into four small slices.
- Prepare the watermelon by slicing off both ends of the watermelon. Then slice the watermelon in half down the short side. Use a melon baller and scoop out the flesh of each side. With the watermelon rinds scoop out the remaining flesh and dump out any juice. Finally, use this as a bowl to hold the watermelon flesh balls.
- Prepare the kiwi by cutting a zig-zag pattern around the middle of the kiwi with a paring knife. Try to keep a consistent and even pattern as much as possible. Gently pull the kiwi apart.
- Prepare the mango by using a chef's knife to cut along each side of the pit in the middle of the mango. This should result in two slices of mango. Switch over to a paring knife, and make a crosshatch cut through the flesh, making sure not to cut through the skin of the mango. Gently press up on the bottom of the skin to expose the cubes.
- Prepare the cantaloupe by drawing a faint line down the center circumference of the cantaloupe using the tip of the knife. Next, cut a zig-zag pattern, using the line as a guide. It's important to use a chef's knife so you can cut deep enough into the middle of the melon. Make the cuts as even as possible. Gently tug on each side of the canteloupe until it pulls apart. Scrape and scoop out the seeds in the middle of each melon.
- With the second cantaloupe, use a melon baller and scoop out the flesh. Place the balls inside the decoratively cut cantaloupe.
- To assemble the display, add the blueberries and blackberries down the middle of the tray.
- Place the strawberries and raspberries in a row next to the blueberries and blackberries.
- On one side of the tray, place the pineapple leaves on the corner. Pile up the pineapple slices around the leaves. On the other side lay the orange slices.
- Place the watermelon bowl on the corner of the platter opposite the pineapple leaves.
- Set the grapes next to the orange slices. Then, next to the pineapple stack a pile of kiwi. With any leftover kiwi flowers, place them around the board for a pop of color.
- Add two mangos slices to each corner of the platter. Place the cantaloupe bowl on the counter (on the opposite side of the watermelon bowl).
Notes
- If you're preparing this board for a party, be sure to wear latex free, food safe gloves while cutting the fruit and assembling the platter.
- It's essential to have a sharp chef's knife and a paring knife while cutting the fruit. This will help you achieve clean cut lines.
- You can vary the size of the platter depending on how small or large your fruit display is. I'd suggest a platter that's at least 12 x 17 inches (as pictured in the recipe card).
- Don't be afraid to set the fruit bowls, like the watermelon and canteloupe, next to the platter instead of on the platter.


Jenna
I just made this fruit display for my sister's baby shower last weekend. Everyone LOVED it and thought it was so cute. It went perfectly with our rainbow theme. Thanks for the great guide.
Jessica Mode
Jenna - I'm so glad everyone loved it! This display is perfect for a baby shower!